
Loading...
Loading...
Loading...
Loading...
Loading...
Loading...
Loading...
Loading...
Loading...
Loading...
Loading...
Loading...
Loading...
Loading...
Loading...
Loading...
Loading...
Loading...
Loading...
Loading...
Loading...
Loading...
Loading...
Loading...
Loading...
Loading...
Loading...
Loading...
Loading...
Loading...
Loading...
Loading...
Loading...
Loading...
Loading...
Loading...
Loading...
Loading...
Loading...
Loading...
Loading...
Loading...
Loading...
Loading...
Loading...
Loading...
Loading...
Loading...
Loading...
Loading...
Loading...
Loading...
Loading...
Loading...
Loading...
Loading...
Loading...
Loading...
Loading...
Loading...
Loading...
Loading...
Loading...
Loading...
Loading...
Loading...
Loading...
Loading...
Loading...
Loading...
Loading...
Loading...
Loading...
Loading...
Loading...
Loading...
Loading...
Loading...
Loading...
Loading...
Loading...
Loading...
Loading...
Loading...
Loading...
Loading...
Loading...
Loading...
Loading...
Loading...
Loading...
Loading...
Loading...
Loading...
Loading...
Loading...
🌟 𝐈𝐧𝐭𝐫𝐨𝐝𝐮𝐜𝐢𝐧𝐠 𝐋𝐮𝐦𝐨 𝐂𝐨𝐩𝐢𝐥𝐨𝐭: 𝐓𝐡𝐞 𝐅𝐢𝐫𝐬𝐭 𝐀𝐈 𝐂𝐨𝐩𝐢𝐥𝐨𝐭 𝐏𝐮𝐫𝐩𝐨𝐬𝐞-𝐁𝐮𝐢𝐥𝐭 𝐟𝐨𝐫 𝐄𝐝𝐮𝐜𝐚𝐭𝐢𝐨𝐧 🌟
The Future of Education – Measuring Real Competencies
Move beyond counting attendance and clicks to truly understanding what learners know and can do.
Key Pillars:
Bloom’s Taxonomy as a Guide
Measure knowledge, comprehension, application, and higher-order thinking.
From Engagement to Evidence
Not just watching or participating – capture clear proof of learning.
Interactive Learning Experiences
In-video discussions, peer review, and interactive quizzes that generate real data.
Data-Driven Insights
Track performance in real time and identify strengths and gaps in learner competencies.
Goal:
Empower educators to transform engagement into meaningful measures of understanding, ensuring learners are truly prepared for the challenges of tomorrow.
is proud to unveil Lumo Copilot, a groundbreaking AI companion designed not to replace educators, but to empower them. Our vision is clear: free teachers from time-consuming setup and administrative tasks, so they can focus on what truly matters—engaging with students and elevating learning outcomes. Lumo Copilot streamlines content creation, grading, and personalized insights, all while keeping educators in the driver’s seat. With Annoto, AI is here to handle the busywork—enabling teachers to invest their time and energy where it counts: on pedagogy and student success. 🔒 𝐀𝐈 𝐜𝐨𝐦𝐩𝐥𝐢𝐚𝐧𝐜𝐞, 𝐭𝐫𝐚𝐧𝐬𝐩𝐚𝐫𝐞𝐧𝐜𝐲, 𝐚𝐧𝐝 𝐭𝐫𝐮𝐬𝐭 𝐚𝐫𝐞 𝐚𝐭 𝐭𝐡𝐞 𝐜𝐨𝐫𝐞. Lumo Copilot is built with strict adherence to privacy and compliance standards, ensuring a safe and responsible AI experience for every institution and learner. Annoto is proud to be the first to deliver an AI Copilot that’s truly tailored for education—rethinking what’s possible and putting people at the center of the learning journey. Stay tuned—this is just the beginning.
Bloom’s Taxonomy has been a cornerstone in education for decades, providing a framework for understanding the levels of learning — from basic recall of facts to complex creation of new knowledge.
Traditionally, educators have used Bloom’s Taxonomy to design curricula, assessments, and activities that progressively move learners from lower-order to higher-order thinking skills.
Today, with AI-driven learning assistants like Annoto’s Lumo Copilot, we can bring Bloom’s framework to life in an interactive, scalable, and personalized way.
Bloom’s Taxonomy outlines six cognitive levels, typically visualized as a pyramid:
Remembering – recalling facts, terms, and concepts
Understanding – explaining ideas and interpreting meaning
Applying – using knowledge in new situations
Each step moves learners toward deeper engagement, critical thinking, and mastery.
AI changes how we can scaffold these levels in real time. With Lumo Copilot:
At the Remembering stage, AI can prompt learners with flashback questions, highlight key terms, or auto-generate quick knowledge checks.
For Understanding, Lumo Copilot can explain complex concepts in plain language, summarize videos, or offer analogies tailored to the learner’s context.
In Applying, AI suggests practical exercises, scenario-based questions, or real-world applications tied to the course content.
For instructors and institutions, embedding AI into Bloom’s Taxonomy means:
Scalable personalization: AI adapts to each learner’s pace and stage.
Reduced workload: Automates formative assessment and feedback loops.
Engagement beyond passive watching: Video becomes an active, interactive learning space.
Imagine a lecture video on Climate Change:
Remembering: “List three greenhouse gases mentioned in the video.”
Understanding: “Explain in your own words why CO₂ levels affect global temperatures.”
Applying: “Suggest one action a local community could take to reduce emissions.”
Lumo Copilot automates scaffolding these prompts — and guides learners seamlessly up the Bloom’s ladder.
Bloom’s Taxonomy provides the educational foundation. AI provides the scalability and personalization. Together, they redefine what’s possible in digital learning.
Annoto Lumo Copilot isn’t just about watching videos — it’s about transforming them into dynamic learning journeys that foster deeper thinking, reflection, and creation.
Engaging course materials are essential for creating an effective and inclusive teaching and learning environment. Annoto seamlessly integrates into your LMS, providing your courses with rich, interactive content. Annoto enables institutions to elevate their learning delivery. Annoto enhances collaboration, assessments, and insights by facilitating time-based video interactions and offering in-depth analytics on user and video engagement and learning outcomes. This empowers the creation of diverse educational video-based use cases, driving deeper engagement and understanding among users, fostering an inclusive and accessible learning environment that empowers learners of all backgrounds and abilities to achieve their full potential.
Evaluating – making judgments, critiquing, defending ideas
Creating – generating new ideas, products, or perspectives
When Analyzing, learners can use Lumo Copilot to compare perspectives, generate timelines, or map cause-and-effect relationships.
For Evaluating, AI can spark debate prompts, ask for evidence-based justifications, and provide structured feedback.
At Creating, Lumo Copilot empowers learners to design projects, write reflections, or even co-create multimedia content — guided but not limited by AI.
Evaluating: “Do you agree with the speaker’s position on renewable energy? Why or why not?”
Creating: “Design a campaign idea for your school to raise awareness about carbon footprints.”


Annoto facilitates the creation of dynamic, interactive learning experiences within the LMS, leveraging both current and future video content.
By providing tools that cater to a diverse range of students, we help them reach their fullest potential. Whether it is in traditional classrooms, online courses, or hybrid learning setups, Annoto's solution ensures that everyone has the opportunity to succeed.
This all-encompassing approach leaves no learner behind, fostering an educational experience that is both equitable and empowering.
Usable by all colleges and departments across the organization for educational video and collaboration needs.
Advanced commenting features, such as video as comment, anonymized comments, and gamification, enhancing engagement.
Social engagement tools including badges, notifications, and activity feeds to foster a collaborative learning environment.
Comprehensive support for peer review activities, enabling structured feedback and evaluation among peers.
Skill assessment functionalities for detailed evaluation of student skills, ensuring thorough and precise assessment.
Seamless integration with LMS activities for a cohesive user experience.
Support for LMS grading, including the creation of criteria and rubrics.
Rich assessment analytics and detailed feedback mechanisms for in-video quizzes, providing valuable insights.
Support for a variety of grading layouts, ensuring flexibility in assessment.
Gradebook pass-back support.
Based on Video Progress: Tracks and records students' progress through video content, ensuring they have watched and engaged with the necessary material before marking the activity as complete.
Based on User Participation: Monitors and assesses users' engagement in interactive elements, such as comments, quizzes, and discussions, to determine completion based on their active participation and involvement in the learning activities.
Personal notes feature with export functionality, allowing students to keep track of their learning.
One-on-one chat for personalized learning support, facilitating direct communication between students and instructors.
Detailed analytics at the site, course, and video levels, providing comprehensive insights.
Insights into user behavior, video performance, assessments, and activity trends, enabling data-driven decision-making.
User-friendly interface with simple preferences to enhance the user experience.
Easy-to-use features that streamline the creation and management of educational content.
One-click integration without the need for configuration or installation.
Full functionality within all LMS activities, without redirecting users to external platforms.
Utilizes all LMS capabilities with Annoto, across different activities such as assignments, pages, and discussions.
Media source and platform agnostic, capable of overlaying on top of existing videos embedded in the LMS.
Support for leading video sources and media providers such as Panopto, Kaltura, MS Stream, YouTube, Vimeo, and custom providers
Centralized video-based educational activities and analytics seamlessly without the need to migrate current and future content.
We believe that our customers are at the heart of everything we do. Our support services are designed not just to solve problems but to foster strong, lasting relationships built on trust and satisfaction.
Providing ongoing training support, including workshops and online resources, reflects our commitment to continuous learning.
We believe in empowering our users with the knowledge and skills to utilize our tools effectively.
This commitment to education is a core part of our support philosophy.
Support includes tailored guidance, advising, and training sessions - of your choice: Webinar, Workshop, Train the trainer, 1*1 sessions with Faculty
We see ourselves as more than just a service provider; we are your partner in the journey towards better learning and collaboration. Our support services are an integral part of this partnership, designed to ensure that every interaction with Annoto enhances your experience.
At Annoto, compliance is at the heart of our mission to enhance the educational experience. We are committed to upholding the highest standards of security, ensuring that all data is protected through advanced encryption and continuous monitoring. Our privacy practices strictly adhere to regulations such as GDPR and FERPA, safeguarding user information and maintaining trust. We champion accessibility by complying with WCAG standards, making our platform inclusive for all learners. Furthermore, our support for LTI 1.3 ensures seamless integration with various LMS platforms, promoting interoperability and a cohesive learning environment. Annoto’s dedication to compliance not only meets necessary requirements but also fosters a secure, private, and inclusive space for education to thrive.
Transform Your Course Videos: Engage, Assess, and Gain Insights in Seconds Are you looking to make your course videos more interactive and engaging for your students?
Discover how Annoto can help you achiving anything you need! In this guide, you'll learn how to:
Enhance Learning: Incorporate in-video quizzes for real-time knowledge checks.
Skills Assessment: Conduct video critiques for comprehensive skills evaluation and peer reviews.
Deepen Understanding: Facilitate time-based discussions to promote deeper learning.
Extended Self-Learning: Create interactive content that encourages ongoing student engagement and reflection.
Gain Insights: Obtain actionable data on student interaction and video content performance.
We will show you how to effortlessly add these powerful features to your videos, making your course content interactive and engaging, an integral and dynamic part of your curriculum. Get Inspired:
Annoto's Activity Completion feature enhances the functionality of video-based learning within the Moodle environment. By using Annoto Activity Completion within Moodle, instructors can track and assess student engagement and performance more effectively through the completion of video-based activities synced to Moodle Activity Completion reports.
Here's an overview of how it works and its benefits:
Annoto is fully integrated with Moodle, allowing instructors to easily include interactive video activities as part of their course content. The platform leverages Moodle's native Activity Completion feature to monitor student progress through video completion, discussions, and other interactive elements.
With Annoto, instructors can see how much of the video each student has watched and participated in discussions. Activity completion data from Annoto is linked directly to the Moodle Activity completion, enabling automated Activity completion of these video-based activities.
In this brief demonstration, we will show you how to create a skill assessment review process using a video that a student has submitted. This process allows instructors to provide feedback on the student's assignment by using in-context comments provided by Annoto. Here's the workflow you can follow:
Set up the assignment.
Establish rubrics that include the desired criteria.
Have students submit their assignments and reflect on them
Instructors can then review the videos, provide feedback, and assign a grade based on the rubrics and criteria they have set.
All of this can be done within the speedgrader of Canvas.
That's it! This process allows a seamless and effective review process and makes grading more structured and efficient.
Annoto provides powerful analytics to gain deep insights into learners' performance within in-video quizzes.
By tracking responses in real-time, educators can identify trends, pinpoint knowledge gaps, and assess learner engagement directly within the video content.
These insights allow for a better understanding of how learners interact with the material, helping to tailor future content and improve overall learning outcomes.
Annoto can be used as an activity in Canvas pages. Once A video with Annoto is added, Annoto can be used for discussions, Q&A, faculty-students interaction, students-interaction, tasks, etc. In order to add a video with Annoto to a page:
Go to Pages
Click on “View all pages” button:
Click the “ +Page “ button to create a new page:
Add page title
In the text box select "Embed Kaltura Media" - it will be either in the toolbar, or under “Apps" plug:
Choose the video you want to add.
Save & Publish
Annoto enhances learning in Brightspace (D2L) by integrating interactive, in-video quizzes with Kaltura videos. This feature supports educators in creating engaging content and provides valuable insights into student performance.
Quizzes are seamlessly embedded within videos, allowing dynamic student interaction.
With automatic grade passback to the Brightspace gradebook, quiz results are instantly recorded, saving time and ensuring accurate grade tracking.
Detailed analytics on quiz performance help educators adjust instructional strategies based on student interaction and areas of difficulty.
Annoto's Assessment Criteria Library is a robust feature designed to enhance the educational experience by providing a structured and consistent way to evaluate video-based content.
Here's a concise overview of its key components and benefits:
Key Components:
Pre-Defined Criteria: The library offers a set of pre-defined assessment criteria, making it easy for educators to apply standardized evaluations across different courses and videos.
Customizable Options: Users can tailor the criteria to suit specific course needs, ensuring assessments are relevant and targeted.
Reusable for All Courses: Criteria can be saved and reused across multiple courses, saving time and effort in the assessment setup process.
User-Friendly Interface: Designed with ease of use in mind, the interface allows educators to quickly set up and modify criteria, ensuring a hassle-free experience.
Moodle presents an array of activities that Annoto could be integrated seamlessly with your present workflows allowing you to use these resources to respond effectively to the tasks and processes you are currently handling By tapping into the diverse functionalities offered by Annoto within Moodle's platform, you can enhance the way you address your ongoing work tasks and projects Implementing Moodle's activities with Annoto can serve as a solution to complement and support your existing workflow processes efficiently.
Use the discussion forum activity where one student upload a video performing some actions (i.e. a psychological intervention), where comments made by fellow learners are visible.
Use the Assignment activity where instructors able to make private comments to the video creator/uploader.
Annoto can be used on a video that is used for discussions. In this case – Annoto can be used to provide guidance\ instructions to students as well as questions for them to answer in the discussion. As every comment is time-tagged in Annoto, questions can be related to specific moments in the vide and engage a discussion related to that.
Go to Discussions
Click the “ +Discussion “ button to create a new discussion
Add topic title
In the text box select "Embed Kaltura Media" - it will be either in the toolbar, or under “Apps" plug:
Add the media you want in this discussion
Set all other options as you prefer.
Click “Save”
Annoto enhances learning in Canvas by integrating interactive, in-video quizzes with Kaltura videos. This feature supports educators in creating engaging content and provides valuable insights into student performance.
Quizzes are seamlessly embedded within videos, allowing dynamic student interaction. With automatic grade passback to the Canvas gradebook, quiz results are instantly recorded, saving time and ensuring accurate grade tracking.
Detailed analytics on quiz performance help educators adjust instructional strategies based on student interaction and areas of difficulty.
Introducing Annoto's Assessment Criteria feature – a powerful tool to streamline both formative and summative assessments.
With Annoto's Assessment Criteria, you can create different criteria to evaluate and grade student performance on various assignments and activities. These criteria provide a clear framework for what is expected from students and how their work will be judged.
With fully customizable criteria, including:
In-Video Quizzes
Annoto enhances the learning experience by integrating interactive, in-video quizzes within Canvas LMS. This innovative feature supports educators in creating engaging, interactive content that not only enriches the learning process but also provides valuable insights into student understanding and performance. The in-video quizzes are seamlessly embedded within the video content, allowing students to interact with the material in a dynamic and engaging way.
Annoto’s in-video quizzes is the automatic grade passback to the Canvas gradebook. This means that quiz results are instantly recorded in the LMS, saving educators time and ensuring that all grades are accurately tracked and reflected in the students' overall performance records.
Annoto provides detailed analytics on quiz performance, enabling educators to gain insights into how students are interacting with the content. This data can inform instructional strategies, helping educators to identify common areas of difficulty and adjust their teaching methods accordingly.
Restrict Access Using Annoto Activity Completion in Moodle
Annoto's integration with Moodle enables instructors to restrict access to specific course content based on student engagement with video activities.
By using Moodle’s Restrict Access feature, instructors can set criteria that require students to complete interactive video activities—such as watching videos, participating in discussions —before gaining access to the next section of the course.
This functionality promotes progressive learning by ensuring students actively engage with material before moving forward, helping them stay on track and reinforcing key learning outcomes.
To set access restrictions, navigate to the activity you want to limit based on previous activity completion.
Annoto's Video Activity Completion feature seamlessly integrates with Blackboard LMS, providing educators with a powerful tool to monitor and manage student engagement in video-based learning activities. This feature offers detailed insights into which students have completed assigned video content, ensuring that all participants are staying on track with their coursework.
Key Benefits:
Enhanced Engagement Tracking: Easily track video completion rates within the Blackboard LMS, allowing educators to see which students have watched the entire video and who might need additional support.
Resync Outcomes to LMS Gradebook is a feature that ensures seamless synchronization between the results of activities performed within Annoto and the Learning Management System's (LMS) gradebook.
This function helps educators automatically update student grades based on their engagement, quiz completion, and other interactive actions within videos, minimizing manual grading efforts.
By keeping the LMS gradebook continuously up-to-date, the feature supports efficient tracking of student progress and improves accuracy in reporting, fostering a more streamlined workflow for instructors.
Personal notes in an educational platform like Annoto provide a powerful tool for enhancing individual learning experiences. This feature allows learners to engage deeply with content, tailor their learning journey to their needs, and retain information more effectively.
Key Benefits of Personal Notes:
1. Enhanced Comprehension and Retention: Taking personal notes helps learners process information more thoroughly. By summarizing, questioning, and synthesizing the material, learners actively engage with the content, which promotes better understanding and longer retention. Writing down notes in their own words also helps solidify the learning, making it easier to recall information later.
2. Customized Learning Paths: Personal notes enable learners to customize their study materials according to their learning styles and needs. Learners can highlight sections that they find challenging or noteworthy, add personal insights, and track questions they might want to explore further. This level of customization makes learning more relevant and effective for each individual.
3. Reflection and Critical Thinking:
Annoto's Video Activity Completion feature seamlessly integrates with Canvas LMS, providing educators with a powerful tool to monitor and manage student engagement in video-based learning activities. This feature offers detailed insights into which students have completed assigned video content, ensuring that all participants are staying on track with their coursework.
Key Benefits:
Enhanced Engagement Tracking: Easily track video completion rates within the Canvas LMS, allowing educators to see which students have watched the entire video and who might need additional support.
Annoto Interactions enables to engage the learners in additional ways, such as: quizzes, polls, surveys, etc.
Each interaction includes a bundle of settings, created specifically to match the needs of it, and after choosing the settings, you will be able to review the final result of the interaction that was created.
In the in the Annoto Dashboard you can see all interactions' activity and users' grades, under the tab.
Note: Not all LMS activities support grade pass-back to the LMS itself.
Therefore, in order to have the Interactions grades automatically sent to the grade center of the LMS, it is important to choose the type of activity that does support grade pass-back.
Activities that do not support grade pass-back may include an indication, with the message:
Annoto's Assessment Criteria Library is a robust feature designed to enhance the educational experience by providing a structured and consistent way to evaluate video-based content.
Here's a concise overview of its key components and benefits:
Key Components:
Pre-Defined Criteria: The library offers a set of pre-defined assessment criteria, making it easy for educators to apply standardized evaluations across different courses and videos.
Annoto enhances the learning experience by integrating interactive, in-video quizzes within Moodle LMS. This innovative feature supports educators in creating engaging, interactive content that not only enriches the learning process but also provides valuable insights into student understanding and performance. The in-video quizzes are seamlessly embedded within the video content, allowing students to interact with the material in a dynamic and engaging way.
Annoto’s in-video quizzes is the automatic grade passback to the Moodle gradebook. This means that quiz results are instantly recorded in the LMS, saving educators time and ensuring that all grades are accurately tracked and reflected in the students' overall performance records.
Annoto provides detailed analytics on quiz performance, enabling educators to gain insights into how students are interacting with the content. This data can inform instructional strategies, helping educators to identify common areas of difficulty and adjust their teaching methods accordingly.
In order to use Annoto in a video within your Blackboard
1. Add the video to your Media Gallery\ My Media
2. Go to Build Content
3. Choose Content Folder
3. In the Content Folder window, add the name of the activity
4. In the Text window, click on the Plus icon (called: add content):
Annoto enhances learning in Blackboard by integrating interactive, in-video quizzes with Kaltura videos. This feature supports educators in creating engaging content and provides valuable insights into student performance.
Quizzes are seamlessly embedded within videos, allowing dynamic student interaction.
With automatic grade passback to the Blackboard gradebook, quiz results are instantly recorded, saving time and ensuring accurate grade tracking.
Detailed analytics on quiz performance help educators adjust instructional strategies based on student interaction and areas of difficulty.
When using Moodle in Chrome and adding an LTI tool, such as Annoto Assignment or Annoto Dashboard, the “Shared Secret” field in Moodle is automatically completed, while it should be empty (a Moodle bug). As a result, the following error is received:
Fixing it is done in the following way:
Annoto's In-Video Quizzes enhance learner engagement by integrating questions directly within videos. While traditionally used for grading, not all quizzes need to impact course grades. Annoto allows instructors to set quizzes as non-graded, encouraging participation without the pressure of evaluation. This feature is ideal for practice, knowledge checks, or feedback, supporting a learning environment focused on mastery and confidence rather than formal assessment.
4. Organized Review and Study: Personal notes are typically organized and accessible within the learning platform, making it easy for learners to revisit and review their notes regularly. This organization is particularly beneficial during revision sessions or when preparing for assessments. Being able to access and compile notes across different learning modules helps in creating comprehensive study materials.
5. Exportable Content for Future Use: Annoto and similar platforms often allow learners to export their personal notes. This functionality is invaluable for creating study guides, preparing for exams, or even compiling research. Having a portable format means that learners can access their notes across different devices or share them with peers, further enhancing the collaborative learning experience.
6. Privacy and Personal Space: Unlike comments or discussions that might be public, personal notes are private, giving learners the security to express doubts, make mistakes, and note down thoughts they might not want to share publicly. This privacy encourages honesty and openness in learning, which is essential for personal development.
In summary, personal notes are a critical feature of any learning platform that seeks to support and enrich the educational journey. By allowing learners to engage with the content on a personal level, reflect critically, and organize their learning, personal notes serve as a bridge between passive watching and active learning. This feature not only supports academic success but also fosters a habit of lifelong learning and self-improvement.
Have any questions? Any other ideas or thoughts regarding Individual Learning? Click here to contact us.


Video Activity Completion
User-generated content (Coming Soon)
Transform the way you evaluate and support learners with Annoto's comprehensive and versatile Assessment Criteria.
Annoto's Assessment Criteria Library is designed to enhance the educational experience by providing a structured and consistent way to evaluate video-based content.
Here's a concise overview of its key components and benefits:
Key Components:
Pre-Defined Criteria: The library offers a set of pre-defined assessment criteria, making it easy for educators to apply standardized evaluations across different courses and videos.
Customizable Options: Users can tailor the criteria to suit specific course needs, ensuring assessments are relevant and targeted.
Reusable for All Courses: Criteria can be saved and reused across multiple courses, saving time and effort in the assessment setup process.
User-Friendly Interface: Designed with ease of use in mind, the interface allows educators to quickly set up and modify criteria, ensuring a hassle-free experience.

Annoto can be used across all Canvas activities. When using In-Video Quizzes, the grading passback is supported in all types of activities (e.g Assignments, Discussions, Pages)
When using quizzes with multiple attempts, you should limit the number of attempts as part of the quiz question creation process.
In the Canvas assignment, it should be set to "Unlimited."
When creating In-Video Quizzes for a video source or entry, ensure that this video is not used elsewhere in the course. Doing so can lead to conflicts when using In-Video Quizzes and resyncing the results to the gradebook
Using Annoto within Kaltura?
This can be done in multiple ways:
Asking the learners questions related to specific moments in the video
Bringing their attention to specific moments in the video
Translating or simplifying terms, phrases, or ideas
Connecting moments in the video to previous class discussions
Highlighting moments that are important for the final exam
Using Annoto as an enriching layer – providing additional knowledge or resources
Providing any type of message to the viewers
In Guided Watching, video as a comment opens additional ways for the instructor to deliver messages to the viewers. Showing the correct annunciation of a term or a phrase, recording the screen for “How to” purposes, and even adding additional insights or comments as a video are only a few examples of what can be done.
The Annoto Analytics and Insights Dashboard presents analytics and insights on the class activity, in terms of video consumption, users’ participation and engagement, and enables a quick and easy management of the discussion (replying easily to learners, give their comments “Educator’s Thumbs Up” and even delete comments, if needed). All from the dashboard itself.
Click on "Add restriction"
Click on "Activity completion"
Choose the activity that needs to be completed before this activity can be viewed.
Now, learners can access this content only after completing the activity requirements for the "Video Activity Completion" page.
They can also see an indication to this requirement
Annoto enhances audience engagement by making viewers active contributors, creating an immersive experience that mirrors the interactivity of in-person events. With support for Kaltura Webcasting, Annoto extends the conversation from live events to on-demand video (VOD), maintaining the context of each interaction. This feature not only enriches live streaming with collaborative notes and discussions but also preserves these interactions for the VOD content, with comprehensive analytics accessible via the Annoto dashboard.
Annoto supports Kaltura Webcasting and provides a unique capability of continuing user discussions and personal notes that were made during live video streams, on VOD, keeping each comment in sync with the video. Annoto provides analytics and insights on the user's activities during the live session and afterward in the VOD. Now Kaltura Webcasting users can collaborate and take notes during live streaming and then continue on the recorded content, and all the analytics will be available through the Annoto dashboard (also integrated as part of Kaltura). Kaltura Webcast has added support to “Live to VOD” - This is a unique capability enabling all user interactions (comments, notes, votes, etc.) created during the Live session to be available on the recorded session as well.
Informed Interventions: Identify students who may be falling behind and intervene promptly to provide necessary support, enhancing overall learning outcomes.
Seamless Integration: The Video Activity Completion feature integrates smoothly with Blackboard, ensuring a hassle-free experience for both educators and students.
Data-Driven Decisions: Utilize completion data to make informed decisions about course content and delivery, optimizing the learning experience for all students.
By leveraging Annoto's Video Activity Completion feature within Blackboard LMS, educators can ensure higher levels of student engagement, timely interventions, and a more interactive and effective learning environment.
Multiple attempts are not set in the LMS, For Example, In the LMS (e.g. Canvas) assignment, it should be set to "Unlimited." Learners will not be able to redo the assignment or retake the quiz an unlimited number of times because Annoto is managing the retries, and the LMS (e.g. Canvas) settings do not affect this activity.
Make sure the Assignment Due Date has not passed.
When creating In-Video Quizzes for a video source or entry, make sure that this video is not used elsewhere in the course. Using the same video in different contexts can lead to students answering quizzes outside of the intended assignment context, such as on a simple page that is not connected to or defined as an assignment. Consequently, their results may not sync properly. This can create conflicts when using In-Video Quizzes and trying to resync the results with the gradebook.
Two ways to submit an assignment:
In the shared space - the Comments Space. In this case, all users can see what their fellow learners have written and learn from one another.
The assignment is filled in the Personal Notes Space and then exported to a document (via the Annoto menu) and submitted to the instructor (via email or any other way of your choice)
Click here to learn how to export personal notes.
The Annoto Dashboard tables can be exported, meaning you can easily see all analytics in a table (thus filter a specific user for grading purposes).
A video discussion can be also exported, enabling to see all the comments that were written by a specific user in a video.
Have additional ideas of assignments? We'd love to hear them! Click here to share with us.
Informed Interventions: Identify students who may be falling behind and intervene promptly to provide necessary support, enhancing overall learning outcomes.
Seamless Integration: The Video Activity Completion feature integrates smoothly with Canvas, ensuring a hassle-free experience for both educators and students.
Data-Driven Decisions: Utilize completion data to make informed decisions about course content and delivery, optimizing the learning experience for all students.
By leveraging Annoto's Video Activity Completion feature within Canvas LMS, educators can ensure higher levels of student engagement, timely interventions, and a more interactive and effective learning environment.
After the interaction is created and reviews, it's important to publish it, so the learners can see it. Learn here how to publish.


"Grade passback might not be supported for this activity. Learn more"
Note: some player types, such as Kaltura, may not include the grading pass-back warning, even though the activity is not graded.
Reusable for All Courses: Criteria can be saved and reused across multiple courses, saving time and effort in the assessment setup process.
User-Friendly Interface: Designed with ease of use in mind, the interface allows educators to quickly set up and modify criteria, ensuring a hassle-free experience.
When you use the Annoto Assignment activity to create In-Video Quizzes, grading passback is supported.
You can activate the Annoto In-Video Quizzes at the Course level. Then, you can easily create quizzes without having to go to the Annoto dashboard every time.
b. In the content window:
Click on the Kaltura icon:
c. Click Embed for the video you are interested in
If you want – you can choose the embed aspect ratio and the embed size, on the gear icon next to Embed icon
d. Save the activity
Annoto will be automatically added to the video
a. Add a name to the activity
b. In Video section, click Add Media
c. Click Embed for the video you are interested in
If you want – you can choose the embed aspect ratio and the embed size, on the gear icon next to Embed icon
d. Save the activity
Annoto will be automatically added to the video
Click here to learn about the comprehensive analytics the dashboard provides and all the insights that can be gained from them.
6. Click Embed for the video you are interested in
If you want – you can choose the embed aspect ratio and the embed size, on the gear icon next to Embed icon
Annoto will be automatically added to the video.
Can't see anything? Check the next section to learn how to set Annoto features.
In the Interactions tab, click on the Plus button (bottom right) and choose "Create":
Select your preferred Interaction type:
True/ False
Multiple Choice
Multiple Answer
etc.
Once the Interaction type is chosen, click "Next":
Then define the settings of the interaction (Content, Settings, Preferences and Review)
Learn all about it in the next session - Interactions Creation Flow

Here is a video that shows how to solve the issue: https://watch.screencastify.com/v/izG0DjmU00tPuw8fY1Mc


Annoto enables a 2-way interaction between an instructor and his learner, to provide accurate, professional time-coded feedback.
In addition to instructor’s assessment and feedback, learners can also reflect on their own videos, sharing what they learned in the process and the insights they gained on themselves, allowing the instructor to see the entire learning process of each user.
Skills assessment can be used for any type of skill (physical skills, as well as performing, cognitive and mental skills) and are used in different academic disciplines, such as:
As every comment is time-based, learners know exactly what they did well and what skills may need further work, or improvement. They have a direct communication channel to their instructor to reflect, to reply, to ask, to share thoughts and most importantly: to learn from.
Instructors have the privilege of reviewing their learners' videos at their own time, whenever is convenient, knowing that they will always stay updated, as once their learners reply, they will be notified and will be able to answer, teach and educate.
In addition to written feedback, recording a video as a comment is another great way to express yourself when responding to the learner's presented skill. Throughout the video, additional massages can be delivered (body language, for example), as well as demonstration of skills.
The provides analytics on each viewer’s (number of comments, replies and notes), as well as provides a quick and easy .
Want to share with us other ideas regarding skill assessment? We'd love to hear them! to tell us.
Collaborative learning enables and endorses communication between peers in addition to communication between instructors and learners. . In general: questions can be asked and answered, participants can share thoughts, ideas, theories and even impressions from the video.
In general: questions can be asked and answered, class participants can share thoughts, ideas, theories and even impressions from the video.
Collaborative learning can include Q&A (raised either by the learners or the instructor) as well as learners' interactions.
As the entire discussion is on top of the video, Q&A becomes an integral part of the video, not having to leave the video for other platforms in order to ask questions or clarifications.
Since every comment is time-based, all questions and answers are always within the context of the video, meaning: even an "I don't get it" comment can easily be answered, knowing to what specific moment in the video it refers.
Good\ relevant\ smart comments can be highlighted by the "Educator's Thumbs up" feature (whenever an instructor "Likes" a specific comment or a reply). to see how "Educator's Thumbs up" look like.
Q&A can be in all directions:
Instructor poses questions, learners answer
Learners ask, instructor answers
Learner asks, other learners answer
Learners can even have the ability to post questions or comments as anonymous. In this case, only instructors will see the user's name. to see how Anonymous comments look in instructor's view.
Learners can use the platform to interact with one another, regarding video content:
Introduce themselves
Ask questions
Share thoughts
More on learners interaction can be found .
Video as a comment can be an integral part of the discussion on a video, enabling the instructor and the learners to express themselves not only in writing, but also in speaking, using facial expressions, hand gestures and body language.
In addition, instructors or learners can easily record their screen, for demonstrations or to better make a point.
The activity in the discussion is measured, analyzed and presented in the , enabling to get a clearer view on , l, as well as to directly from the dashboard.
Encountered other types of interactions? We'd love to hear them! to share them.
Importing Annoto activities from one course to another is a streamlined process that enhances efficiency and consistency in course management. This feature allows educators and instructional designers to duplicate Annoto-powered interactive elements, ensuring that educational activities, annotations, quizzes, and discussions can be seamlessly integrated across multiple courses.
Benefits of Importing Annoto Activities
Efficiency: Reduces the time and effort required to set up new courses by reusing pre-existing Annoto activities.
Consistency: Maintains a consistent learning experience across different courses, ensuring that all students receive the same high-quality interactions and assessments.
Scalability: Facilitates the expansion of course offerings without duplicating effort, making it easier to manage large-scale educational programs.
Conclusion
Importing Annoto activities from one course to another simplifies course management and enhances the learning experience by leveraging pre-existing interactive elements. This feature not only saves time but also ensures a consistent and scalable approach to delivering high-quality educational content.
Introducing Annoto's Video Activity Completion feature – an essential tool for tracking and managing learner engagement.
This feature allows educators to monitor which students have completed video-based activities, ensuring that all participants are keeping pace with the course material.
By providing clear insights into video completion rates, Annoto helps educators identify areas where students may need additional support, fostering a more effective and interactive learning environment.
Annoto can be used across all LMS activities. When using Video Activity Completion, the grading passback is supported in all types of activities (e.g Assignments, Discussions, Pages)
Enhanced Engagement Tracking: Easily track video completion rates within the LMS, allowing educators to see which students have watched the entire video and who might need additional support.
Automated Insights: Automatically generate reports on video activity completion, saving educators time and effort in monitoring student progress.
Informed Interventions: Identify students who may be falling behind and intervene promptly to provide necessary support, enhancing overall learning outcomes.
Coming Soon
Coming Soon
Coming Soon
Didn't find your system? to let us know
Annoto enables you to seamlessly add interactive capabilities to your course videos, either at the course level or the video level.
For example, you can set default preferences for Annoto features that will be overlaid across your course video content, and then update specific videos with different desired features.
Alternatively, you can disable Annoto at the course level and enable it for specific videos.
To set up Annoto features in a course, you can activate interactive capabilities across all your course videos through the section on the Annoto Dashboard.
Here's a brief guide:
Access the Annoto Dashboard: Navigate to the Annoto Dashboard from your course platform.
Go to Kaltura's Media Gallery
Go to the Channel Actions menu
In the Annoto Dashboard click on the Preferences tab
Enable Features: Choose the features you want to enable for your course videos. You can do this by toggling the options or selecting a preset:
This setup will apply the chosen features to all course videos, enhancing the interactive experience for your students.
There are two ways to set Annoto features for a specific video:
From the Annoto Dashboard
From the Video View
To set Annoto for a specific video from the Annoto dashboard:
In the Annoto Dashboard, click on the Hub tab.
Select the video you want to disable Annoto for (you can search by video title).
Go to the Preferences tab of this video view.
Go to the video where you want to enable Annoto.
Based on your organization setting, you will have one of the following two options:
After clicking the Icon , you will see Annoto Dashboard launch
If you click on the menu , you should then click on the Annoto Dashboard:
You will see the Annoto dashboard open, choose which features you want to enable and exist.
This setup will apply the chosen features to the video, enhancing the interactive experience for your students.
Annoto's Video Activity Completion feature seamlessly integrates with Canvas LMS, providing educators with a powerful tool to monitor and manage student engagement in video-based learning activities. This feature offers detailed insights into which students have completed assigned video content, ensuring that all participants are staying on track with their coursework.
Key Benefits:
Enhanced Engagement Tracking: Easily track video completion rates within the Canvas LMS, allowing educators to see which students have watched the entire video and who might need additional support.
Automated Insights: Automatically generate reports on video activity completion, saving educators time and effort in monitoring student progress.
Informed Interventions: Identify students who may be falling behind and intervene promptly to provide necessary support, enhancing overall learning outcomes.
Seamless Integration: The Video Activity Completion feature integrates smoothly with Canvas, ensuring a hassle-free experience for both educators and students.
Data-Driven Decisions: Utilize completion data to make informed decisions about course content and delivery, optimizing the learning experience for all students.
By leveraging Annoto's Video Activity Completion feature within Canvas LMS, educators can ensure higher levels of student engagement, timely interventions, and a more interactive and effective learning environment.
Annoto enables you to seamlessly add interactive capabilities to your course videos, either at the course level or the video level.
For example, you can set default preferences for Annoto features that will be overlaid across your course video content, and then update specific videos with different desired features.
Alternatively, you can disable Annoto at the course level and enable it for specific videos.
To set up Annoto features in a course, you can activate interactive capabilities across all your course videos through the section on the Annoto Dashboard.
Here's a brief guide:
Access the Annoto Dashboard: Navigate to the Annoto Dashboard from your course platform.
Go to Kaltura's Media Gallery
Go to the Channel Actions menu
In the Annoto Dashboard click on the Preferences tab
Enable Features: Choose the features you want to enable for your course videos. You can do this by toggling the options or selecting a preset:
This setup will apply the chosen features to all course videos, enhancing the interactive experience for your students.
There are two ways to set Annoto features for a specific video:
From the Annoto Dashboard
From the Video View
To set Annoto for a specific video from the Annoto dashboard:
In the Annoto Dashboard, click on the Hub tab.
Select the video you want to disable Annoto for (you can search by video title).
Go to the Preferences tab of this video view.
Go to the video where you want to enable Annoto.
Based on your organization setting, you will have one of the following two options:
After clicking the Icon , you will see Annoto Dashboard launch
If you click on the menu , you should then click on the Annoto Dashboard:
You will see the Annoto dashboard open, choose which features you want to enable and exist.
This setup will apply the chosen features to the video, enhancing the interactive experience for your students.
This is an accessibility statement from Annoto Ltd.
Annoto Ltd. is committed to making Annoto accessible to everyone, including individuals with disabilities. To support this commitment, we have implemented the following measures:
Include accessibility as a key component of our mission.
Integrate accessibility considerations into internal policies and practices.
Incorporate accessibility requirements in our procurement processes.
Designate an accessibility officer to oversee accessibility initiatives.
Provide ongoing accessibility training for all staff members.
Set specific accessibility goals and assign clear responsibilities.
Use formal quality assurance methods to uphold accessibility standards.
At Annoto, we have established a mature accessibility program. Our product development process is guided by up-to-date accessibility standards, including WCAG 2.2 Level AA and Section 508 compliance. Accessibility is a cross-functional priority, with each team taking ownership of accessibility within their areas of responsibility.
Our accessibility program includes:
Cross-functional ownership: Each team within Annoto is empowered to address accessibility in their work and contribute to an inclusive user experience.
Priority for exceptions: Accessibility exceptions are treated as high-priority defects and are triaged and resolved with the same level of urgency as other critical issues.
Commitment beyond compliance: For Annoto, accessibility is more than a checklist. It is a commitment to providing an engaging, inclusive learning environment where everyone can succeed.
Annoto is fully conformant with WCAG 2.2 Level AA, the standard defined by the Web Content Accessibility Guidelines (WCAG) to improve accessibility for individuals with disabilities. "Fully conformant" means that Annoto meets all applicable WCAG 2.2 Level AA requirements without any exceptions.
Additionally, Annoto conforms with:
The Revised Section 508 standards as published by the U.S. Access Board in the Federal Register on January 18, 2017.
The Corrections to the ICT Final Rule as published by the U.S. Access Board in the Federal Register on January 22, 2018.
We are continually working to improve accessibility across our platform and welcome any feedback on your experience. If you encounter any accessibility barriers while using Annoto, please reach out to us:
Email: [email protected]
We aim to respond to all feedback within two business days.
Annoto Ltd. uses the following methods to evaluate accessibility on our platform:
External Evaluation: Annoto’s accessibility is reviewed through an independent, external assessment.
An evaluation report is available at: .
Our commitment to accessibility is ongoing, and we continually seek opportunities to enhance Annoto’s usability for all users. Thank you for helping us to ensure a more inclusive experience.
Annoto's Assessment Criteria Library is a robust feature designed to enhance the educational experience by providing a structured and consistent way to evaluate video-based content.
Here's a concise overview of its key components and benefits:
Key Components:
Pre-Defined Criteria: The library offers a set of pre-defined assessment criteria, making it easy for educators to apply standardized evaluations across different courses and videos.
Customizable Options: Users can tailor the criteria to suit specific course needs, ensuring assessments are relevant and targeted.
Reusable for All Courses: Criteria can be saved and reused across multiple courses, saving time and effort in the assessment setup process.
User-Friendly Interface: Designed with ease of use in mind, the interface allows educators to quickly set up and modify criteria, ensuring a hassle-free experience.
Enable you to quickly apply the criteria you created within the Assessment Criteria Library at the course level or on specific videos.
Learn more about how to use the Assessment Criteria in your course activities
Annoto enhances the learning experience by integrating interactive, in-video quizzes within Canvas LMS. This innovative feature supports educators in creating engaging, interactive content that not only enriches the learning process but also provides valuable insights into student understanding and performance. The in-video quizzes are seamlessly embedded within the video content, allowing students to interact with the material in a dynamic and engaging way.
Annoto’s in-video quizzes is the automatic grade passback to the Canvas gradebook. This means that quiz results are instantly recorded in the LMS, saving educators time and ensuring that all grades are accurately tracked and reflected in the students' overall performance records.
Annoto provides detailed analytics on quiz performance, enabling educators to gain insights into how students are interacting with the content. This data can inform instructional strategies, helping educators to identify common areas of difficulty and adjust their teaching methods accordingly.
Annoto can be used across all Canvas activities. When using In-Video Quizzes, the grading passback is supported in all types of activities (e.g Assignments, Discussions, Pages)
For each In-Video Quiz Graded Activity, an assignment will be created in Canvas. In this assignment, you can adjust all the assignment settings, such as points and due dates.
Transform Your Course Videos: Engage, Assess, and Gain Insights in Seconds Are you looking to make your course videos more interactive and engaging for your students?
Discover how Annoto can help you achiving anything you need! In this guide, you'll learn how to:
Enhance Learning: Incorporate in-video quizzes for real-time knowledge checks.
Skills Assessment: Conduct video critiques for comprehensive skills evaluation and peer reviews.
Deepen Understanding: Facilitate time-based discussions to promote deeper learning.
Extended Self-Learning: Create interactive content that encourages ongoing student engagement and reflection.
Gain Insights: Obtain actionable data on student interaction and video content performance.
We will show you how to effortlessly add these powerful features to your videos, making your course content interactive and engaging, an integral and dynamic part of your curriculum. Get Inspired:
Annoto enhances the learning experience by integrating interactive, in-video quizzes within Brightspace (D2L) LMS. This innovative feature supports educators in creating engaging, interactive content that not only enriches the learning process but also provides valuable insights into student understanding and performance. The in-video quizzes are seamlessly embedded within the video content, allowing students to interact with the material in a dynamic and engaging way.
Annoto’s in-video quizzes is the automatic grade passback to the Brightspace (D2L) gradebook. This means that quiz results are instantly recorded in the LMS, saving educators time and ensuring that all grades are accurately tracked and reflected in the students' overall performance records.
Annoto provides detailed analytics on quiz performance, enabling educators to gain insights into how students are interacting with the content. This data can inform instructional strategies, helping educators to identify common areas of difficulty and adjust their teaching methods accordingly.
Annoto can be used across all Brightspace (D2L) activities. When using In-Video Quizzes, the grading passback is supported in all types of activities (e.g Assignments, Discussions, Pages)
You can activate the Annoto In-Video Quizzes at the Course level. Then, you can easily create quizzes without having to go to the Annoto dashboard every time.
Using Annoto within Kaltura?
Annoto is enabling your course participants to add time-based annotations as an overlay to any video content, turning passive video watching into an active and collaborative learning experience while providing you actionable insights on the students and the video content delivered.
Annoto lets you create a variety of assessments and interactive video-based activities.
You can incorporate video-based feedback into Canvas assessments, create in-video quizzes or meaningful discussions by letting your students add time-based annotations to video lectures in different content pages,or/and use it as a personal learning journal through the course, and much more.
Transform passive video viewing into an active, collaborative experience that provides you with actionable insights about students and videos.
With Annoto, you can use video content for Video Assessment, skills development, Peer Review & Reflection, Video Feedback, Collaborative Learning, and so .
[ANNOTO WITHIN YOUR LMS]
Annoto works within the Canvas environment within your existing video content (e.g. Kaltura, Vimeo and any other video source) with zero configuration (without redirecting the instructor outside of the Canvas LMS) and integrated into the Kaltura environment.
To set up Annoto features in a channel, you can activate interactive capabilities across all your Channel videos through the Preferences section on the Annoto Dashboard.
Here's a brief guide:
Access the Annoto Dashboard: Navigate to the Annoto Dashboard from your Channel.
Go to Kaltura's Media Gallery
Go to the Channel Actions menu
Click on Annoto Dashboard
In the Annoto Dashboard click on the Preferences tab
Enable Features: Choose the features you want to enable for your Channel videos. You can do this by toggling the options or selecting a preset:
This setup will apply the chosen features to all Channel videos, enhancing the interactive experience for your students.
RSI isn’t just about compliance with federal regulations; it’s about ensuring every student has a meaningful, engaging, and successful online learning experience. At Annoto, we’re dedicated to empowering institutions to meet RSI requirements while delivering top-tier, interactive education. See how RSI can transform your online courses and the way you connect with your students. 👇 Let’s work together to raise the standard of online education and keep students at the heart of everything we do!
Annoto helps customers meet RSI requirements set by the U.S. Department of Education for online learning environments by fostering meaningful and consistent engagement between instructors and students.
Here’s how Annoto can support compliance:
Annoto enables continuous interaction through:
In-Video Comments: Instructors can leave time-stamped comments on videos, prompting students to engage in discussions, clarifying content, or offering personalized feedback.
Collaborative Learning: Students and instructors can collaborate directly in the video, allowing for ongoing dialogue and review.
Peer Review and Feedback: Annoto allows students to engage with each other's work, providing a layer of interaction and feedback that promotes deeper learning.
Annoto enhances the quality of interactions:
In-Video Quizzes: These assessments ensure students actively engage with video content. Instructors can track quiz results and use them as a tool to prompt follow-up discussions or additional support.
Skill Assessments: Instructors can evaluate student understanding and provide timely, substantive feedback, ensuring students are receiving valuable insights to improve their learning.
Managed and Anonymous Comments: Instructors can moderate and control discussions, ensuring that the interaction is relevant and valuable, both for students and instructors.
Annoto’s detailed analytics give instructors a clear view of student participation, engagement levels, and overall progress, helping them ensure that interactions are not only regular but meaningful:
Engagement Insights: Track how often students engage with video content, quizzes, and discussions, ensuring regular participation.
Completion Tracking: Monitor how students progress through videos and assessments, ensuring they’re completing the necessary steps for compliance.
With Annoto, institutions can easily track and document interactions, fulfilling RSI requirements and ensuring that their courses meet the federal regulations for regular and substantive engagement.
Somewhat similar error might appear if you do not grant browser permission to record screen when prompted. Please make sure to grant the permissions when prompted by the browser.
Due to recent browser permission changes in some environments you may get an error when trying to capture your screen:
This issue may typically appear in LTI embeds inside LMS. The issue is due to LMS not providing screen capture permission for the LTI iframe embed.
We expect the LMSs will update their LTI embed permissions in the near feature, and this issue would be resolved.
For more information please see "Chrome launches display-capture" at:
Other browsers have released similar updates.
Once a video is recorded and uploaded to Kaltura, it takes a few seconds/minutes to process it. In case you the video is played before processing is completed by Kaltura, you will get an error saying: "No source video was found - Entry in process". Like this:
Not to worry! Wait a bit and then play the video again.
If you are unable to edit your comment or delete it, it is probably because one of the following happened:
More than 24 hours have passed since you wrote the comment
Someone already replied to your comment
Note: Every Brightspace environment may look a bit different. Below you will find a few examples of workflows. Follow the one that is similar to your Brightspace environment.
If you the buttons in your Brightspace are not similar to the examples below, do not worry! Feel free to contact us for dedicated guidance: [email protected]
In order to use Annoto in a video within your Brightspace:
Add the video to your Media Gallery\ My Media
In the navigation menu, choose "Content":
3. Click "Add Existing":
4. In "What would you like to add" window, click "More":
5. Under "Third Party" choose: "Add Media":
6. Choose the video you are interested in from the list of videos
7. Click Embed for the video you are interested in
8. If you want – you can choose the embed aspect ratio and the embed size, on the gear icon next to Embed icon
9. Annoto will be automatically added to the video:
3. Click "Existing Activities":
Choose "Embed Kaltura Media (Quicklink)":
Choose how you want to upload your video:
7. Embed the video you are interested in
8. If you want – you can choose the embed aspect ratio and the embed size, on the gear icon next to Embed icon
9. Annoto will be automatically added to the video
to learn about the comprehensive analytics the dashboard provides
Importing Annoto activities from one course to another is a streamlined process that enhances efficiency and consistency in course management. This feature allows educators and instructional designers to duplicate Annoto-powered interactive elements, ensuring that educational activities, annotations, quizzes, and discussions can be seamlessly integrated across multiple courses.
Benefits of Importing Annoto Activities
Efficiency: Reduces the time and effort required to set up new courses by reusing pre-existing Annoto activities.
Consistency: Maintains a consistent learning experience across different courses, ensuring that all students receive the same high-quality interactions and assessments.
Scalability: Facilitates the expansion of course offerings without duplicating effort, making it easier to manage large-scale educational programs.
Conclusion
Importing Annoto activities from one course to another simplifies course management and enhances the learning experience by leveraging pre-existing interactive elements. This feature not only saves time but also ensures a consistent and scalable approach to delivering high-quality educational content.
On top of enabling discussion and personal notes, Annoto can be used for different types of activities. Every activity is measured, analyzed, and presented in the Annoto Analytics and Insights Dashboard, enabling you to evaluate learners' performance (both quantitatively and qualitatively).
Annoto enhances the learning experience by integrating interactive, in-video quizzes within the LMS. This innovative feature supports educators in creating engaging, interactive content that not only enriches the learning process but also provides valuable insights into student understanding and performance. The in-video quizzes are seamlessly embedded within the video content, allowing students to interact with the material in a dynamic and engaging way.
Annoto’s in-video quizzes is the automatic grade passback to the LMS gradebook. This means that quiz results are instantly recorded in the LMS, saving educators time and ensuring that all grades are accurately tracked and reflected in the students' overall performance records.
Annoto's Video Activity Completion feature seamlessly integrates with Blackboard LMS, providing educators with a powerful tool to monitor and manage student engagement in video-based learning activities. This feature offers detailed insights into which students have completed assigned video content, ensuring that all participants are staying on track with their coursework.
Key Benefits:
Enhanced Engagement Tracking: Easily track video completion rates within the Blackboard LMS, allowing educators to see which students have watched the entire video and who might need additional support.
Annoto enables you to seamlessly add interactive capabilities to your course videos, either at the course level or the video level.
For example, you can set default preferences for Annoto features that will be overlaid across your course video content, and then update specific videos with different desired features.
Alternatively, you can disable Annoto at the course level and enable it for specific videos.
Transform Your Course Videos: Engage, Assess, and Gain Insights in Seconds Are you looking to make your course videos more interactive and engaging for your students?
Discover how Annoto can help you achiving anything you need! In this guide, you'll learn how to:
Enhance Learning: Incorporate in-video quizzes for real-time knowledge checks.
Skills Assessment: Conduct video critiques for comprehensive skills evaluation and peer reviews.
Deepen Understanding: Facilitate time-based discussions to promote deeper learning.
Extended Self-Learning: Create interactive content that encourages ongoing student engagement and reflection.
Gain Insights: Obtain actionable data on student interaction and video content performance.
We will show you how to effortlessly add these powerful features to your videos, making your course content interactive and engaging, an integral and dynamic part of your curriculum. Get Inspired: See how other already did it from FSU, NYU, Georgia Tech, and many other institutions are transforming their teaching methods with Annoto
The D2L "Learner mode" and impersonating a student do not accurately simulate the student experience for LTI integrations and are not reliable ways to evaluate it.
To properly check the student experience, you should create a separate student account, log in with it, and test from there.
Seamless Integration: The Video Activity Completion feature integrates smoothly with the LMS, ensuring a hassle-free experience for both educators and students.
Data-Driven Decisions: Utilize completion data to make informed decisions about course content and delivery, optimizing the learning experience for all students.


During this time, learners act individually (each of them watch the video and performs the activity they were requested to complete), for example:
Describing what they are seeing in the video
Answering questions in the comments space (in this case it is recommended to add questions in specific parts of the video in advance [prior to asking learners to watch it])
Analyzing the video according to a model that was previously learned
Throughout the learners' activity, the instructor can read learners' comments and plan the discussion that will be following this activity.
The Annoto Analytics and Insights Dashboard provides insights on the activity in the video, and enables you to stay on top of everything that is happening during the activity:
How many comments each learner wrote (Collaboration in Video Users table)?
Did all learners complete watching the video, or did some of them watch only a part of it (Total completion in Video Users table)?
What comments were written? You can read the entire discussion. This allows you to:
Plan how to navigate\ manage the class discussion
See if there are any issues\ topics in which learners my be struggling and need further assistance\ explanation\ examples.
Setting up a specific time in which all learners will participate
Within this slot of time, all learners must find as many X* as possible
Every learner needs to find as many X* as possible (at his own time)
[*Example: in marketing course the instructor arranged a competition between all learners - watching a video that contains many different commercials, learners need to find as many commercial elements as possible]
With the Annoto Analytics and Insights Dashboard you can view the participation of each learner and his level of success in the competition:
How many comments each learner write (Collaboration in Video Users table)?
Did all learners complete watching the video, or did some of them watch only a part of it (Total completion in Video Users table)?
What elements did they find? You can read the entire discussion.
At the end of the session, each learner answers questions about the session, such as:
What is the most important thing you took from this session?
What interested you the most?
Is there a topic you would like to re-discuss in the next session?
Learners can answer either in the or in their Space.
At the beginning of the next session, learners can be asked to share what they wrote (in case they were asked to write in their Personal Notes space).
We are always happy to hear about new activities with Annoto! Click here to tell us.
Annoto can be used across all LMS activities. When using In-Video Quizzes, the grading passback is supported in all types of activities (e.g Assignments, Discussions, Pages)
Coming Soon
Didn't find your system? Click here to let us know
Have additional ideas of interactions? We'd love to hear them! Click here to share with us
In crafting Annoto quizzes, we set out to redefine the educational tool landscape. Collaborating closely with top learning designers and instructors, we aimed to identify and surpass the limitations of current market offerings. Our focus was clear: create a tool that is not only simple and quick but also rich in actionable insights, allowing educators to adapt content dynamically. The result is a product designed by educators, for educators, offering unparalleled value and innovation to our customers.
Creation in 3 simple steps Create, Preview, Publish Everything is managed directly from the video view
Choose between pop-up quizzes in the middle of the video or alongside the Annoto side panel.
Students receive instant feedback on their quiz results.
Gain deep, actionable insights into learners' performance and the effectiveness of quizzes.
Effortlessly transfer activities from one course to another, supporting Blueprint copies
Advanced capabilities like Limit Fast Forwarding, enabling you to restrict fast forwarding the video until all Optional/Mandatory quizzes are answered
Supports versioning and real-time changes. Made a mistake? No problem. You can update quizzes even after publishing, and Annoto will handle everything, including updating the gradebook.
Designed to be fully accessible to all users.
Our reliable grade sync module ensures accurate and automatic synchronization of grades. Annoto's Reliable Grade Sync System (RGSS) seamlessly updates quiz and assessment scores to your LMS gradebook in real time. With built-in LMS verifications, it eliminates the risk of manual errors.
Informed Interventions: Identify students who may be falling behind and intervene promptly to provide necessary support, enhancing overall learning outcomes.
Seamless Integration: The Video Activity Completion feature integrates smoothly with Blackboard, ensuring a hassle-free experience for both educators and students.
Data-Driven Decisions: Utilize completion data to make informed decisions about course content and delivery, optimizing the learning experience for all students.
By leveraging Annoto's Video Activity Completion feature within Blackboard LMS, educators can ensure higher levels of student engagement, timely interventions, and a more interactive and effective learning environment.
Here's a brief guide:
Access the Annoto Dashboard: Navigate to the Annoto Dashboard from your course platform.
Go to Kaltura's Media Gallery
Go to the Channel Actions menu
Click on Annoto Dashboard
In the Annoto Dashboard click on the Preferences tab
Enable Features: Choose the features you want to enable for your course videos. You can do this by toggling the options or selecting a preset:
This setup will apply the chosen features to all course videos, enhancing the interactive experience for your students.
There are two ways to set Annoto features for a specific video:
From the Annoto Dashboard
From the Video View
To set Annoto for a specific video from the Annoto dashboard:
In the Annoto Dashboard, click on the Hub tab.
Select the video you want to disable Annoto for (you can search by video title).
Go to the Preferences tab of this video view.
Set the features you want for this video (you can use a preset, such as "Disabled" or "Analytics," or enable only the personal notes for this video).
Go to the video where you want to enable Annoto.
Based on your organization setting, you will have one of the following two options:
After clicking the Icon , you will see Annoto Dashboard launch
If you click on the menu , you should then click on the Annoto Dashboard:
You will see the Annoto dashboard open, choose which features you want to enable and exist.
This setup will apply the chosen features to the video, enhancing the interactive experience for your students.
To set Annoto for a specific video from the Annoto dashboard:
In the Annoto Dashboard, click on the Hub tab.
Select the video you want to disable Annoto for (you can search by video title).
Go to the Preferences tab of this video view.
Set the features you want for this video (you can use a preset, such as "Disabled" or "Analytics," or enable only the personal notes for this video).
Go to the video where you want to enable Annoto.
Based on your organization setting, you will have one of the following two options:
After clicking the Icon , you will see Annoto Dashboard launch
If you click on the menu , you should then click on the Annoto Dashboard:
You will see the Annoto dashboard open, choose which features you want to enable and exist.
This setup will apply the chosen features to the video, enhancing the interactive experience for your users.
Once you add a comment in the Comments Space, everyone that watches this video can see what you wrote.
Yes! Anyone can edit or delete a comment that they wrote in the Comments Space within 24 hours after it was written, unless someone already replied to the comment.
Instructors can edit or delete their comments at any time as long as it did not get a reply.
Instructors have the ability to delete comments made by others (in case they are inappropriate, for example). Click here to learn how to delete a learner's comment.
Yes, personal notes can be edited and deleted at any time.
If you are unable to edit your comment or delete it, it is probably because one of the following happened:
More than 24 hours have passed since you wrote the comment
Someone already replied to your comment
It is useful to format the message by adding new line, for example to add bullets or ordered lists, or just to start a new line of text.
Shift + Enter will add a new line
For bullets, Shift + Enter opens the next bulleted line.
Clicking Shift + Enter twice will start another line in the comment with no bullet:
Annoto Discussions are private per course. If you use the same video in two different courses, you will have two different discussions.
However, if you wish to have the same discussion for different courses - this is also a possibility (you can define that within the Annoto settings). Feel free to contact us for that.
Definitely! When Annoto is an overlay (on top of the video), a user can drag the widget to anywhere he wants on top of the video
Make sure everything is set up correctly to enable recording video as a comment. You can learn all about it here.
If you still experience issues, we are here for you! Contact us at: [email protected]
Multiple Choice Questions allows you to ask a question and provide as many answers as you like, with only one correct answer.
Multiple Answer Questions allows you to ask a question and provide as many answers as you like, with more than one correct answer. There is no limitation on the number of correct answers you can set.
Annoto currently supports fill-in-the-blank style questions through the Multiple Select and Multiple Answer question types.
These formats allow instructors to present a sentence with a single blank space and offer a predefined set of options for learners to choose from—enabling both simple and more nuanced fill-in-the-blank interactions.
This approach is flexible and effective for a wide range of learning objectives, including vocabulary reinforcement, concept checks, and knowledge recall. Learners can engage actively by selecting the correct word or phrase that completes the sentence, encouraging critical thinking in context.
Fill in the Blank using Multiple Select type:
The capital of France is ___.
(Only one correct option is selected from the list.)
Fill in the Blank using Multiple Answer type:
___ are considered programming languages.
This method keeps the quiz experience intuitive while allowing for customizable assessment logic depending on the instructional goal.
Fill in the blank using a Multiple-Select quiz type:
Fill in the blank using a Multiple-Answer quiz type:

When using quizzes with multiple attempts, you should limit the number of attempts as part of the quiz question creation process.
For Example, In the LMS (e.g. Canvas) assignment, it should be set to "Unlimited." Learners will not be able to redo the assignment or retake the quiz an unlimited number of times because Annoto is managing the retries, and the LMS (e.g. Canvas) settings do not affect this activity.
The reason for setting it to unlimited is that when we resync the grades, The LMS (e.g. Canvas) counts it as a retry. If learners exceed the allowed retries, Annoto won't be able to resync the grades, which is why you are receiving an error message. Alternatively, you can increase the number of retries allowed.
When creating In-Video Quizzes for a video source or entry, make sure that this video is not used elsewhere in the course. Using the same video in different contexts can lead to students answering quizzes outside of the intended assignment context, such as on a simple page that is not connected to or defined as an assignment. Consequently, their results may not sync properly. This can create conflicts when using In-Video Quizzes and trying to resync the results with the gradebook.
Please ask the students who haven't had their grades synced to the gradebook to access the video through the Assignment activity. By doing this, their grades should sync back into the Gradebook. If the grades don’t sync immediately, you can click the resync button to force the update.
Make sure the Assignment Due Date has not passed.
As when clicking on the "Resync outcomes to LMS", Annoto will sync the missing outcomes using the current date and time, rather than the original submitted date and time.
Extend the deadline for the assignment
Then resync the outcomes to the LMS, and everything will be updated!
If you are getting a warning such as:
This is probably because the activity is in LMS context (type of activity) that does not support grading, such as Canvas LMS Page.

Here's a brief guide:
Access the Annoto Dashboard: Navigate to the Annoto Dashboard from your course platform.
Go to Kaltura's Media Gallery
Go to the Channel Actions menu
Click on Annoto Dashboard
In the Annoto Dashboard click on the Preferences tab
Enable Features: Choose the features you want to enable for your course videos. You can do this by toggling the options or selecting a preset:
This setup will apply the chosen features to all course videos, enhancing the interactive experience for your students.
There are two ways to set Annoto features for a specific video:
From the Annoto Dashboard
From the Video View
To set Annoto for a specific video from the Annoto dashboard:
In the Annoto Dashboard, click on the Hub tab.
Select the video you want to disable Annoto for (you can search by video title).
Go to the Preferences tab of this video view.
Set the features you want for this video (you can use a preset, such as "Disabled" or "Analytics," or enable only the personal notes for this video).
Go to the video where you want to enable Annoto.
Based on your organization setting, you will have one of the following two options:
After clicking the Icon , you will see Annoto Dashboard launch
If you click on the menu , you should then click on the Annoto Dashboard:
You will see the Annoto dashboard open, choose which features you want to enable and exist.
This setup will apply the chosen features to the video, enhancing the interactive experience for your students.


Annoto is working with the top leading universities and organizations in the world like NYU, Georgia Tech, University of Utah, and OECD, Positioned at the most critical place of the learning system, between the user and the video content, gives the ability to impact the user learning process and the video content delivered.
Adding some case studies from our customer success stories where customers share their experience and impact with Annoto:
How New York University uses Annoto to empower Online Learning with Video – part of the Annoto webinar: Learn to leverage videos in learning environments.
In this video Dominick Bagnato, Service Manager for educational Media Production Tools and Facilities in NYU shares a how Annoto is used across NYU and the feedback they received
How Bentley University uses Annoto to empower Online Learning with Video
In this video Steve Salina from Academic Technology Center at Bentley University shares a how Annoto is used across Bentley University for a variety of use cases and the feedback they received.
Annoto provides you the ability to gain insights on learners' activity and learning. Using different types of questions can shed light on different aspects of the learning, such as: learners' online presence, levels of understanding, video feedback, etc.
These questions dig deeper into the content of the video and provide a clearer view of the levels of understanding - of a specific learner as an individual and of all learners as a whole.
Theory to Practice
Analysis
Probing questions
"What are potential reasons for..."
"What are the advantages and disadvantages of..."
"Analyze the video according to the model we studied in our last session"
It is recommended to ask questions that will encourage varied answers, rather than asking a Yes\No question, that may ne resulted by multiple “yes’s” in the discussion.
The discussion itself can be managed in the .
This type of questions enables learners to share what's on their minds and can increase the reach in terms of the number of users that will participate. As opposed to knowledge questions (that in case they are not mandatory, probably only learners who have confidence in their knowledge will answer), questions that ask learners to share feelings and thoughts can get more users to answer (even the “shy” ones), as there is no “right” and “wrong” when it comes to feelings .
Emotional questions
Reflection Questions
"How did that video make you feel? "
"What would you do differently..?"
“How would you use what you’ve learned in this video in your daily life?”
You may invite learners to reply to their peers, in order to increase the learners’ interaction, and to empower the learning-fusion.
The main idea of this assignment is to cause learners to get in the video and watch it.
Describing
Identifying elements in the video
"Please identify all the ... in the video"
"Describe the actions of character X in the video”
"What 3 key elements are mentioned in the video? "
Video watching statistics can be found in the
Adding a question that includes the phrase: “until this moment” or “so far” towards the end of the video keeps the viewers “on their toes” in terms of staying concentrated throughout the video.
For example: “What is the uniqueness of the video from the beginning and up until this moment? “
“What musical elements did you recognize in the song so far?”
Of course, any other question that comes to mind can be used.
Have more questions phrasing you would like to share with us? We'll be more than happy to hear them - to tell us.
Annoto provides a versatile platform that enriches digital learning environments by supporting a wide array of educational activities.
Here’s how Annoto addresses three key categories of learning:
Feedback and Assessment
Annoto transforms traditional video content into interactive learning experiences with embedded assessment tools. The platform enables:
Skills Assessment: Annoto enables dynamic two-way interactions between instructors and learners, providing time-coded, professional feedback directly on video submissions. This method allows for precise pinpointing of both strengths and areas for improvement.
Peer Review: Peer review extends the learning from individual feedback to collective learning, enabling learners to benefit from the perspectives of their peers.
Collaboration and Engagement
Annoto fosters a collaborative learning environment by allowing rich interaction between participants:
Interactive Comments: Learners and instructors can interact dynamically within the video through comments, fostering a sense of community and enhancing learner engagement.
Peer Learning: The platform encourages learners to engage with each other’s queries and contributions, promoting a collaborative learning culture where students can learn from peers and contribute to discussions.
Self Learning
For learners pursuing self-directed studies, Annoto offers tools that enhance the self-learning experience:
Personal Notes Space: Learners can annotate videos with their own notes and highlights, which remain private and can be exported for personal study or revision.
In-Video Quizzes: Instructors can integrate different types of quizzes (True/False, multiple choice) directly into video content, allowing for immediate assessment of learner comprehension. This helps learners process and understand the material on a deeper level.
Annoto effectively supports the educational process by integrating tools for feedback, collaboration, and self-learning directly into video content. Whether it’s through enhancing learner engagement, enabling detailed feedback, or supporting self-study tactics, Annoto tailors its features to meet diverse learning needs and styles, making it a valuable asset in any educational setting.
Whether you prefer learning everything you can about a new tool or are simply looking for an effortless way to boost student engagement, the recommendations below will help you explore Annoto in the way that best suits your needs.
You can change your Annoto course and video preferences at any time,
Are you still unsure about how to get started with this?
Take a look at how other customers began their journey and the positive impact it had on their experience. Discover various ways educators are using Annoto for different purposes and see the benefits they have achieved.
Explore these use cases to get a better idea of how you can make the most out of Annoto
Once Annoto is enabled in your course, it is automatically added to videos that are embedded in your Canvas.
In order to use Annoto in a video within your Canvas, choose the activity you are interested in (Pages\ Discussion, etc.)
1. Create new
2. Add a title to the activity
3. In the content section, click the Applications icon:
4. Choose Embed Annoto Media
5. In the Embed Annoto Media window, add the URL (in [Embed Code\ URL]):
6. Add the video title.
If you want – you can set the embed aspect ratio and the embed size:
7. Click Embed
8. Save the activity
9. Annoto will be automatically added to the video
You can access the Annoto Dashboard in two ways:
From the Course Level
From the Video view
You can access the Annoto Insights Dashboard directly from the Canvas menu:
The Annoto Insights Dashboard is displayed.
Go to one of the video where you have Annoto.
Based on your organization setting, you will have one of the following two options:
After clicking the Icon , you will see Annoto Dashboard launch
If you click on the menu , you should then click on the Annoto Dashboard:
to learn about the amazing analytics the dashboard provides and all the insights that can be gained from them.
In this short demonstration, we'll show you how to create a student assignment for submitting a video for review.
This process allows both peers and instructors to provide feedback on the student's assignment by using in-context comments provided by Annoto.
Here's the workflow you can follow:
Set up the assignment.
Establish rubrics that include the desired criteria.
Have students submit their assignments.
Instructors can then review the videos, provide feedback, and assign a grade based on the rubrics and criteria they have set.
All of this can be done within the Grade Center of Blackboard!
That's it! This process allows for effective peer review and makes grading more structured and efficient.
1. Login to Blackboard as an instracture
2. Click on "Assigments"
3. Click on adding "Assignment"
4. Click to add the assignment name
5. Create the desired Rubrics
6. Define the criteria to be used and the corresponding weights for grading.
7. Click to submit the assignment.
8. Now, let's outline the workflow for students to submit their videos for feedback purposes.
9. Click on the "Add content"
10. Click on Embed Kaltura Media
11. The students have two options:
They can upload an existing video they have already recorded.
They can record a video directly using Kaltura Express Capture.
12. When they use Kaltura Express Capture, a window will appear, giving them the option to record using thier camera.
Once done, they simply click on "Save and Embed".
13. Finally, click on "Submit."
14. Now, as an instructor, we will review the student assignment and provide feedback. We have the ability to annotate it using Annoto. To access the submitted assignments, click on the Grade Center.
15. Click here to view the student assignment.
16. Click here to see the submitted video.
17. Provide your own time-based feedback in the form of text and video using Annoto comments. Assign a grade based on the specific rubrics you have defined. And the best part is, you can perform all of these tasks directly within Blackboard!
Have questions? Contact us at [email protected]
Learners’ Interaction is a way for learners to share thoughts, theories & ideas, and in some cases - even feelings (For example: users sharing how the video made them feel).
Learners can use the platform to interact with one another, regarding video content:
Introduce themselves
Ask questions
Share thoughts
Some courses include learners from different regions, backgrounds or even countries. Starting a course with learners introduction can overcome social distancing, help the learners feel more comfortable and encourage collaborative learning.
Learners can introduce themselves as part of the discussion (the instructor can invite the users to introduce themselves), or even as an introduction video (on which other users can comment).
There is a lot that a learner can learn from his peers. Asking questions will not only help the learner to have a better understanding of the video, but can also expose learners to other ways of thinking.
Having the opportunity to share one's personal view of things can create meaningful discussions between learners, the kind that nurtures outside of the box thinking and celebrates similarities and differences between learners.
For a learner, being able to answer others' questions means to take a step forward in terms of learning. When learners are given the legitimization to answer their peers, their answers become more in-depth, established, and based on knowledge, as the responsibility to provide a good, relevant, meaningful answer is on their shoulders.
Since the discussion between learners contributes to their learning experience by being exposed to additional ways of thinking, being able to record themselves can open up the discussion even more.
Learners can now see and hear their peers, better understand their tone, their ways of thinking or the meaning of their insights, by seeing them explaining it.
It also enables the viewers to introduce themselves.
The instructor can choose whether to take an active part in the discussion or not (the from the , enabling the ability to read the comments of all the videos in one place). The dashboard can also give a full image of the engagement and participation of the users in , as well as in the .
Want to share with us other benefits and usages of Learners Interaction? We'd love to hear them! to tell us.
You can stay on top of things by following the discussion.
Following a discussion means you will receive a notification email whenever someone replies to your comments in a discussion or whenever a new comment is added to the conversation.
Following\ Unfollowing the discussion is done via the Annoto menu.
By default, you will not be notified on new comments.
Following a discussion is by either of the following:
Adding a comment in the Comments space (once you add a comment in the shared comments area in a specific video, you will be notified on replies and new comments created in this video).
Following a video via the Annoto menu
You can follow the video discussion without adding a new comment by clicking the Bell icon in the Annoto menu:
Instructors can choose what they want to follow:
Follow this discussion - means receiving notifications for new comments & replies that are added in this specific video
Follow this group - means receiving notifications for new comments & replies that are added in any of the videos in the course\ channel.
In order to be a follower - the bell should be green. When the following-bells in the menu are clear - no notifications will be received, as can be seen here:
You can enable/disable which email notification you will get from Annoto in "my Space". Accessing it is from the Annoto menu:
Choose which email notifications you would like to receive:
Followed Groups - once enabled, you will be notified on new comments and replies in the videos within the group (course/ channel, etc.)
Followed Discussions - once enabled, you will be notified on new comments and replies in this discussion (video)
Replies - once enabled, you will be notified when a comment you wrote received a reply
Toggle right (green) = Enabled
Toggle left (grey) = Disabled
Please note that if you disable notifications in the preferences, you will no longer receive any emails for any of the videos in the course.
Want to control which notification you receive? You can manage the Annoto discussions in all the videos from the Annoto menu. Click to learn how.
You can also follow\unfollow the discussion from the Annoto Dashboard. Click to learn how to do so.
The Annoto User Space is a personal space where users can see and edit their details, see personal stats for reflection and export personal notes for the whole course.
User Space can be accessed from the main menu:
The user space includes 2 sections:
My Space
Activity Feed
The User Space helps learners to reflect on their entire learning activity in the course and provides a quick access to all new comments & replies in the video they are following.
My Space presents your profile info, as well as your activity throughout all the videos in your courses, for example:
Number of comments you added in the Comments Space
Number of personal notes you added in the Comments Space
My Space also enables you to export your personal notes on course level. Click to learn more about this option.
The activity feed helps users stay updated with everything that interests them :)
The Activity feed can be accessed by clicking on the "Feed" Tab in :
In the activity feed you can see all the latest activity that happened in the Comments space (the Annoto shared environment) in the videos that you are following.
To learn more about following, click
You can see the activity in two aspects:
Me – shows only content submitted by you
Everyone – shows all the activity in the videos that you are following
Here is an example of what you can see in "Everyone" mode:
Once Annoto is enabled in your course, it is automatically added to videos that are embedded in Brightspace (D2L).
In order to use Annoto in a video within your Brightspace (D2L):
1. Under Content tab: Click "Add Existing":
2. Choose: "Annoto Quicklink":
In the Embed Annoto Quicklink window, add the URL (in [Embed Code\ URL]):
4. Add the video title.
If you want – you can set the embed aspect ratio and the embed size:
5. Click Embed
6. Annoto will be automatically added to the video
You can access the Annoto Dashboard in two ways:
From the Course Level
From the Video view
You can access the Annoto Insights Dashboard directly from the Brightspace (D2L) navigation bar:
The Annoto Insights Dashboard is displayed.
Do not have Annoto Dashboard in the NavBar?
Go to one of the video where you have Annoto.
Based on your organization setting, you will have one of the following two options:
After clicking the Icon , you will see Annoto Dashboard launch
If you click on the menu , you should then click on the Annoto Dashboard:
to learn about the amazing analytics the dashboard provides and all the insights that can be gained from them.
A flipped classroom is pedagogical approach where learners first explore new course content outside of class by viewing a pre-recorded lecture video or digital module. This is the reverse of the more common practice of introducing new content at class, then assigning homework and projects to completed by the learners independently in an asynchronous way.
Welcome to the Annoto Dashboard!
The Annoto Dashboard provides full management and analytics capabilities in order to shed light on learners' video consumption and behavior within Annoto in-video collaboration widget, providing you with analytics and insights on their activity in the course.
Annoto enables learners to contribute, share and learn together, promoting an interactive group experience. Annoto allows learners to lean forward, become actively involved and return to the video content, sharing ideas and learn with their peers and instructors. For example, learners can ask questions on specific moments in the video that they didn’t understand and get notified when answered, or engage in meaningful conversations on the content. All the interactions are time-tagged, and therefore are kept in the context of the video.
Each user can also see who in online and have a 1*1 chat with any of the other participants and in addition, users can manage a personal notebook where they can reflect on the video content, add bookmarks and can add additional information (e.g., videos and web links).
Powered by comprehensive analytics and insights, Annoto sheds light on users and their interactions within the video content, shedding light on how and when users interact with the video content and with each other.


(Multiple correct options can be selected by the learner.)


If mastering a new technology is not something your schedule allows, we recommend a simple and effortless approach to reaping the benefits of Annoto without the learning curve:
Notetaking. Encourage students to use the personal notes feature to summarize video content, bookmark important moments, and document their thoughts and questions. Notetaking offers a private space for students to get more out of their video experience. Notes are time-tagged to the video and can be exported and saved.
Analytics. Get insights into student interactions. Use the dashboard to access comprehensive analytics that include activity trends, interaction types, completion, and more.
Note: This features will be enabled by default in the interactive widget
Ready to try something new but don’t want to get too deep in the weeds? In addition to notetaking and analytics, we recommend the following:
Comments. By allowing comments, instructors convert passive video viewing into an interactive group experience. Students engage in meaningful conversations about the content, asking questions and sharing ideas with peers and instructors. For large courses, instructors can limit discussions to a more manageable Q&A format. See tips for encouraging discussion with in-video comments.
Quizzes. Engage students with true/false, multiple, choice, or multiple answer quizzes. Choose the moment in the video a question will appear, assign points, and create responses for correct and incorrect answers. Modify settings to allow additional attempts or video replay, set time limits, and shuffle answer order.
When the power of in-video collaboration is fully embraced, it can help foster connections with and among students, enhance instructor “presence”, and improve learning. For a deeper look at Annoto's capabilities, that can be tailored to fit any use-case. try the following:
Annoto Preferences – With Annoto Preferences, you can easily decide what capabilities you want to enable on a course or video level, creating active learning experiences quickly.


Mentions - once enabled, you will be notified on comments that you are mentioned in


Here is an example of how to add a video via Page:
Turn Editing On
Add an activity or resource
Choose Page
In the page:
a. Add a name to the page
b. In the content window:
Click on the Link icon:
c. Enter the URL of the video that you are interested in:
d. Click Create link
e. Save
Annoto will be automatically added to the video.
In the page:
a. Add a name to the page
b. In the content window:
Click on Insert or edit an audio\ video file icon:
c. Click "Browse Repositories":
d. Choose the media you would like to add and click "Upload this file"
d. Save
Annoto will be automatically added to the video.
Please note: the size of the media that can be uploaded to Moodle depends on the settings of your organization. Any video that your Moodle enables to add - Annoto will be added to.
The Annoto Insights Dashboard provides comprehensive analytics and insights about the users and their interactions, giving a view on how and when users interact with the video content and with each other.
In case the Annoto Dashboard is not automatically added to your course, adding the Annoto Insights Dashboard is done via "Add an activity or Resource". Adding the dashboard once for each course will provide analytics and insights for ALL course videos and users.
You can access the Annoto Dashboard in two ways:
From the Course Level
From the Video view
Turn Editing On
Add an activity or resource
Choose Annoto Dashboard
4. Add Activity Name
5. Save
The Annoto Analytics Dashboard is displayed.
Go to one of the video where you have Annoto.
Based on your organization setting, you will have one of the following two options:
After clicking the Icon , you will see Annoto Dashboard launch
If you click on the menu , you should then click on the Annoto Dashboard:
Click here to learn about the comprehensive analytics the dashboard provides and all the insights that can be gained from them.

In online learning flipped classroom, learners are requested to watch a video before a synchronous session. During their watching, they are required to complete tasks, such as:
Answer questions in the comments space (in this case it is recommended to add questions in specific parts of the video in advance [prior to asking learners to watch it])
Share their thoughts\ questions\ impressions of the video in the comments space
Have a discussion with their fellow learners (reply to their peers' comments and questions)
Summarize the new content in their Personal Notes, and then share what they have learned with fellow learners (teach them, or share insights on the new content)
Can watch the video multiple times (as many as needed), at his own pace, can ask questions in advance (no need to wait until the learning session), and get guidance to the process of watching the video
Can highlight important moments in the video, summarize, or bookmark things in the personal notes, then export them and bring them to the next session
The video, as well as the discussion, are constantly available, thus enabling the learner to go back to the video at any given moment, to re-watch, to read the discussion, to learn and to find new thinking angles
All learners can watch the video at the same time, or each of them on their own time - extremely flexible
The Instructor:
The Annoto Insights Dashboard sheds a light on the learning that took place
The instructor can see the questions that were raised during the learning process (prior to the session this content will be discussed)
The instructor knows in advance whether there are topics that need further clarifications
The session can be planned in advance, based on the questions and comments that were raised in the comments space
The Annoto Analytics and Insights Dashboard provides insights on the activity in the video, thus in addition to viewing learners' participation & understanding (a lot can be learnt not only from learners' comments, but also from their replies to one another), it can help planning the next session, based on the discussion in the video:
How many learners watched the video (and what percentage of the video each of them watched).
Which learners commented in the video? Who replied to fellow learners?
What comments were written? You can read the entire discussion. This allows you to:
Plan how to navigate\ manage the class discussion
See if there are any issues\ topics in which learners may be struggling and need further assistance\ explanation\ examples.
Want to share with us how you used Annoto in your Flipped Classroom? We'd love to hear that! Click here to tell us.
The dashboard provides a number of views allowing to get a quick glance on the course activities and gradually dive into details up to insights on single user activity on a specific video.
The main views are:
Course View - contains course management hub, insights and preferences.
Video View - allows to manage the discussion, provides detailed insights, evaluate the assessment results and customize preferences for the specific video.
User View - provides detailed insights on specific user activities within the course.
Most of the main views contains the following tabs:
Look for and for icons in the dashboard to get quick information and links to the relevant details docs.
The Navigation Bar (at the top of the page) is bread-crumbs-style navigation system that indicates the view you are in and allows quick navigation.
For exmple, the above navigation bar shows Video View of a video called "Climate Change 101" in a course called "Annoto". Clicking on the course name will take you back to the Course View.
To navigate into more specific view, simply click on one of the rows in the hub or on a row in any of the tables in the insights tab.
For example:
In the Course Hub, clicking on any of the video rows takes you to the discussion within the video.
In Insights Course Videos table, clicking on a video row takes you to the Video View of that specific video.
In the Insights Course Users Activity table clicking on user row takes you to the User View of that specific user.
At the bottom of each table, you can find the controls bar:
On each Insights tab of the dashboard the date range controls allows to set the preferred period for the analytics.
The time period can be set by clicking on the date range. This will open a calendar in which you can choose your preferred dates (choose "from", "to" and click "apply") :
You can subscribe to be notified on new comments posted in your course directly from the dashboard.
In order to subscribe to email notifications, all you have to do is click on Follow this Course button at the top right part of the dashboard:
Once you see "Following", you are subscribed and will receive email notifications for every new comment (or a reply) that was added in any of your course videos.
New, not reviewed comments can always be spotted in the Hub.
Under Course Content page:
Go to Build Content
Choose Annoto Widget Embed
3. In the Annoto Widget Embed window, add the URL (in [Embed Code\ URL]):
4. Add the video URL and the video title.
If you want – you can choose the embed aspect ratio and the embed size:
5. Click Embed
Annoto will be automatically added to the video.
Under Course Content page:
Go to Build Content
Choose Content Folder
3. In the Content Folder window, add the name of the activity
4. In the Text window, click on the Plus icon (called: add content):
5. In Add Content window, choose Annoto Widget Embed
6. In the Annoto Widget Embed window, add the URL (in [Embed Code\ URL]):
4. Add the video URL and the video title.
If you want – you can choose the embed aspect ratio and the embed size:
5. Click Embed
Annoto will be automatically added to the video.
6. Submit the activity
You can access the Annoto Dashboard in two ways:
From the Course Level
From the Video view
Go to your Course Management menu
Click on Course Tools
Choose Annoto Dashboard
The Annoto Insights Dashboard is displayed.
Go to one of the video where you have Annoto.
Based on your organization setting, you will have one of the following two options:
After clicking the Icon , you will see Annoto Dashboard launch
If you click on the menu , you should then click on the Annoto Dashboard:
Click here to learn about the amazing analytics the dashboard provides and all the insights that can be gained from them.

Annoto adds an interactive layer to the video content that consists of :
In-Video Collaboration Widget
Interactive Timeline
Every comment is time-tagged, meaning everything you write is always in the context of the video. Clicking on the time-tag of each comment takes to the exact moment in the video it refers.
Annoto In-Video Collaboration Widget allows to collaborate with the learners, ask questions, take notes and much more - always in the context of the content.
Using the colored tabs, a user can move between “Comments” and “Personal notes” (You can also do it via the “Menu” button).
Here is a closer look on the In-Video Collaboration Widget
At the bottom of the video, there is the interactive timeline that provides a visual representation of the comments\ notes at the Annoto widget (in accordance with the tab that is currently presented). The comments are represented by the colorful bars on the timeline.
The height of the bars represents the number of comments (or notes) and the colors represent their sentiments (if no sentiment was used, bar will be grey).
Clicking on one of the bars (comment indicators) in the timeline:
Takes you to that exact moment in the video
Scrolls the discussion to the relevant comments for this moment
The Annoto Comments Space provides you with a one-click-away conversation with anyone on the video:
Ask your learners questions about a video
Share your ideas & thoughts
Answer learners' questions
Share examples, or ask the learners to share
Add links and videos as comments
See the level of understanding of your learners
Place translations or clarifications to words, phrases or ideas in the exact place in the video that they appear
The Annoto User space reflects entire learning Activity Feed (comments, replies, and more) in all the course videos:
For a quick tour of the User Space, please see this short video.
People Space gives you an overview of the video viewers, to see who is online at any given moment. You can invite any participant (whether online or offline) to a private conversation (a 1*1 chat).
Manage your very own personal notebook:
Highlight specific moments (important parts in the video, things you want to discuss with the learners, topics you wish to focus on, key questions for the exam, etc.).
Add your thoughts and insights (they will be visible only to you).
Learners can Summarize and Bookmark the video for exam preparation.
Export into document for offline review
Annoto Interactions enable you to keep the learners engaged in additional ways, such as: quizzes, polls, surveys, etc.
Each interaction includes a bundle of settings, created specifically to match the needs of it, and after choosing the settings, you will be able to review the final result of the interaction that was created.
The Annoto Dashboard was designed in order to shed light upon learners' video consumption and behavior within the Annoto in-video collaboration widget, providing you with analytics and insights regarding their activity in the course:


The rich text editor enables users to create and format content using a wide range of styling options. It includes features like bold, italics, underline, headings, bullet points, and numbered lists. Users can also add links to enrich their content.
This guide explains how to use these tools in Annoto, making it easier to design visually engaging text.
Steps:
Enter '1.' and press space
Enter some text
Press Shift+Enter
Enter some more text
Result:
A formatted numbered list should be created
When Shift + Enter pressed twice the formatted list mode should exit back to regular text
Steps:
Enter '*' or '-' and press space
Enter some text
Press Shift+Enter
Enter some more text
Result:
A formatted bullet list should be created
When Shift + Enter pressed twice the formatted list mode should exit back to regular text
Steps:
Write some text giving the hyperlink a name
Select the URL of choice and copy it
Select the text to be a hyperlink
Press Ctrl + V or Cmd + V (on Mac) to past the URL link
Result:
The selected text should become a hyperlink
Other text should remain regular
Steps:
type one of the special character combinations and press space
Some examples:
:)
;)
:@
<3
d:
Result:
the characters should be replaces by an emoji
Steps:
Enter some text
Enter '**' type text to be bold, and enter a closing '**'
Type some more text
Enter '*' type text to be Italic, and enter a closing '*'
Result:
Text that was entered between **some bold text** should be bold
Text that was enterd between *some italic text* should be Italic
Text that was enterd between ==highlighted text== should be highlighted
Steps:
Enter '>' and press space
Enter some text
Press Shift+Enter
Enter some more text
Result:
A formatted text should be created
When Shift + Enter pressed twice the formatted text mode
Steps:
Enter some formatted text using steps 1-6
Press Ctrl+Z and Ctrl+Shift+Z (Cmd instead of Ctrl for MAC) to travel in history changes
Result:
Undo and redu functionality using the shortcuts should work
Steps:
Enter '$' character
$
Results:
Math editor popup should open
2. Focus should be placed in the editor text area
Copy past LaTeX equation
Hit 'Enter' keyboard and click on V button
The popup editor should close
Math equation should be rendered
3. Clicking on x button or 'Esc' Keyboard key should close the popup and allow entering regular text for exampl $12
4. The 'V' button should be disabled (until text is entered)
In this brief demonstration, we will show you how to create a peer review process using a video that a student has submitted.
This process allows both peers and instructors to provide feedback on the student's assignment by using in-context comments provided by Annoto.
Here's the workflow you can follow:
Set up the assignment and the peer reviews.
Establish rubrics that include the desired criteria.
Have students submit their assignments and review each other's work.
Instructors can then review the videos, provide feedback, and assign a grade based on the rubrics and criteria they have set.
All of this can be done within the SpeedGrader of Canvas.
That's it! This process allows for effective peer review and makes grading more structured and efficient.
Click on "Assignments"
Click on the "+ Assignment" button to create a new assignment.
4. Please provide the name of the assignment. for the example we will use "Peer Review Workflow demo"
5. Select the Submission Type as "Online" and also check the "Text Box" for the Online Entry Option.
6. Choose your preferred method for assigning peer reviews:
Manual -
Automatic
7. In this example, we will utilize the Manual Assign Peer Review option.
8. Once you have everything ready, click on the "Save" button.
9. We'll have Student 1 and Student 2 review each other's assignments.
10. Click on the option "Give student2 another submission to assess" and select student 1.
11. Click on the option "Give student1 another submission to assess" and select student 2.
12. We'll log in as student 1 to submit the assignment.
13. Click on "Peer Review Workflow demo"
14. Click to "Start Assignment" and then click on "Embed Kaltura Media"
15. Choose between using "Express Capture" to record your camera or uploading a pre-recorded video. Once you have made your decision, click on the option to embed the video.
16. Click on "Submit Assignment"
17. Click on "Required Peer Review 1"
18. Click on Student 2 to review their video assignment.
19. I, as Student 1, now have the ability to provide feedback on Student 2's assignment using time-based comments (Text & Video) through Annoto.
After Student 1 and Student 2 have provided feedback on each other's assignments, I, as an instructor, can review their assignments and assign a grade using Canvas SpeedGrader.
21. Click on "Peer Review Workflow demo"
22. To review student submissions, click on "SpeedGrader."
23. In this view, you have the ability to:
Review Student 2's video submission and also review Student 1's feedback.
Provide your own time-based feedback in the form of text and video using Annoto comments. Assign a grade based on the specific rubrics you have defined.
And the best part is, you can perform all of these tasks directly within Canvas!
Have questions? Contact us at [email protected]
One of the best ways to improve skills is to learn from feedback. Peer review takes Skills Development to the next level, enabling a learner to learn from their "audience", as the fellow learners provide the feedback, sharing what they learned from the performance, offer additional ways to perform\ improve the skill, etc.
A learner uploads a video, fellow learners provide time-base feedback on the performance.
The learners who provide feedback, not only share their impressions and what they’ve learned from the video, but they also get to learn from their peers, see how they chose to perform and formulate their own do's and don'ts list.
Instructors can guide the learners how to maintain a high level of discussion and what to focus on. In addition, they can have full control on the discussion, as they have the ability to delete comments if needed (deleting can be done both from the Annoto widget and from the dashboard - for you to choose).
When providing feedback to peers, video as a comment can enrich the discussion, by providing feedback that is not only in writing. Fellow learners can record themselves sharing their thoughts, providing additional ideas and ways of how to perform the skill that is presented, or even share their screen to demonstrate a specific ability.
The provides analytics on each viewer's (video completion), (number of comments, replies and notes), as well as provides a quick and easy .
Have any questions? Anything you wish to tell us regarding peer review? to contact us.

The Annoto allows you to add notes that are visible only to you.
Learners use their personal notes to summarize the video, bookmark and highlight specific moments.
Instructors use their personal notes to reflect on the content, add insights based on the discussion in the Comments Space and plan ahead based on these insights (an instructor's personal note can be for example: "remember to provide an additional explanation to this topic\ share examples".)
These analytics can provide insights that can be used for grading, for identifying at-risk learners and for getting a general idea of what is the progress of each of the learners in the course.
Accessing the User View is done when clicking on a user's row in the Users Activity table in the Course view. The user view dives into the user and presents their activity throughout the course.


Press Shift + Enter, two times
Press Shift + Enter, two times
Type some more text
Enter '==' type text to highlight, and enter a closing '=='
Type some more text
Press Shift + Enter, two times
Once you move to the “Personal notes” area, the interactive timeline will visualize only the notes you added.
If you want to add a personal note, all you have to do is start typing in "Write a personal note..." section. The video will be automatically paused (so you won't miss anything while writing).
Each note can get a sentiment, just like in the Sentiments in the Comments Space
Once your note is ready, simply hit Enter, or click the send button (green arrow, as you can see in the image below):
If you wish to move to the next line in your note, click Shift + Enter.
You can format your messages:
Ordered list (Type 1. (or any other number followed by a dot) at the beginning of a new line and it will magically transform to ordered list)
Bullet list (Type * , - or + at the beginning of a new line)
Shift + Enter to a new line
Emojis (Add smiley faces, hearts, winks etc. by typing their shortcuts and a space after them: :-), <3 , ;) or :p )
Bold - Type double asterisks for **Bold text**
Italic - Type underscores for _Italic Text_
Highlight - Type equal signs ==like this== to highlight
Blockquote - Type > at the beginning of a new line
You can also add videos as your personal notes.
Adding a video as a note is done the same way as adding an external video as a comment
The video will be embedded in your personal notebook, as you can see here:
All the personal notes can be exported, both of a specific video and of the entire course.
Your personal notes of a video can be exported to docs or xlsx, directly from the Annoto menu:
Once you click on the “Export” button, you get to choose the format for exporting your personal notes (spreadsheet or a document).
If you're having trouble to decide - you can export to one format and then to the other. There is no limitation for the number of times a user exports.
Each exported file contains:
Course name
Video name
A link to the video
Video duration
The notes are sorted chronologically, and for each comment you can see:
Its timetag (the time of the video it was written at)
The date it was written
The note’s sentiment (if there was any)
For a quick video of how to export your personal notes, click here.
All the personal notes that were written in all videos of a course can be exported from My Space.
This way each user can have his own personal journal of the course.
You can learn how to export your course notes from My Space here.
Learners can use their personal notes to summarize the video, reflect on the content, add questions\ thoughts\ ideas\ insights that only they can see and bookmark specific moments. The notes can be exported and then be edited, printed, submitted or sent. You can encourage your learners to use their personal notes for their needs.
Instructors can use their personal notes to reflect on the content, add insights from the discussion in the comments space, and plan next steps based on these insights (such as: referring to a specific topic that was raised in the discussion, adding examples or sharing another explanation with the video viewers (in case they are struggling, for example) and even make changes in the course content before next semester, based on insights from this semester).
The personal notes can be used for assignments. You can read all about it here.

People
Chat
The people tab enables to see all the users in the course and their presence, thus helps to decrease the loneliness of the learner and to set expectations (when inviting a user to chat – if the user is not online, an instant reply cannot be expected).
Users in People tab are in the following order:
First – all the users who are online (will be indicated by a green dot) – organized in an alphabetical order
Then – all offline users (will be indicated by a grey dot) - organized in an alphabetical order
Clicking on a user’s name will show the user’s details and the option to chat with them:
Of course - there is also the option to search for a specific user:
Clicking on “Chat” button will open a conversation with that person.
Click “Type a message” to chat.
The one-on-one conversation provides the opportunity for learners to discuss with one another regarding the learned material, hence empowering the learning process with private discussions between learners. It also enables instructors a private discussions with any user in the group (TA’s, learners, etc.).
Clicking on the Chat tab shows all the users you have conversations with (and the last message that was written).
Clicking on any of the conversations shows all previous messages with that person.
Once a new chat message was sent to a user, the user will see an indication with the number of new messages:
Clicking on the chat enables to read the messages and dismisses the indication for new messages.
The chat enables a richer experience of writing, same as in the Comments Space :
Ordered list (Type 1. (or any other number followed by a dot) at the beginning of a new line and it will magically transform to ordered list)
Bullet list (Type * , - or + at the beginning of a new line)
Shift + Enter to a new line
Emojis (Add smiley faces, hearts, winks etc. by typing their shortcuts and a space after them: :-), <3 , ;) or :p )
Bold - Type double asterisks for **Bold text**
Italic - Type underscores for _Italic Text_
Highlight - Type equal signs ==like this== to highlight
Blockquote - Type > at the beginning of a new line
In addition to a private discussion, the Annoto 1*1 chat in the People Space can be used as another way for instructor to provide feedback to a learner, as part of the Skills Assessment use case.

The overview section presents aggregated analytics regarding the activity of this user in all course videos.
The Overview includes a completion funnel as well as the user's videos consumption in the course.
The completion funnel sheds light on the user's total activity in the course
Views - Number of times the user viewed videos in this course. For more details please refer to How Views are counted.
Watched Time - total number of seconds the user has watched in the course (for all course videos).
Total Videos - Number of videos in the course.
Watched Videos - Number of videos viewed by the user.
Total Completion - sum of of Watched Videos divided by number of videos in the course (how much of the course videos the user has finished watching).
The video metrics (on the right of the Course Video Completion Funnel), provide insights on the user's video consumption habits.
Average Completion Rate -Sum of percent watched in each view session divided by number of views. This metrics helps answer the question of how well the user performs in terms of dropout.
Average Total Completion - Average Total Completion of all the watched videos. Total Completion is aggregated video completion for all view sessions (video coverage).
Average Watch Time - Average Watch Time of all the videos. Watch Time is aggregated number of seconds watched in all view sessions.
A "perfect" watching experience would be indicated by an equilateral triangle (all edges should be the same, and as close to 100% as possible).
If one of the edges is significantly longer - you may want to pay attention to the user.
For example - In the Video Consumption image above:
The Avg. Watch Time is 248%, meaning: on average, the learner watched the videos in the course more than x2 of their duration.
The Avg. Completion Rate is 2%, meaning: on average, every time the user played a video, this user watched only 2% of it (the user watched only a bit of the video every time they played it).
The Avg. Total Completion is 79%, meaning: on average, the user covered 79% of each video in the course.
Recommended further reading: How to better Understand the Users by using Participation and Engagement Metrics?
In addition, we can find the aggregated activity metrics made by the user in the course:
Views – Number of times videos were viewed in this course by the user. For more details, please refer to How Views are counted.
Engagement – Rating for user generated content creation and consumption for the course. For more details please refer to How engagement is measured.
Collaboration - Number of comments and replies the user has submitted in all course videos.
Notes - Number of personal notes the user has submitted in all course videos.
The Activity in Course Videos table provides analytics about the user's activity in each video within the course.
The table can be sorted by each column to quickly find videos the user is most active on in the course by the selected category. For example: video the user is most engaged in, or video for which the user has the highest or the lowest Average completion rate, etc.
Last Activity - Date when the user was last active in the video.
Views - Number of times the user viewed the video.
Avg. Completion Rate – Sum of percent watched in each view session divided by number of views. This metric provides user's dropout rate for each video.
Total Completion – Aggregated video completion for all view sessions the user had (video coverage).
Watch Time(%) - Aggregated number of seconds the user has watched in all view sessions. The metric is shown in percentage .
Engagement - User's score for creation and consumption in this video. For more details please refer to .
Collaboration - Number of comments and replies the user added in the video.
Replies - Number of times the user replied to a comment in the video.
Notes - Number of personal notes.
Thumbs Up Badges - Number of likes on comments the user received from Educators.
Duration - Video duration.
To learn more about completion metrics we highly recommend reading: What is Total Completion, Average Completion Rate, Watch Time and why should I care?
Recommended further reading: How to use tables sorting for better insights?
Recommended further reading: Using the Activity Trends to Learn about Users Progress.
Might also interest you: How to use Activity Trends graph To
Hub
Enables management of the content
Insights
Provides analytics and insights about the content and the users
Preferences
The place to set features and UX for the course or specific video


When Video as a comment is enabled, Annoto users can reply not only with text, but also in any of the following recording options:
Self-recording (Camera)
Screen recording
And just like everything that happens in Annoto, this ability is also performed within your LMS (without having to go to a different platform) and without the need to download anything.
In order to record a video as your comment:
Click “Add a comment” in the Annoto widget
2. Click the video camera icon:
3. Choose what you want to record: Camera or Screen
4. Select the settings (Microphone\ camera)
If you chose Camera – you will see at the left bottom a screen of what will be recorded
5. Click “START RECORDING”.
6. You can pause the recording anytime by clicking the Pause button and you can continue recording by clicking on the red button:
7. Whenever you want to end the recording, click on the Stop button:
8. Now you can choose what you want to do with the recording:
a. Post – will add the video as a comment
b. Click the X button – will not save the video.
In case you clicked the X button, and you want to record again – click on the video camera icon in the comment and start recording.
The video will be added to the discussion, as you can see here:
You may also see how to do so .
Here are a few examples of how video as a comment can be used to expand and enrich the conversation:
The ability to record a video instead of writing an insight, comment or feedback can be a great time-saver for some people.
Instead of typing your thoughts, you can just say what you have in mind. This can save you some precious time.
If one picture is worth 1000 words, imagine the worth of a video recording!
A video feedback combines not only the content of the feedback, but a lot of additional added value: the tone of what is said, body language, hand gestures - all of these create a much more comprehensive way of expression.
Recording the screen opens a world of possibilities in the ability to show how to do something, instead of explaining it.
This can be used to demonstrate how a program works, to show how to find something in your device, to demo how to change settings, to focus the viewers on a specific location in your screen, etc.
Video as a comment can be used to strengthen the introduction between all video viewers - Learners & Instructors. Anyone can add a self-recorded video, answering a specific question (such as: "why did you choose to take this class?"), or telling about themselves.
Can be used, for example, at the beginning of the semester, where the instructor and the learners introduce themselves in a video – can be a great ice-breaker! 😊
When teaching languages, pronouncing has a huge meaning. Video as a comment can be easily used to demonstrate how to pronounce a specific word, phrase or even a letter.
The instructor can record the correct way to pronounce and\or ask the learners to record themselves doing so.
When a video is created, feedback can be given in several ways.
Adding time-base written comments is one of these ways. By recording your screen as a comment, you can also show exactly what you are referring (in terms of a specific part of the video, as well as a specific location on the screen).
Sometimes the easiest way to help a learner understand is to give them a real, visual example of what you’re talking about.
You can also learn more about video as a comment in the Annoto Use Cases .
In order to record video as a comment, no need to download anything or to go to a different platform. All is within your environment!
If you want to make sure everything is set up for recording, feel free to check out this list:
Internet connection – Internet connection must be stable.
Make sure you have a 0.5 Mbps (500K) internet speed.
You can check your internet speed .
Browser
Make sure your browser is always up to date. If you are not sure, feel free to check it .

\sum{\vec{F} } = \vec{0} \Rightarrow \frac{d\vec{v}}{dt} = 0 


If possible, a wired connection is preferred.
Equipment (Camera\ Microphone)
Make sure you are not currently using your camera in a different app (a camera can be used only in one application at a time).
Make sure your browser permissions allow using the Microphone and Camera.
If you need to enable your microphone and camera and no prompt has shown, you can see how to set it .
If a prompt shows up, make sure to allow using the camera and microphone:


Replies
Personal Notes
Engagement is measured as a score for creation and interactions users have with UGC. Example of actions that contribute to the score: comment, reply, write a personal note, read reply, click on time-tag, like, etc.
Actions such as video play/pause are not counted as engagement.
View is counted as first play of the video in a session. If user plays/pauses the video number of times while watching, it is still counted as single view.
Total Completion is aggregated video completion for all view sessions a user had, it provides a metric for video coverage. This metric answers the question of how much of the the video a user has finished watching over time.
Average Completion Rate is sum of percent watched in each view session divided by number of views. A metric for determining how well the video performs in terms of dropout. This metric answers the question of how much of the video the users watch each time they view it.
Watch Time is aggregated number of seconds a user watched the video in all view sessions over time. Usually this metric is shown in percentage for convenience to be comparable to the completion metrics and to be comparable between the different videos.
Average Completion Rate side by side with Total Completion and Watch Time, provide comprehensive view on how users consume the video content, do they finish watching most of the videos at each play, do they watch it in many short sessions, do they watch same video segments multiple times, etc.
By Clicking on a column's title in any of the tables will sort it top to bottom.
Recommended further reading: How to use tables sorting for better insights.
Click on key metric (legend at the bottom of the graph) will toggle it (show/hide), adjusting the scales of the other metrics:
The toolbar at the top right of the graph allows:
- Zoom in on a specific part of the graph.
- move the graph while zoomed in.
- Zoom out to the original view.
- Drop down menu that allows to download the graph in different formats (csv, svg, png).
In the dashboard look for icons near tables, graphs or highlight cards. Hovering them will show a quick informative tooltip.
The metric is shown in percentage for convenience to be comparable to the completion metrics and to be comparable between the videos in the table.
Hovering the mouse over the percentage shows the formatted time in seconds:
On the Video View, click the Video page link: in the Controls Bar.
The toolbar at the top right of the graph has a drop down menu that allows to download the graph in different formats:
For tutorial on how to export all the course data, please refer to Exporting Course Data.
The list of courses to import data from is individual per user, and it contains courses that the user has previously visited.
Only courses that were visited by the user since this release (April 20th, 2023) are shown. If a user only visited the course prior to the release, they will not be in the list.
The solution is simple: all you need to do us visit the Annoto dashboard of the course that the data need to be imported from and then get back to the target course.
The exported CSV files are compliant with the UTF-8 standard. We do this to ensure that it works well when using different operating systems and different software packages to process these CSV files.
If you use Microsoft Excel to open the CSV files, everything works fine when the file contains just English characters. However, you may run into an issue when your CSV file also contains non-English characters (such as é, ç, ü, etc):
Microsoft Excel is unable to properly display UTF-8 compliant CSV files when they contain non-English characters.
To resolve this issue, one of the following approaches can be used:
On a Windows machine:
Method 1:
Open the CSV file using Notepad.
Click "File > Save As".
In the dialog window that appears - select "ANSI" from the "Encoding" field. Then click "Save".
That's all! Open this new CSV file using Excel.
Method 2:
Open Excel and click "File > New".
Click "Data" tab.
Then click "From Text" option and select the CSV file.
Excel will display "Text Import Wizard".
In step-1 of this wizard:
Select "Delimited".
In "File origin" field - select "UTF-8".
In step-2 of this wizard:
Select "Comma" checkbox (important).
Click the "Finish" button.
Excel will display your CSV file - including non-English characters - properly.
Method 3:
Open Excel and click "File > New".
Click "Data" tab.
Then click "From Text/CSV" option and select the CSV file.
In "File origin" field - select "UTF-8".
In "Delimiter", select "Comma".
Click "Load".
You will see the file with the correct characters.
On a Mac:
Method 2 can be used, or alternatively Use the "Numbers" application instead of Excel.


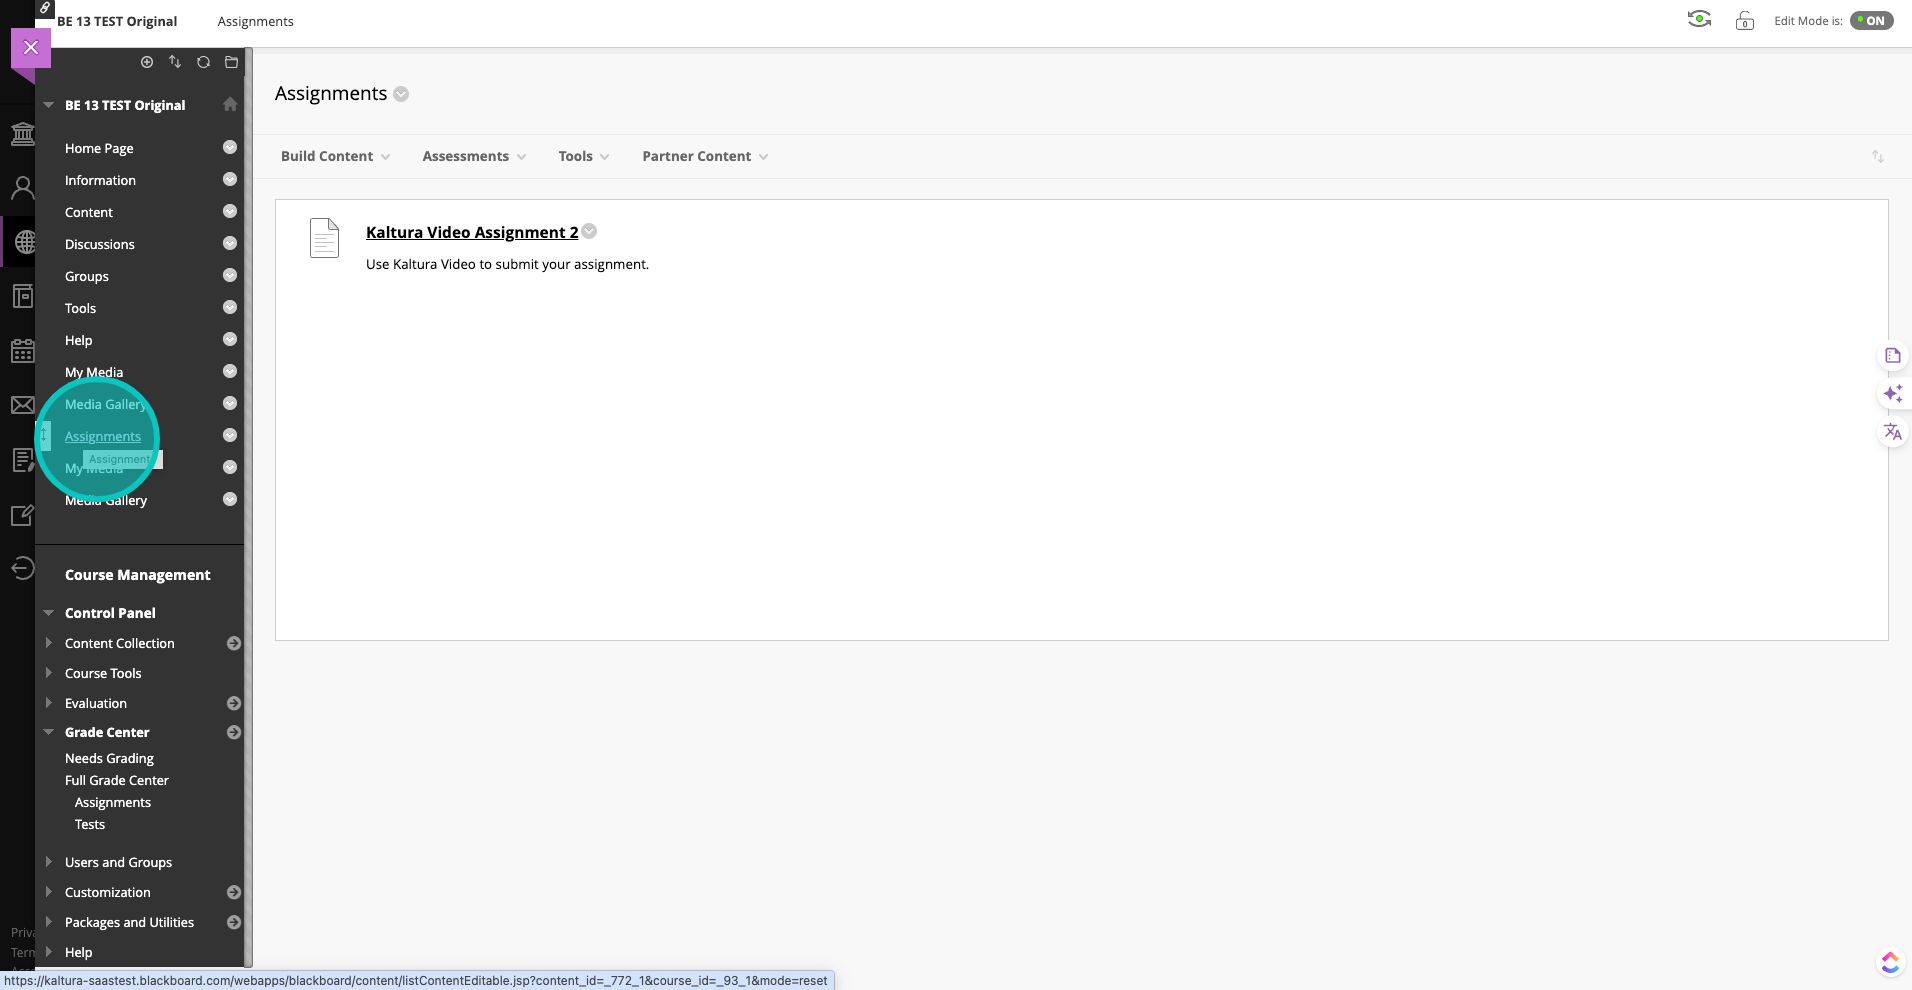
Recommended prior reading material: Course Activity Trends.
Taking a closer look in the Activity Trends graph, can shed light on how users learn overtime.
In the above graph we can focus on the active actions users made in a course, such as comments and replies (collaboration) and see how these actions increased the engagement - not only in the days that the discussion took place, but also in the following days (as users got back to the video, read the comments and replies, clicked on the time tags, added notes etc.).
At the we can use the to learn about a specific user - his activity throughout the course and his learning habits. We can even see how his learning advanced in the course over time.
The Activity Trends graph helps us identify learning patterns by acknowledging dates that had extremely high activity (before\ during\ right after a lecture? before an exam?) and when there was low activity (semester break?). In case we spot low activity when it was not expected, perhaps a comment on some videos, an assignment or a task can re inspire learners to become active.
Let's take this user's activity for example:
From this user's activity trends graph, we can see that about two weeks after the course began (at around Aug 15th ), he increased his level of participation - adding comments (green) and taking notes (orange) on a regular basis. At some point, during course break (Oct 1st - Oct 15th), Hen's activity decreased a little - but not completely. Towards the end of the semester (starting the 2nd half of November), his level of collaboration decreased, however - he did remain engaged until the end of semester (end of November).
Recommended prior reading material: .
A user's engagement indicates active learning, meaning - the user did not only watch the video, but actually had a meaningful interaction with it - either by creating content and\or by consuming it.
In the above example of (Gili Cohen's activity in "Demo" course):
The course includes 22 videos
Gili watched 4 of them – 123 times (for all 4 videos combined)
She finished 12% of the total course content of the 22 videos.
Recommended prior reading material: .
One of the greatest features of the tables in the dashboard is the fact that the columns can be sorted.
This way we can get a better understanding of “the top...” well.. everything!
Sorting the table by the Collaboration column will place videos with most collaboration at the top. High level of collaboration might be an indicator that the video requires additional attention:
It might be extremely interesting and caused a vigorous discussion by the learners. In this case you might be interested in taking a part of the discussion as well.
There might be a part in which the users (all of them, or specific learners) are struggling and it may be helpful to offer your help, provide a different explanation, or share examples.
Sort by to see what videos were the ones that got the most “attention” from learners. Note that the most engaged video is not necessarily the one with the most collaboration, meaning: the content of the discussion is what increased the engagement (and not the number of comments) - might be interesting to take a deeper look in this video.
Sorting the table by the “Users” column will order the videos by the number of users who watched it. It may be interesting to see which videos were not viewed by many users - is it because this video was added at the end of the semester? It's worth investigating further, maybe this video has high drop rate (See Sort By Average Completion Rate below).
Videos with low Avg. Completion rate - means users watched only a little of the video every time they viewed it. It might be worthwhile to understand why - was the video hard to understand? was it not engaging enough? was it too long?
Recommended prior reading material: .
Sorting within the users table also means filtering. Use this feature get a better idea of how many users participated in specific type of activity.
Let’s take a demo course as an example:
In the above example we see there are 19 users in the course, 47% of them collaborated. If we scroll down to the users table and sort by “Collaboration”, we will see exactly how many users collaborated and who they are:
Presence: Sort by Views to see only users that played at least one video. If someone is not on the list - he has not watched any of the course videos yet.
Attention: Sort by Views, if a user has a radical number of views (much more or much less than others), it might indicate on struggling with the content. Diving into , can shed more light by looking at metrics, especially The Average Completion Rate.
Course analytics data can be exported, and dowloaded in CSV format. For more details please refer to :
Once exported, you will receive a zip that contains the following CSV’s:
Overview – the highlights of the course.
Users – Course Users activity (with additional fields such as: user email, votes, last login date).
Videos – Course Videos.
If you need any additional information or have any questions, please contact us at
Recommended prior reading material:
The exported Users table provides comprehensive analytics that can be used for grading, for example:
Participation - learners can be graded for the comments\ questions\ ideas\ answers & thoughts they are sharing:
Collaboration - for example: writing over 5 comments throughout the course grants extra credit
Replies - for example: writing over 3 meaningful replies throughout the course grants bonus points

Gili got 3 "Educator's Thumbs up" in the course for the 10 Comments and replies she wrote (30% is not bad).
She has 102 engagement score indicating a high meaningful activity in the course.
3 of Comments were replies to others indicates level of collaboration and knowledge sharing.
She liked 9 comments written by others.
Finally, she wrote 12 personal notes which can be characteristic of learning (summarising, bookmarking, etc).
Sharing Knowledge:
The Thumbs up column indicates how many Thumbs Up (= Instructor’s “likes”) each learner received. This can be used as extra credit, or bonus points for the learners.
The Replies column can also serve as an indicator to learners who not only take an active part of the discussion, but are actually helping others (replying to other questions). This can also be used as extra credit, or bonus points for the learners.
Quality
Thumbs Up badges - for example: a learner that got more than 5 Educator's Thumbs Up gets extra credit
Course Completion - learners can be graded based Views, Watched video and Completion ratings (available in User View).


Once the interaction type was selected, define its options:
Content
Settings
Preferences
Review
Then, once all is set, publish the interaction.
Note: the interaction will not be visible to learners until it is .
After publishing, there is still an option to edit the interactions.
Phrase the question you want to add.
Phrase the answers to the question. Make sure to check the correct answer (or answers, in case this is a Multiple Answer question).
You can add additional answers by clicking on "+Answer" button:
Set the exact moment in the video that the question will appear.
If video was played when created the interaction, the timestamp will automatically be the moment in the video that you clicked "Create". The timestamp can be manually changed.
Assign the number of points the question is worth. There is no limitation on the number of points you can set.
You may add Feedback to the question, that learners will see after submitting their answer.
In order for the learners to see the feedback, make sure to enable "Answer Reflection" in the Settings window.
When all is set, click Next:
You always have the option to go back, by clicking on "Back" button:
If enabled, reply must be submitted to continue.
Allow retry
If enabled, re-submitting of replies is allowed up to the configured attempts.
You can choose the total number of attempts that are allowed for the question:
Allow re-watch
If enabled, re-watching is allowed after mandatory CTA is presented.
You can manually set the timing of the rewinding in the video:
Time limit
If enabled, submitting of reply will be limited to the configured duration.
When "Allow retry" is enabled, Time limit cannot be set.
If enabled, the order of the answers will be shuffled each time the interaction is presented.
If enabled, reflection and feedback is shown after reply is submitted.
Set where the interaction will appear: as a Popup Modal or as a Side Panel
For Mandatory interactions, Popup Modal presentation is required.
If enabled, video is paused when the interaction is presented.
For Popup Modal, the video is always paused.
Once all is defined, Review window will present a summary of all interaction definitions:
Click "Save" to save the interaction:
When the interaction is created, you can get a preview of it, by going to the 3 dots menu (bottom right) and choosing "Preview":
This will allow you to watch the video and see the interactions that were created, in their exact timing.
Once you are done, click "Exit Preview":
When the interaction is ready - it's time to publish it!
Once all is set, you will see the interaction in the widget, with status "Not Published":
In the interactions tab, click on the 3 dots menu (bottom right) and choose "Publish":
A confirmation pop-up will make sure you want to publish the interaction. Choose "Publish":
Once published, you will see an indication that the interactions are all published.
There is also an option to publish a single interaction: Simply click on the 3 dots menu of the interaction you want to publish:
And click: "publish"
This allows moderators to create multiple interactions and easily publish them one by one. Can be used during the live meetings, webcasts as well as asynchronously.
The created interactions can always be changed; During the creation process and even after it was published:
During any step of the creation, you can always go back to the previous window to adjust the options you chose, by clicking on the "Back" button:
When the interaction is created, the Review window also allows you the option to edit:
After an interaction was published, you can edit it and even determine the impact of the change.
Editing a published interaction is done from the 3 dots menu of the specific interaction you want to change:
Choose if you want to edit or delete the CTA:
Once Edit is chosen, you can change your interaction options.
Choose the impact of the change:
When a change is made in a published interaction, the Review window will allow you to determine what is the impact of published interaction update:
There are three levels of impact:
Minor - Minor change that has no effect on submitted replies.
Major - Major change, give opportunity to re-submit existing replies.
Critical - Critical change that invalidates all replies. A new interaction is created replacing the original.
After the change is saved, the interaction will present an indication that it has a draft and is pending publishing. The changed interaction has to be published in order to take place:
Once the changed is published, you will see an indication for that:
The Annoto Comments Space enable a discussion between all the viewers of a video - learners and instructors. Every comment that is added gets a time-tag, meaning: you can always see to what specific moment in the video each comment refers and understand its context.
If you want to add a comment, simply start typing in "Add a comment..." section. The video will be automatically paused (so you won't miss anything while writing).
Once your comment is ready, simply hit Enter, or click the submit button (green arrow, as you can see in the image below):
and your comment will be added to the discussion:
The Educator indicator
In addition to the name of who wrote the comment, every comment (or a reply) provided by the instructors is marked with the Educator indicator (the graduation hat beneath the user image).
Learners' comments do not have the Educator's indicator icon.
Learners can even have the ability to post questions or comments as anonymous. In this case, only instructors will see the user's name. to see how Anonymous comments look in instructor's view, as you can also see in the following images:
When Anonymous comments are enabled, each learner can choose whether to post the comment as anonymous or not. This is how it looks in the learners' widget:
Each comment (in the Comment Space) and each note (in the Personal Notes Space) gets a timetag that reflects in what specific moment in the video it was added. Therefore every question, comment or a note is always in the context of the video.
Clicking on the timetag will take you to the exact moment in the video that it was written about.
The Annoto Timeline provides a quick overview of the discussion and indicates specific moments in the video that includes many comments or questions.
To learn all you need to know about the Timeline - Click here.
If you wish, you can add a sentiment to your comment, to indicate its type:
You may choose your sentiment by clicking on the icon near the comment that you are typing, as you can see here:
If you want to move to the next line in your comment, click Shift + Enter.
You can format your messages:
Ordered list (Type 1. (or any other number followed by a dot) at the beginning of a new line and it will magically transform to ordered list)
Bullet list (Type * , - or + at the beginning of a new line)
Shift + Enter to a new line
Emojis (Add smiley faces, hearts, winks etc. by typing their shortcuts and a space after them: :-), <3 , ;) or :p )
Bold - Type double asterisks for **Bold text**
Italic - Type underscores for _Italic Text_
Highlight - Type equal signs ==like this== to highlight
Whenever is enabled on the widget, you can mention a user in the comments space by using '@' .
To mention someone, type '@' in the editor then start typing their name. Then, choose the person you want to mention from the list of suggestions.
Enhance the discussion:
Drive a specific user's attention to a certain moment in the video
Empower a learner by mentioning them in the discussion
Learners can mention one another in the context of the video content
You are free to edit or delete any comment you write.
Editing or deleting a comment is done by clicking on the 3 dots menu, that is revealed when hovering the comment's date:
If you want to reply to a comment - all you have to do is click on Reply below the comment, write and hit send, as you can see here:
Whenever a comment has replies, the number of replies is mentioned below the comment. Clicking on that will open the reply so you can read it, as you can see here:
A comment can be “liked” simply by clicking on the red heart near the “reply” button.
The number of "likes" a comment received is shown as well.
Whenever an instructor “likes” a learner's comment or a reply, that comment\reply is marked with “Educator’s thumbs up” (yellow medal on the comment).
As you can see in the following images:
An instructor has the ability to delete learners’ comments from the discussion (in case of inappropriate comments, for example).
Deleting a learner's comment is done by clicking on the 3 dots menu, that is revealed when hovering a comment's date:
You will see that the comment was deleted:
Learners will not see this comment at all (as if it was never written).
Instructors can also delete learners' comments directly from the Annoto Dashboard. .
An instructor has the ability to manually approve any comments before it becomes public.
Setting the option for "Managed Comments" is done in the .
Approving comments is done via the Annoto widget.
When moderating comments is enabled, once a comment is submitted, it will await instructor's approval.
This is how the instructor will see the comment (with "Pending approval" message below the comment):
The instructor can publish the comment, dismiss it, or choose any of the additional options (Reply and Publish, Private Reply or Delete) - based on the .
The learner who posted the comment will see it with "Pending approval" message, until approved by the instructor:
Other learners will not see the comment until it is approved.
Once approved, the comment will be shown in the discussion,
If deleted, the comment will appear as "Deleted by moderator", both for the instructor and for the author (the learner who wrote it). Other learners will not see the comment at all (not even "Deleted by moderator" comment).
If dismissed, the comment will disappear from the Instructor's discussion but will still appear as "Pending Approval" for the author (the learner who wrote it). Other learners will not see the comment at all.
If we take a closer look on an added comment, here is the info we have on each comment:
In order to add an external video (a YouTube video, for example) in your comment:
Go to the video
Copy the video's link (URL)
Go to "Add a comment" in Annoto:
You may either write a comment in addition to the video, or not - as you wish.
4. Paste the video's link (URL)
5. Hit "send".
The video will be embedded in the discussion, as you can see here:
You may comment with your own video: a camera recording (of you) or a screen recording.
Click to learn all about recording video as a comment.
To learn about all the ways you can use the Annoto Comment Space (to engage the viewers, encourage a discussion, use it for assignments, etc. - visit the
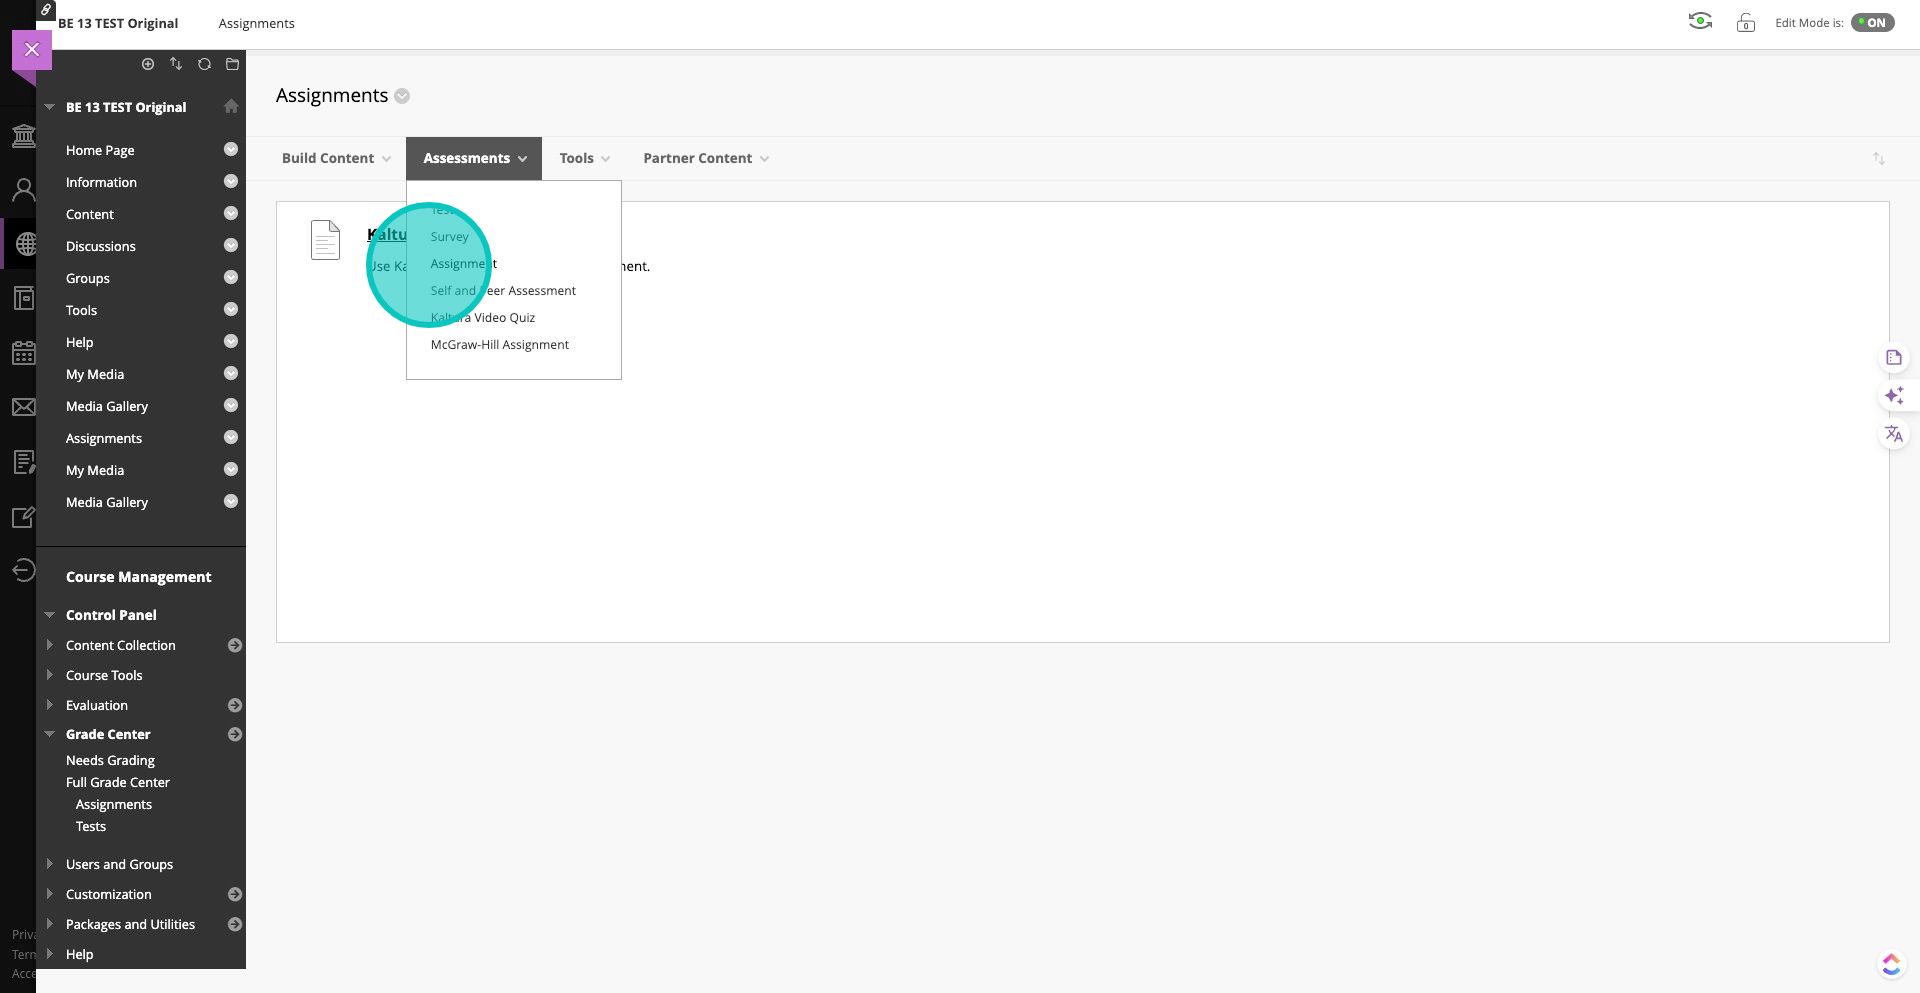
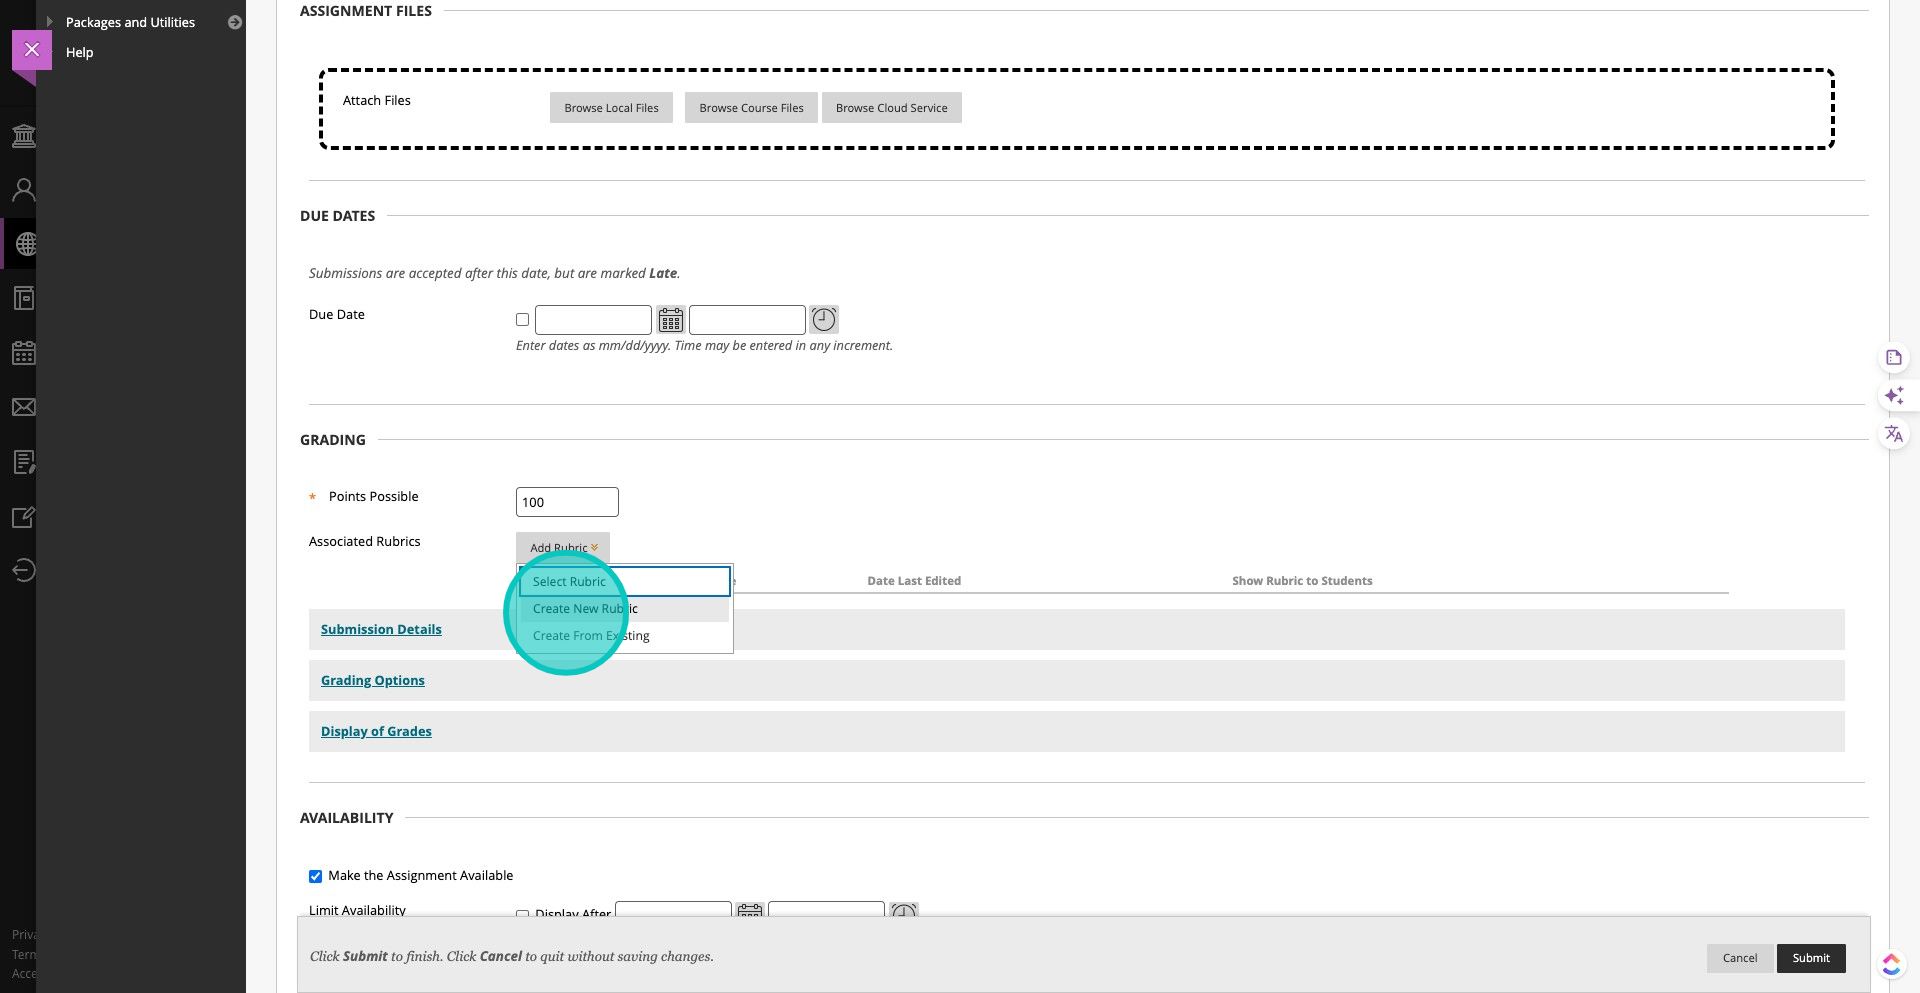
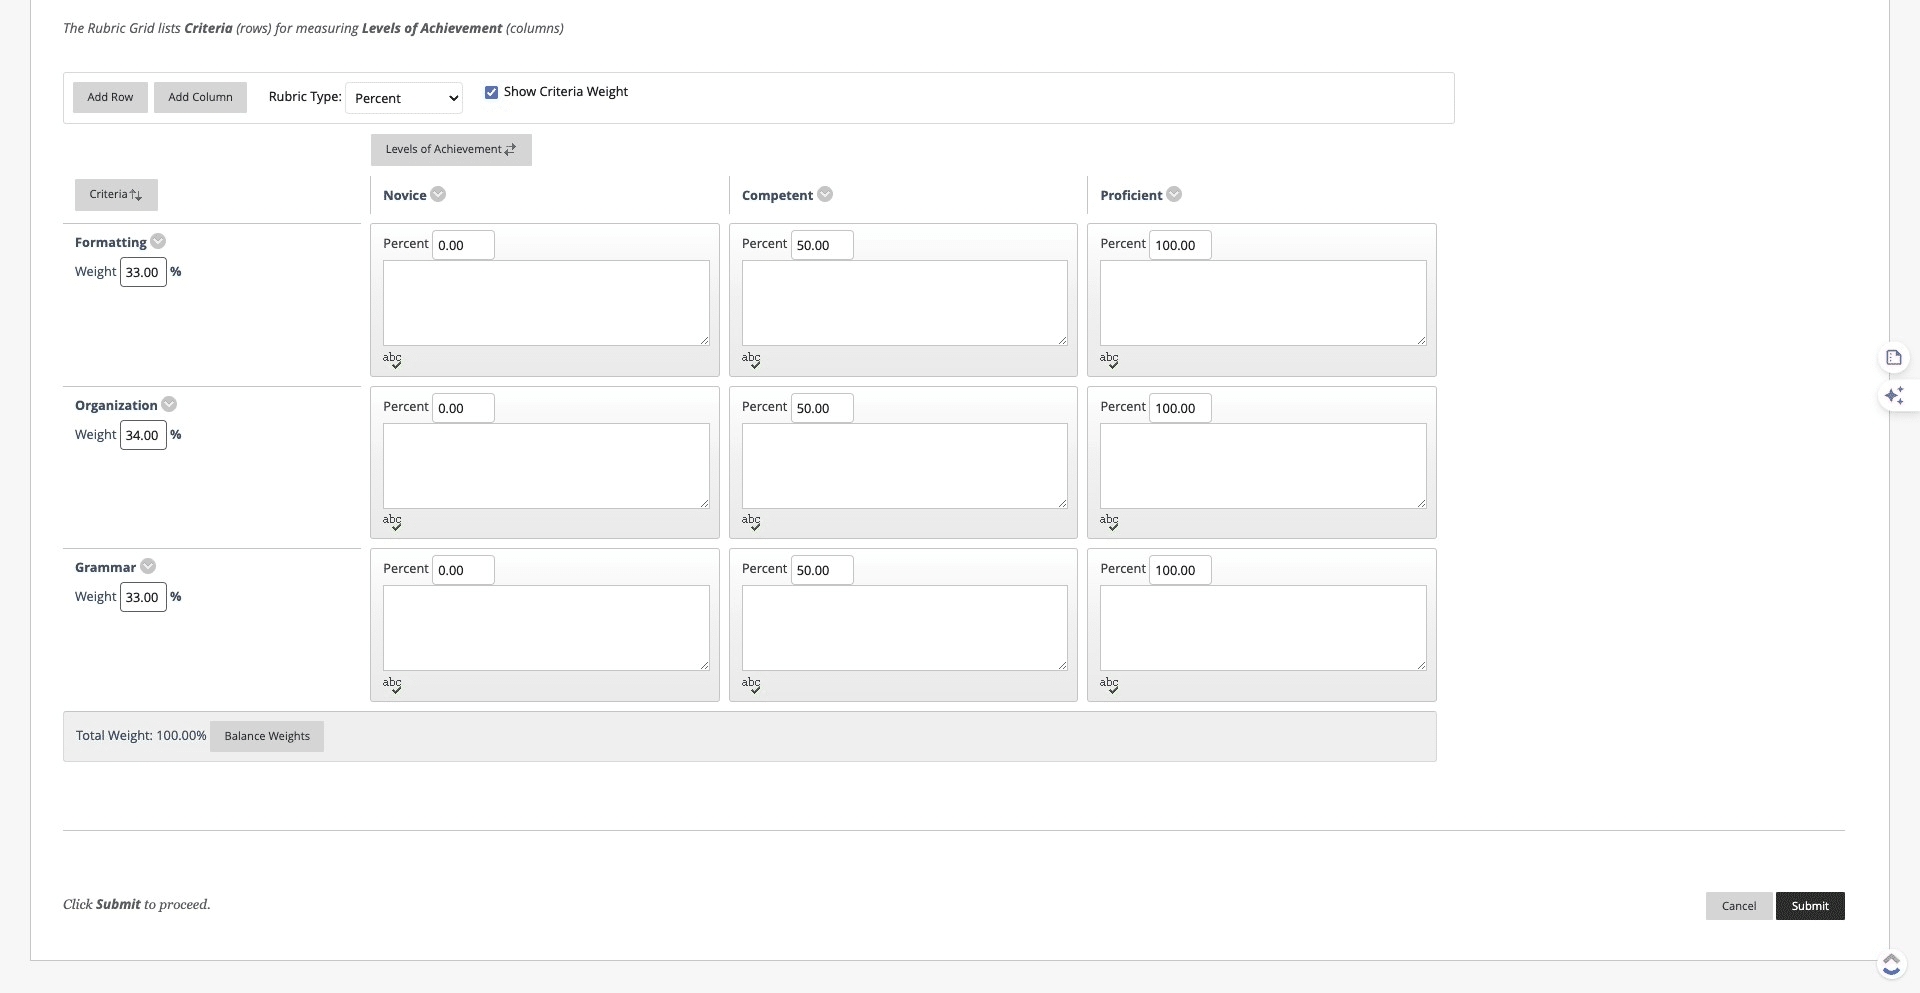
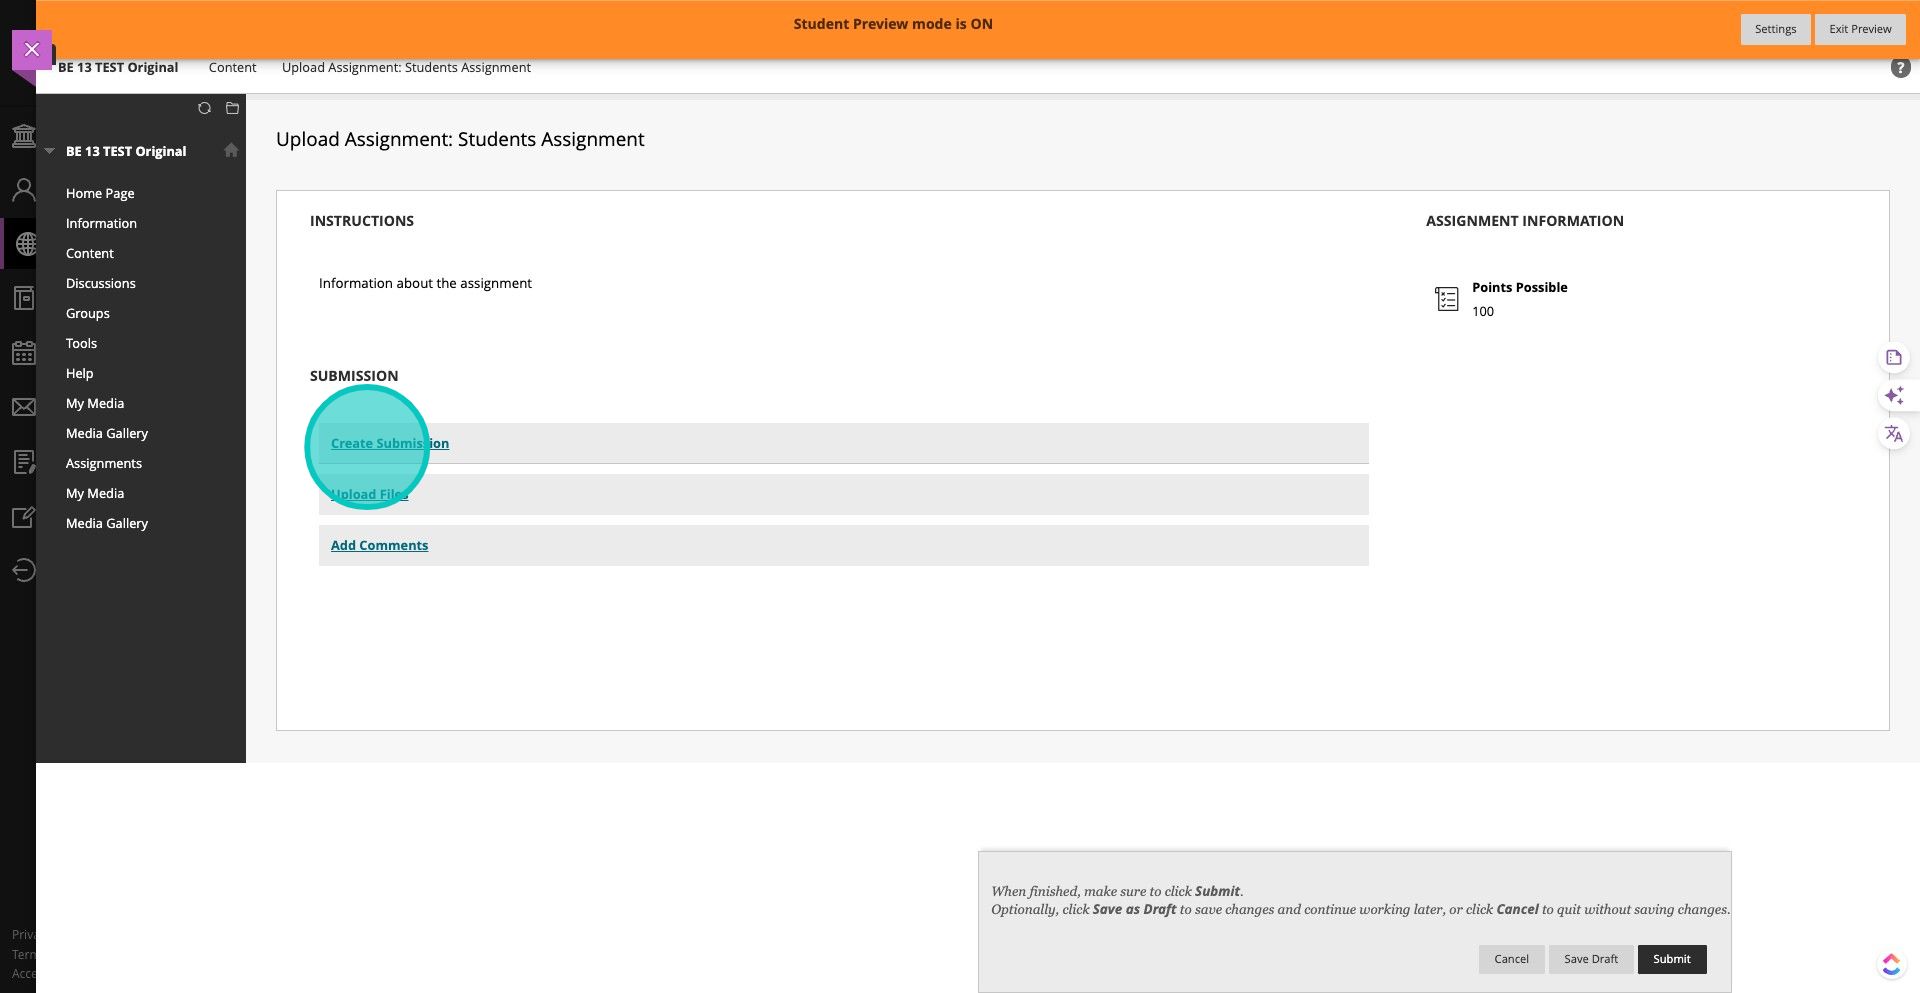
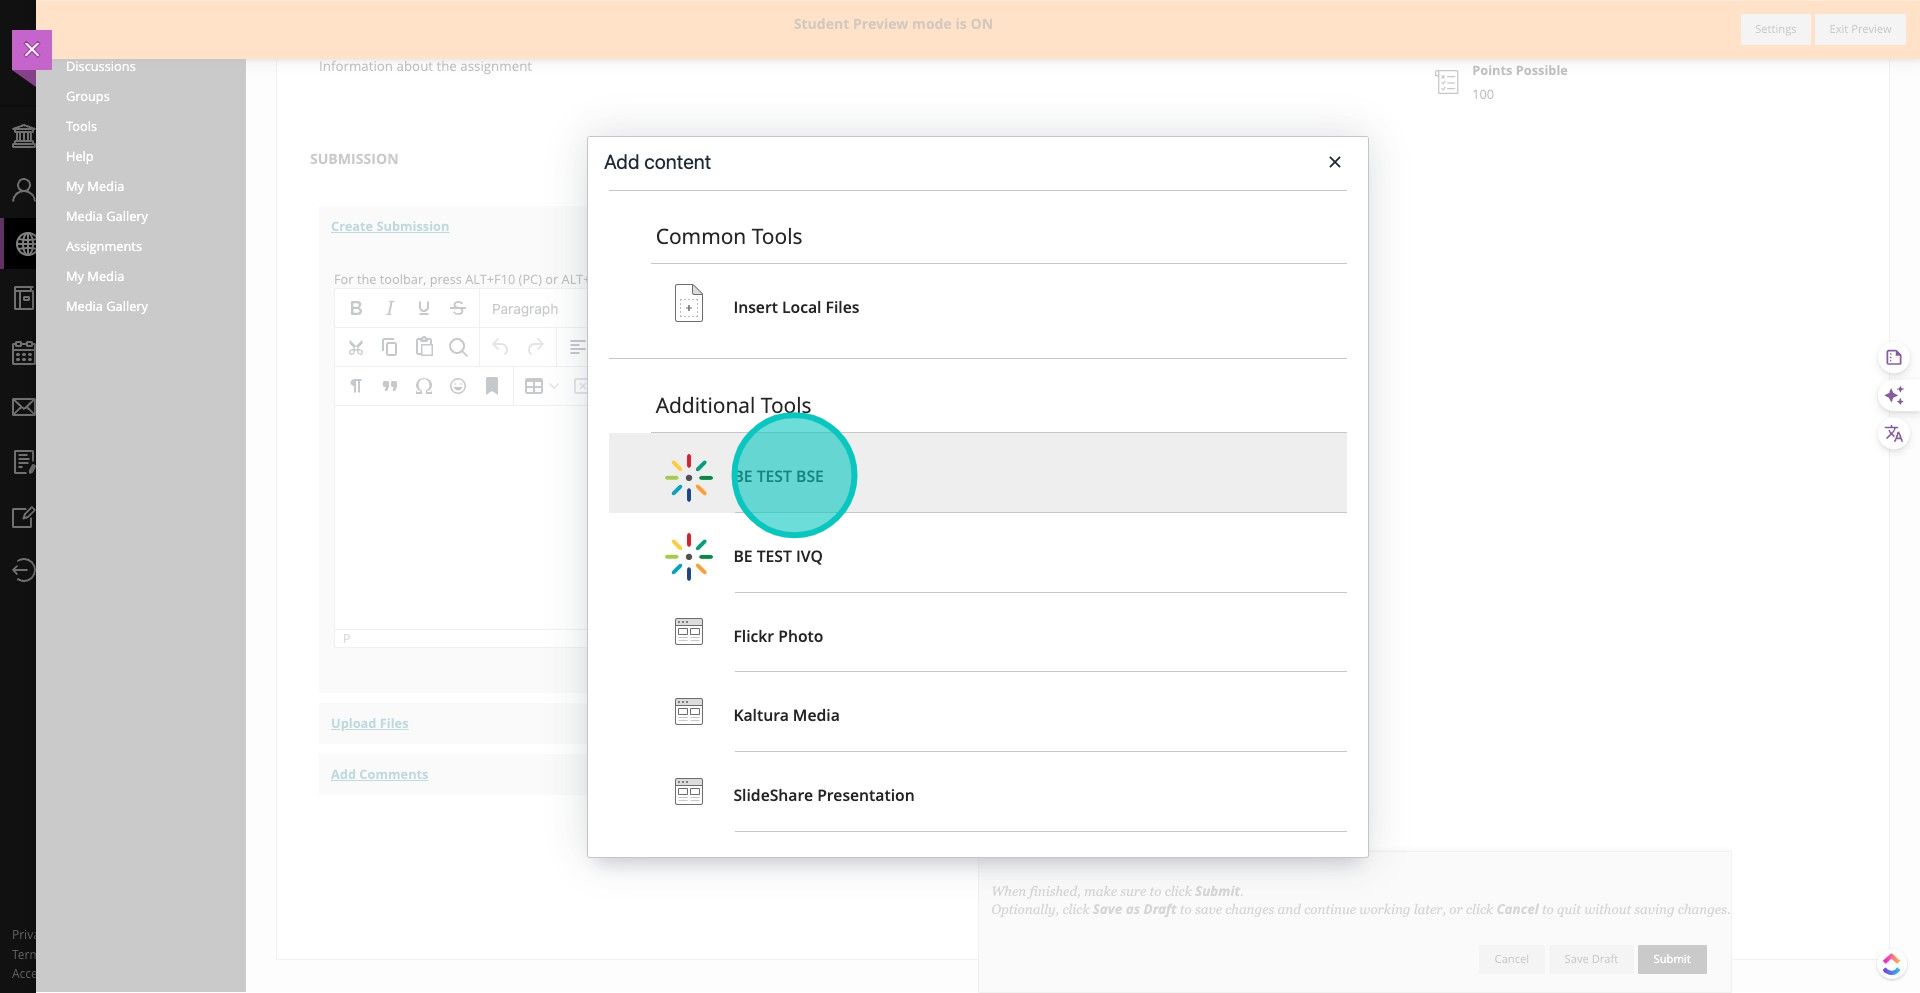
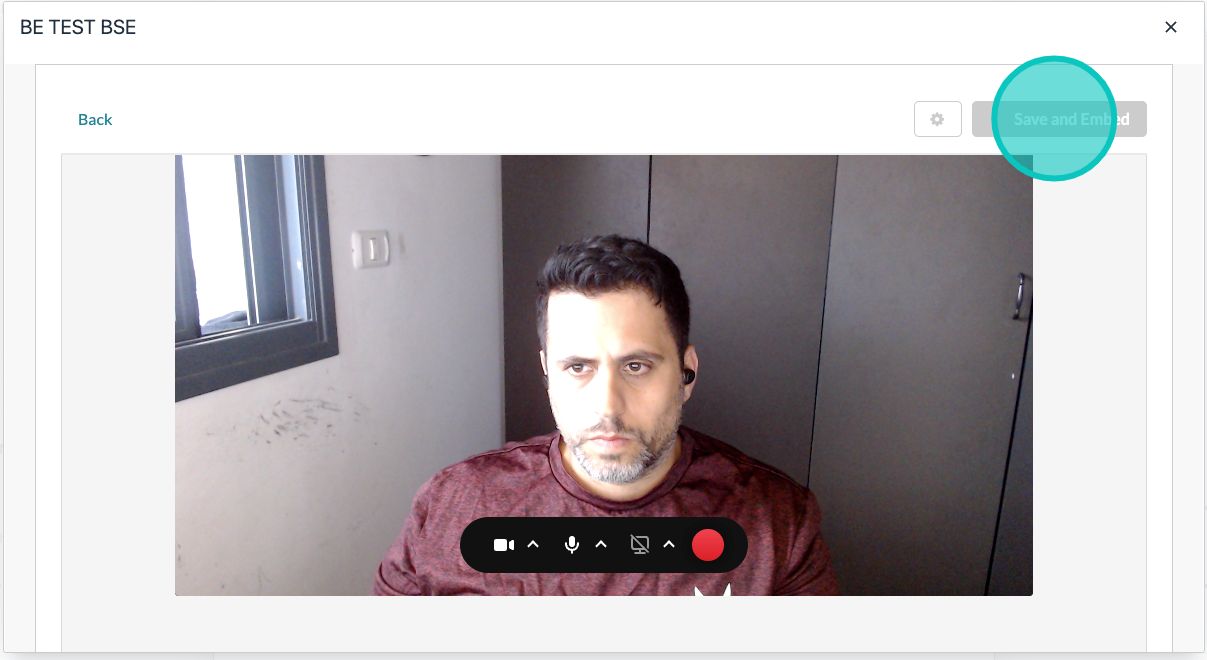
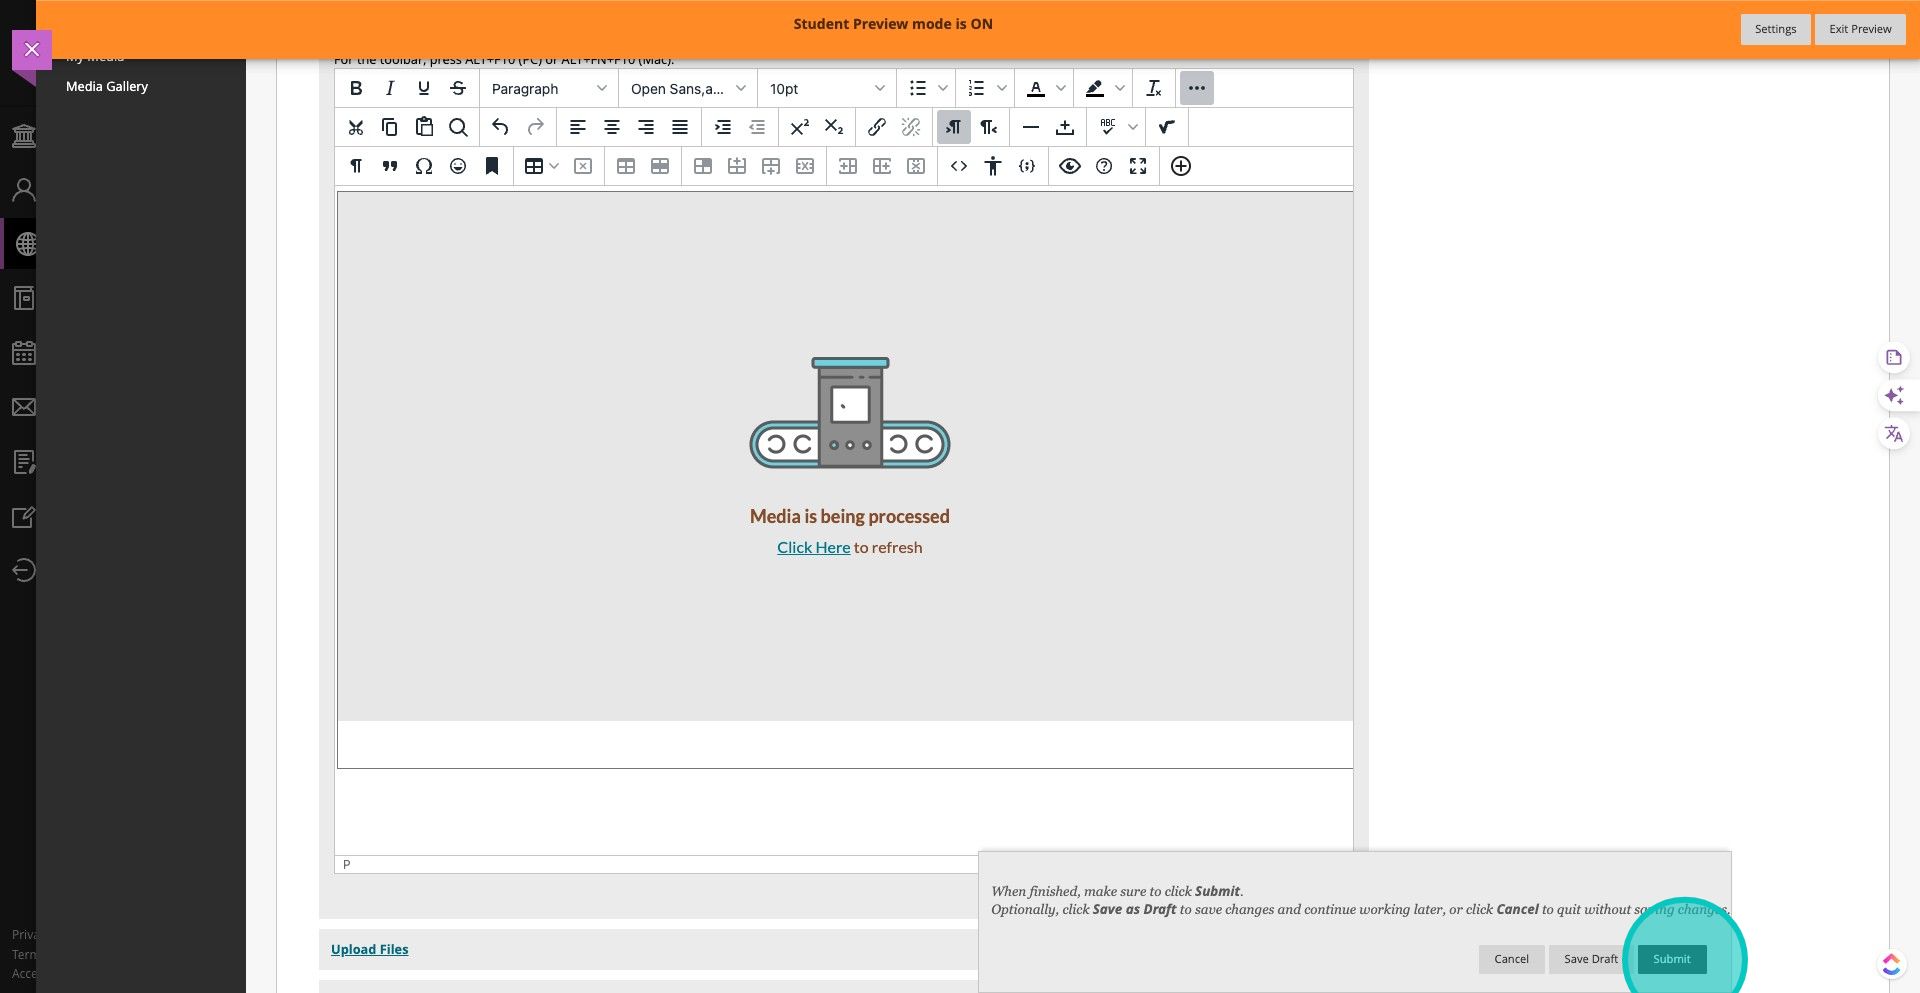
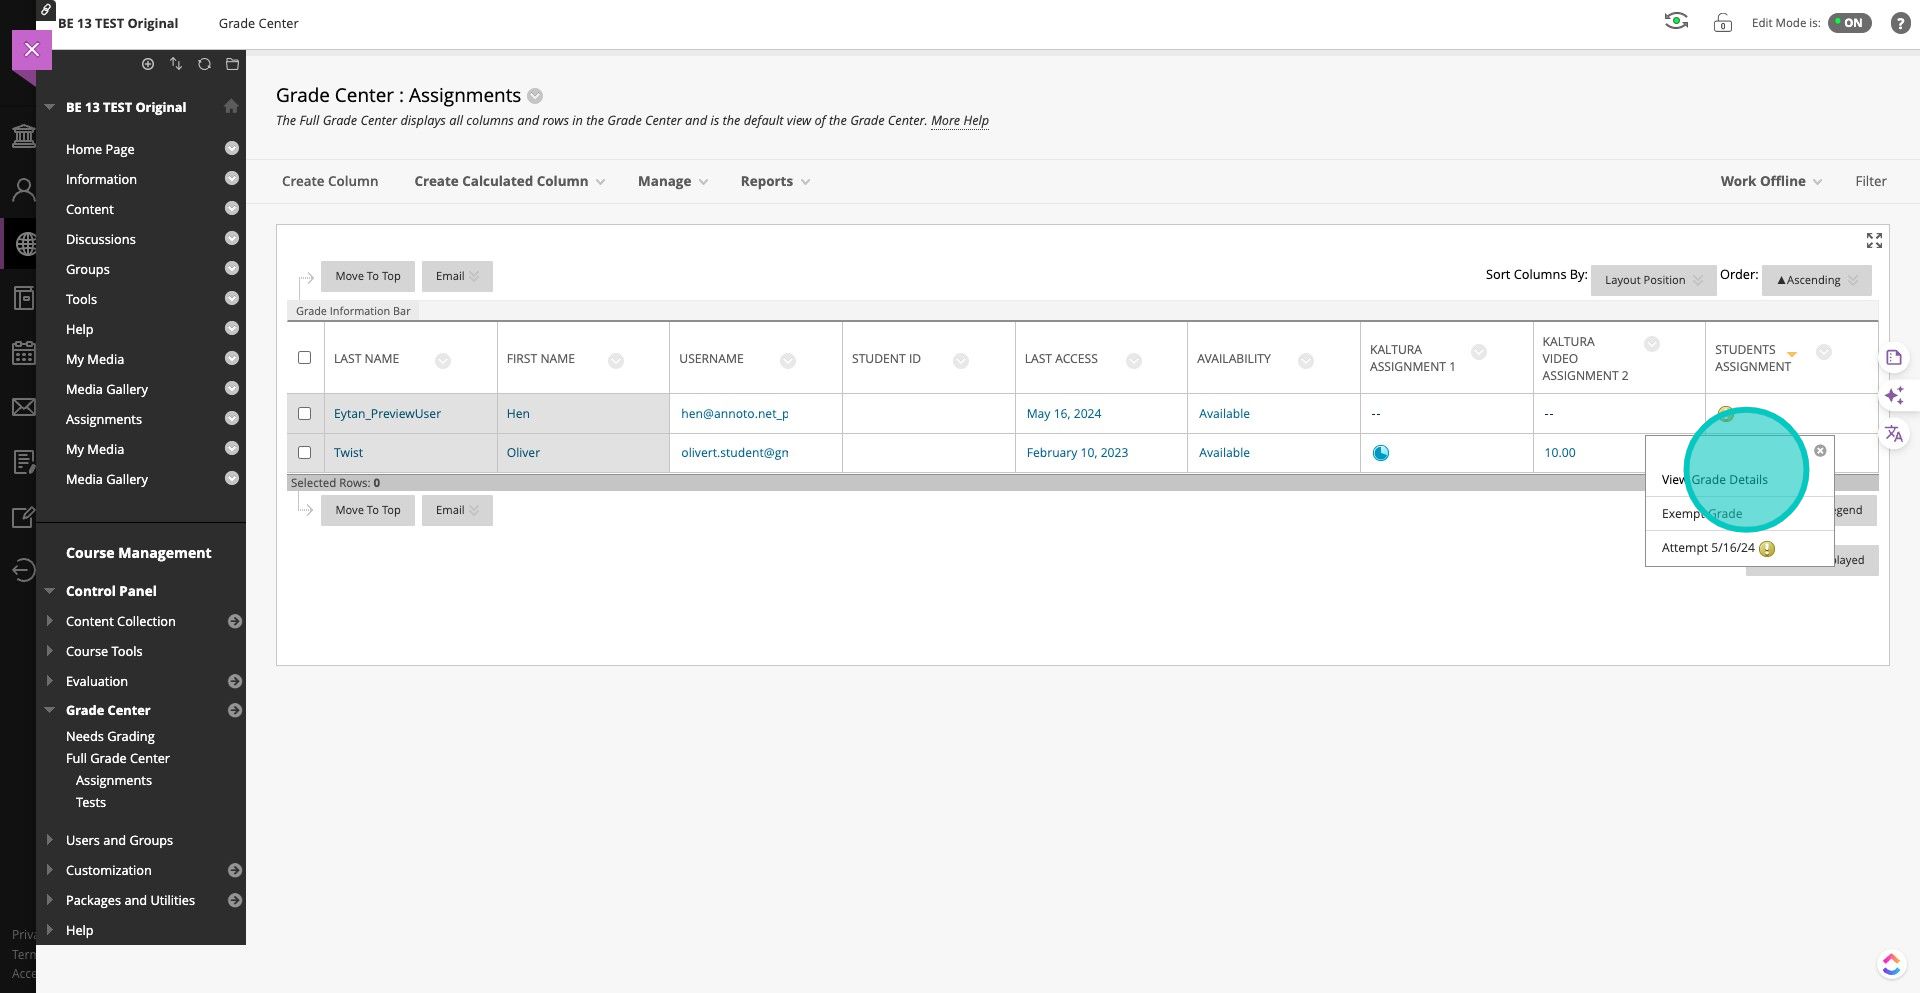


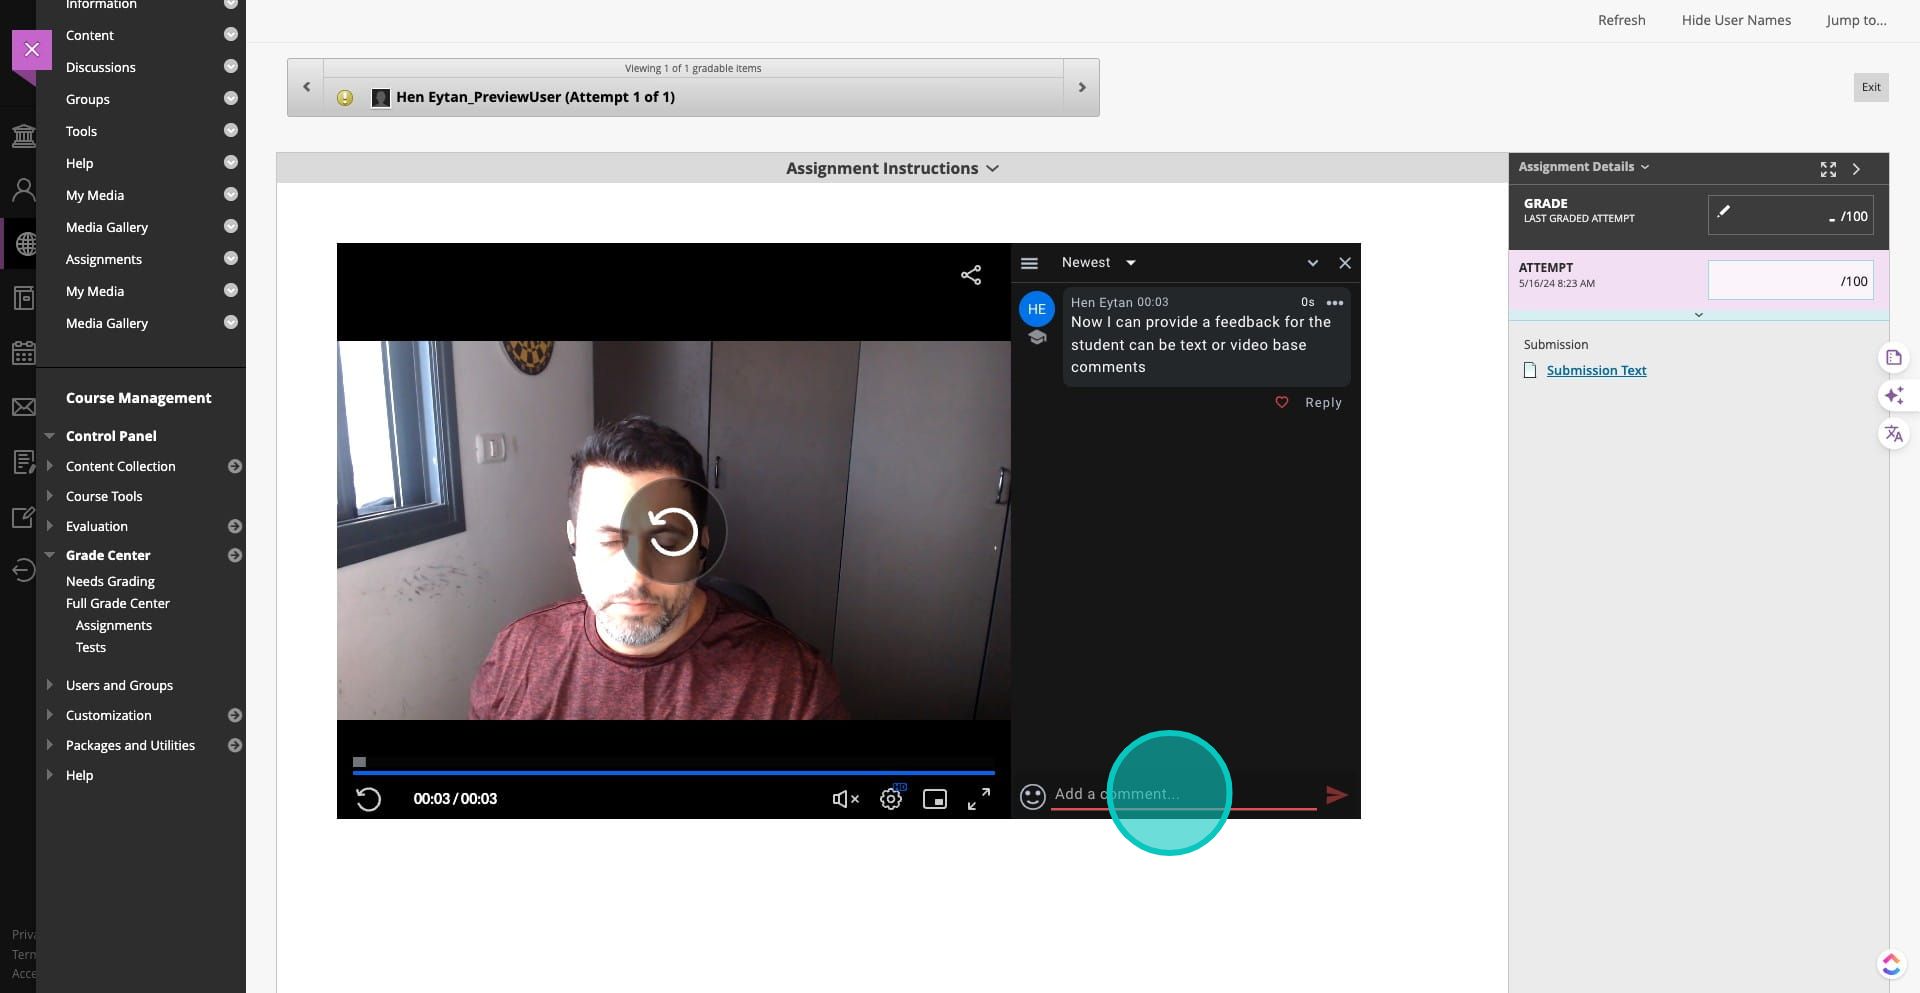
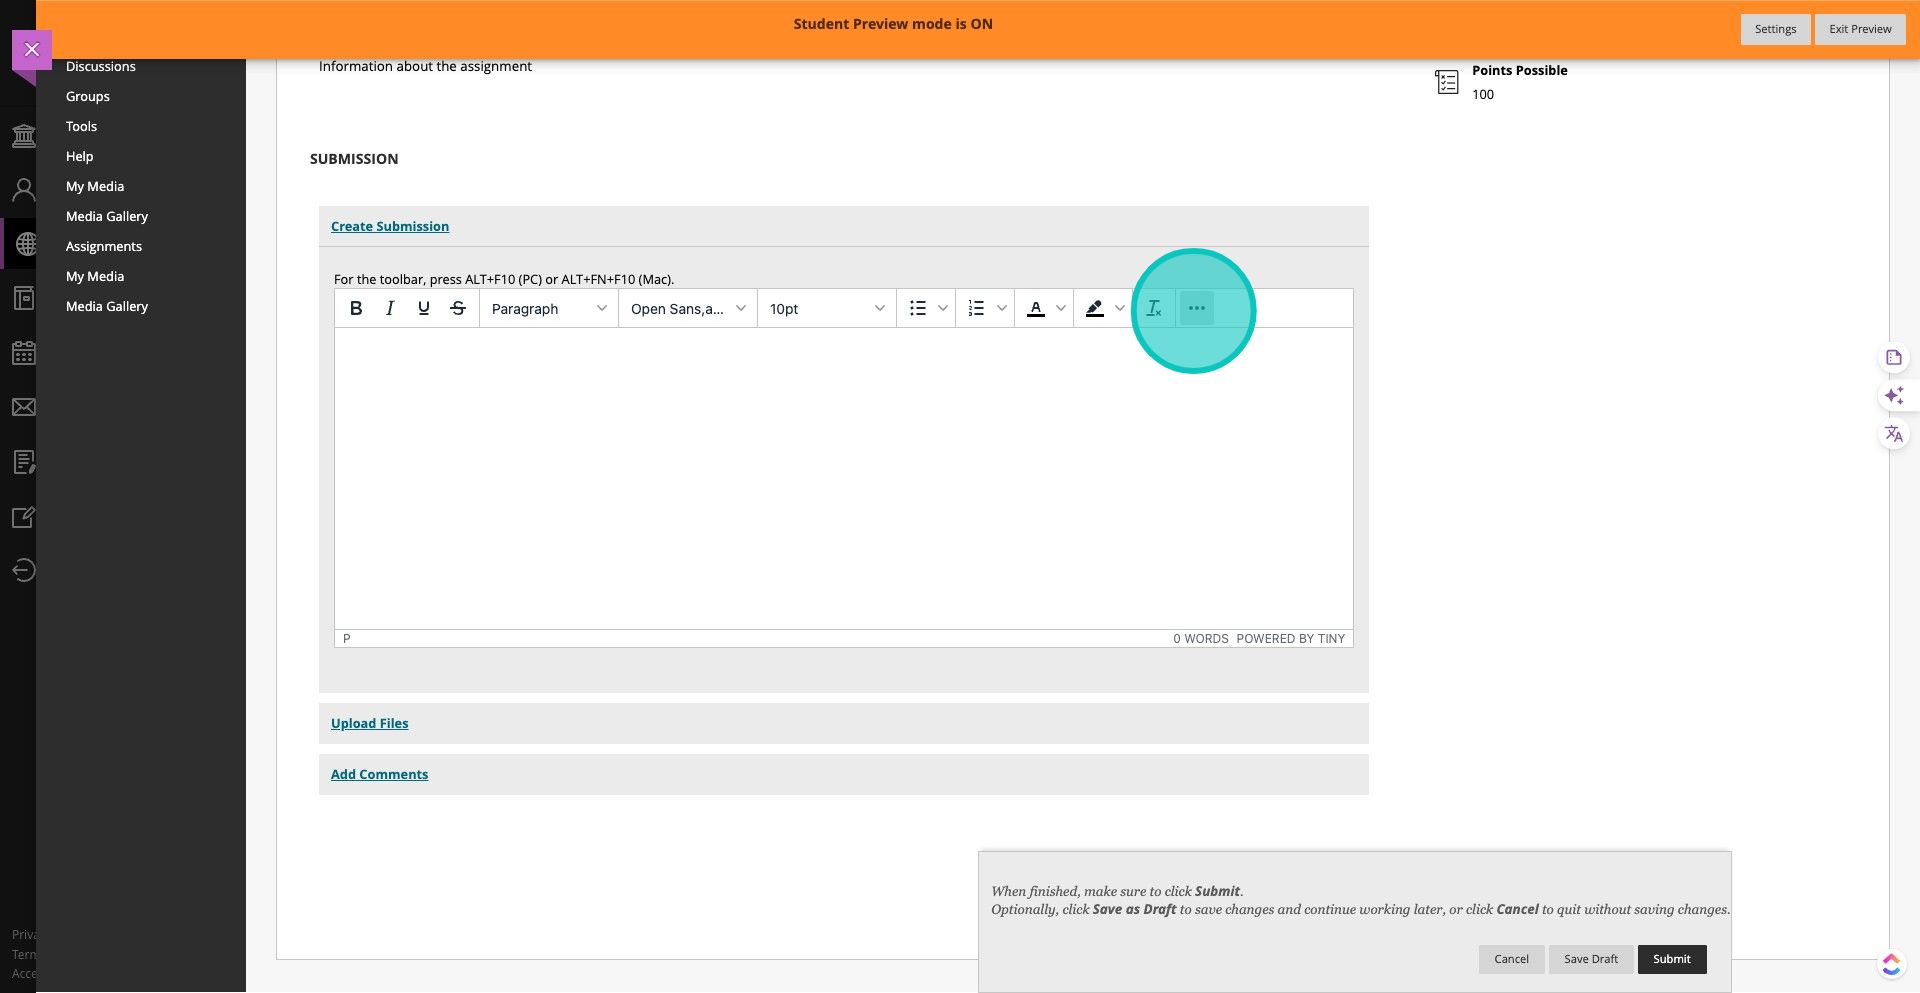

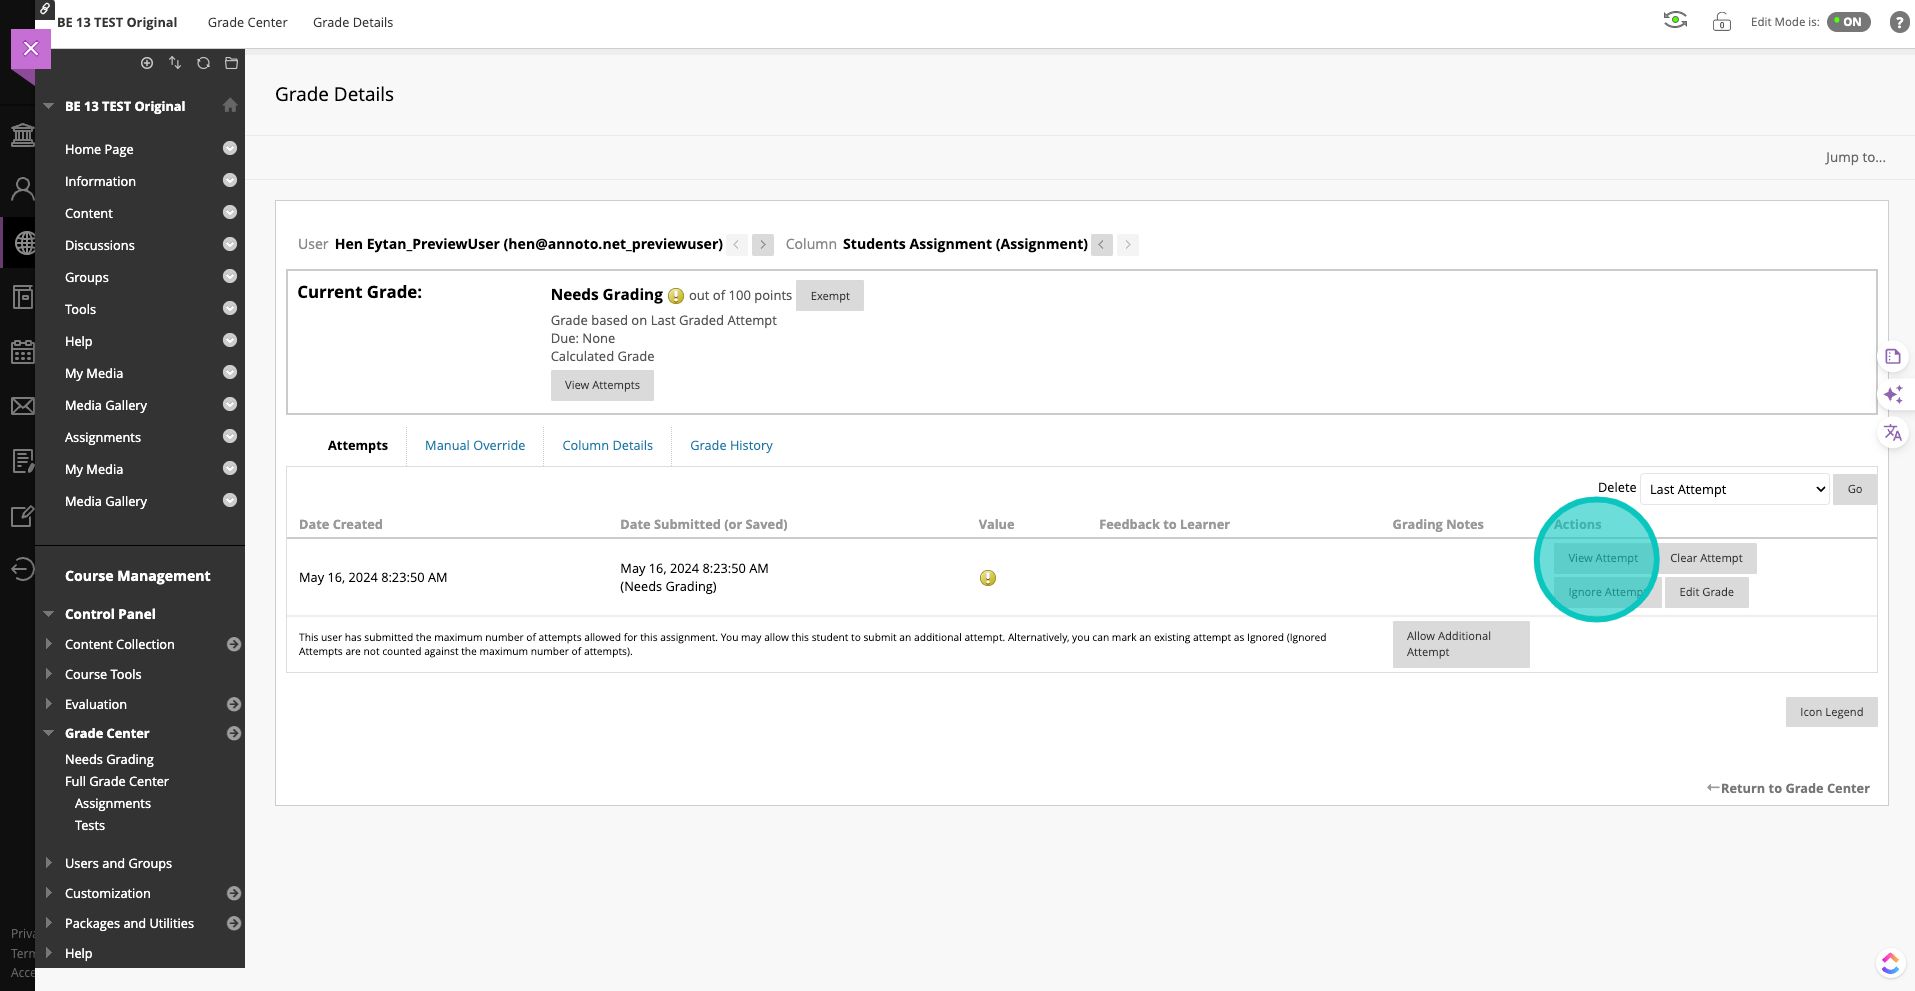
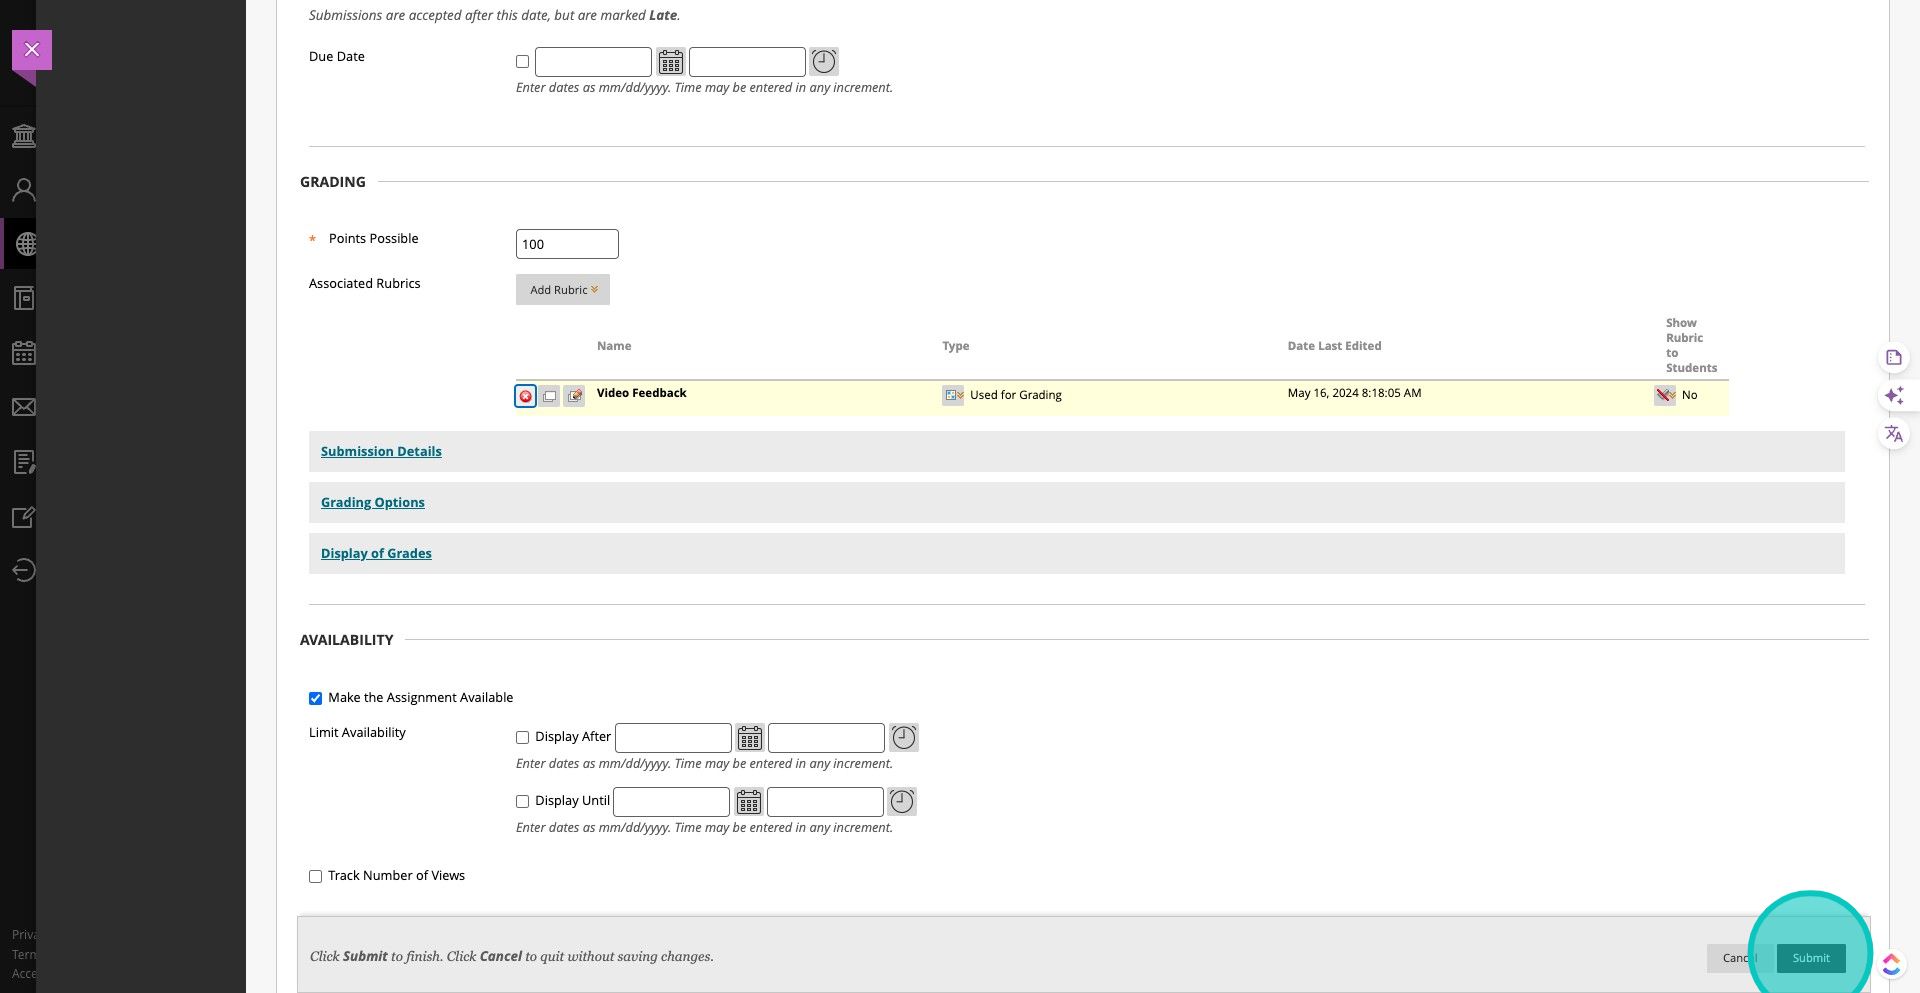
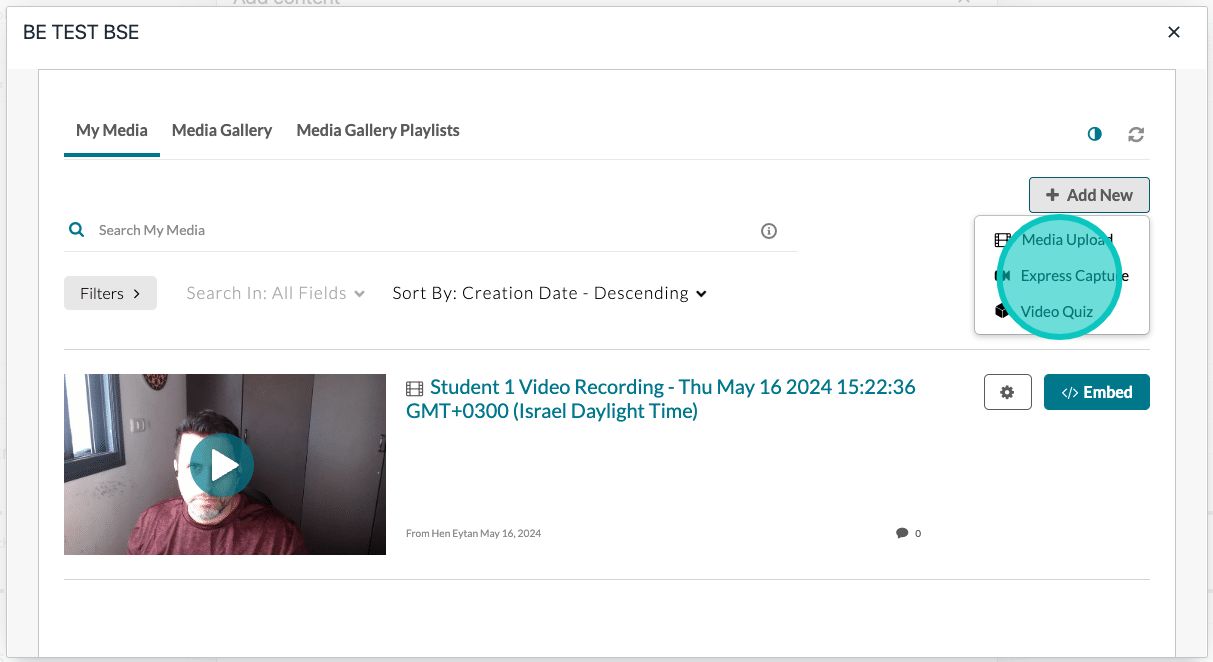
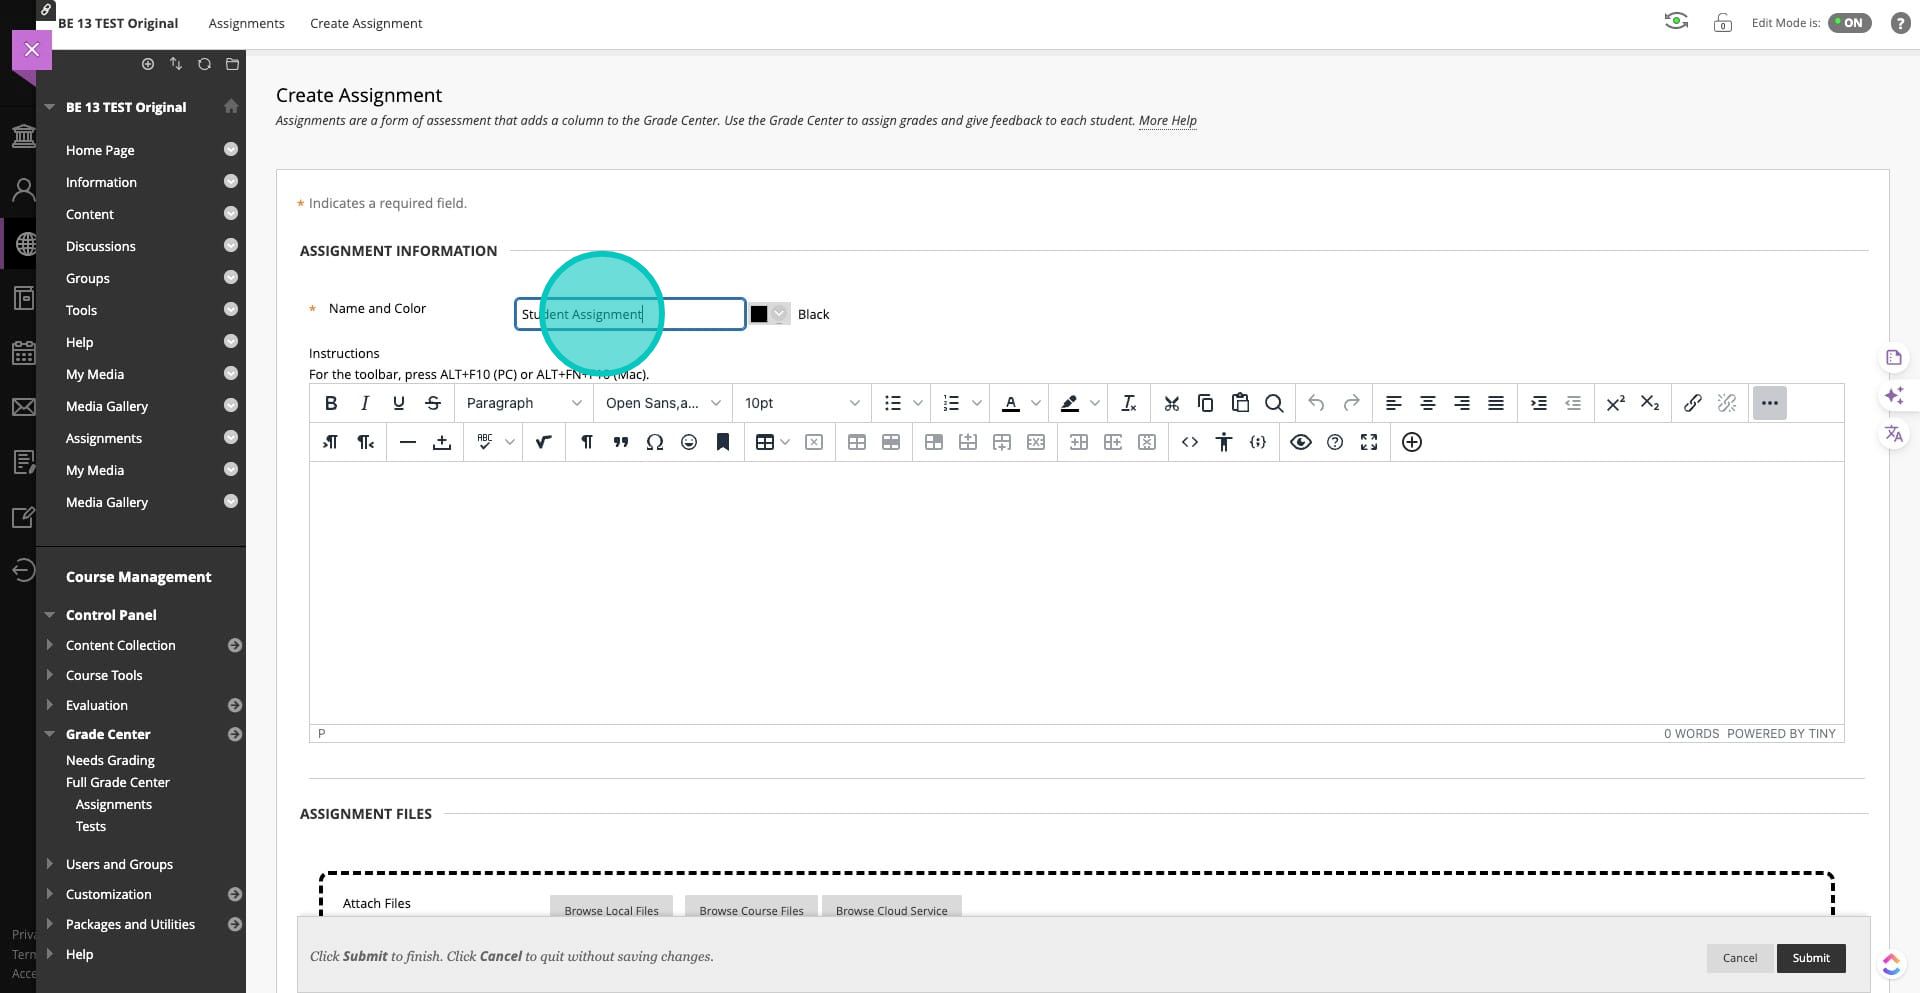


Blockquote - Type > at the beginning of a new line


For tutorial on how to navigate back to Course View, please take a look at Navigating the Dashboard.
The video view provide management insights, assessment and preferences for a specific video.
Below the video title, there are further details about the video duration, description and a link to the page:
In the Video Hub, the discussion of the video can be fully managed via the dashboard, all the common actions are supported:
Reply
Edit/Delete own comments
“Like” a comment - each learner's comment that you’ll like, will get “Educator’s Thumbs Up” badge (which can be used for ).
At the top of the Discussion a quick summary of the remaining comments to review can be found:
Once the review is done:
Not-reviewed comments (the ones you haven’t read yet) will be highlighted in color:
You can decide how you want to review the comments.
Comments can be:
Manually reviewed - You can mark comments as read\ not-read, by clicking on the eye icon:
You can also mark all comments as read with a single click:
Automatically reviewed – Comments will be automatically marked as read after a few seconds:
Not-reviewed comments might be at the last page, therefore if you are not using the sorting ability, it’s important to browse all the comments pages using the navigation bar at the bottom of the discussion:
Video comments can be exported, by clicking on the export icon in the discussion.
Comments can be exported to a spreadsheet or a document!
The export contains course and video information. All the comments are sorted by video time-tag and include common details such as author, date and sentiment.
This section provides you with highlights of participation content consumption and engagement for a specific video.
On the left we can see a radial bar representing how many of the users are participating in the video
Hovering the cursor over the bars provides details on the participation category - the percentage of the users who acted (Engaged\ Collaborated\ Noted, depends on the bar that is hovered).
For more details on the participation categories please refer to .
In the above example: 93% of the learners collaborated and engaged in the video. 71% of the users added personal notes.
This means that most of the users took an active role in learning - by commenting in the shared environment, writing in their personal notes and engaging with others .
The graph on the right provide insights about video consumption.
The triangle represents the top metrics of video consumption:
Avg. Completion Rate – Sum of percent watched in each view session divided by number of views. This metric provides user's dropout rate for each video.
Avg. Total Completion – The average of the aggregated video completion for all view sessions that the video participants had (video coverage).
Avg. Watch Time(%) - The average of the aggregated number of seconds each user has watched in all view sessions. The metric is shown in percentage
A "perfect" watching experience would be indicated by an equilateral triangle (all edges should be the same, and as close to 100% as possible).
If one of the edges is significantly longer - you may want to pay attention to the video.
For example - In the Video Consumption image above:
The Avg. Watch Time is 167%, meaning: on average, viewers spent watching the video more than x1.5 than its duration.
The Avg. Completion Rate is 27%, meaning: on average, every time the video viewers played the video, they watched 27% of it (less than third of the video), which may indicate quick dropout.
The Avg. Total Completion is 43%, meaning: on average, all video viewers covered only 43% of the video not watching all of its content.
In addition, we can find the aggregated activity metrics made by all video participants:
Views – Number of times videos were viewed in this course. For more details, please refer to How Views are counted.
Engagement – Rating for user generated content creation and consumption for the course. For more details please refer to How engagement is measured.
Collaboration - Number of comments and replies in the course (by all course users).
Interactions - Number of Interactions in the course (for all course videos).
Interactions - Number of interactions such as quizzes (for all course users).
Notes - Number of personal notes in the course (by all course users).
The Users Activity table provides analytics of each user's activity in the video:
The table can be filtered by each column to quickly find the most active users in the video by the selected activity type. For example the most engaged users, or users that are sharing their knowledge by adding the most replies, or users with the highest\lowest , etc.
Extremely low activity of a user may indication for "at risk learner".
Last Activity - Date when the user was last active in the video.
Total Completion – Aggregated video completion for all view sessions the user had (video coverage).
Avg. Completion Rate – Sum of percent watched in each view session divided by number of views. This metric provides user's dropout rate for each video.
In the above example table we can see that Gili viewed the entire video ( 100%). However, each time she played it, she watched only a little - on average, she watched 31% of the video every time she played it ().
Note that the total amount of time she spent watching the video () is 573%, meaning she watched it more than once, repeating on some pars.
Recommended further reading:
To learn more about Total Completion, Avg. Completion Rate and Watch time, we highly recommend reading our .
The Activity Trends graph shows trends of key metrics over a period of time in the video. It allows to investigate how the users learn over time and identify important events throughout the video life cycle.
The key metrics of the trends are: Engagement (blue), Collaboration (green), Notes(orange) and Views(red).
Recommended further reading: .
Might also interest you:
The Assessment tab provides details on the graded interactions activities such as quizzes.
Grades Overview of the activity:
The highest grade that was achieved in the video
The mean grade of all participants
The lowest grade that was achieved in the video
User Completion graph shows how many of the participants completed the activity:
Below the overview, you will find the quizzes results of all the users that participated in the activity:
Clicking on a user dives into the activity of that specific user, including the user's final grade, the number of completed interactions and the number of correct attempts.
At the bottom part you can also see the user's answers to each interaction.
Video preferences allows you to override the course defaults and set preferences specific to the video.
To learn more about preferences please refer to the section.
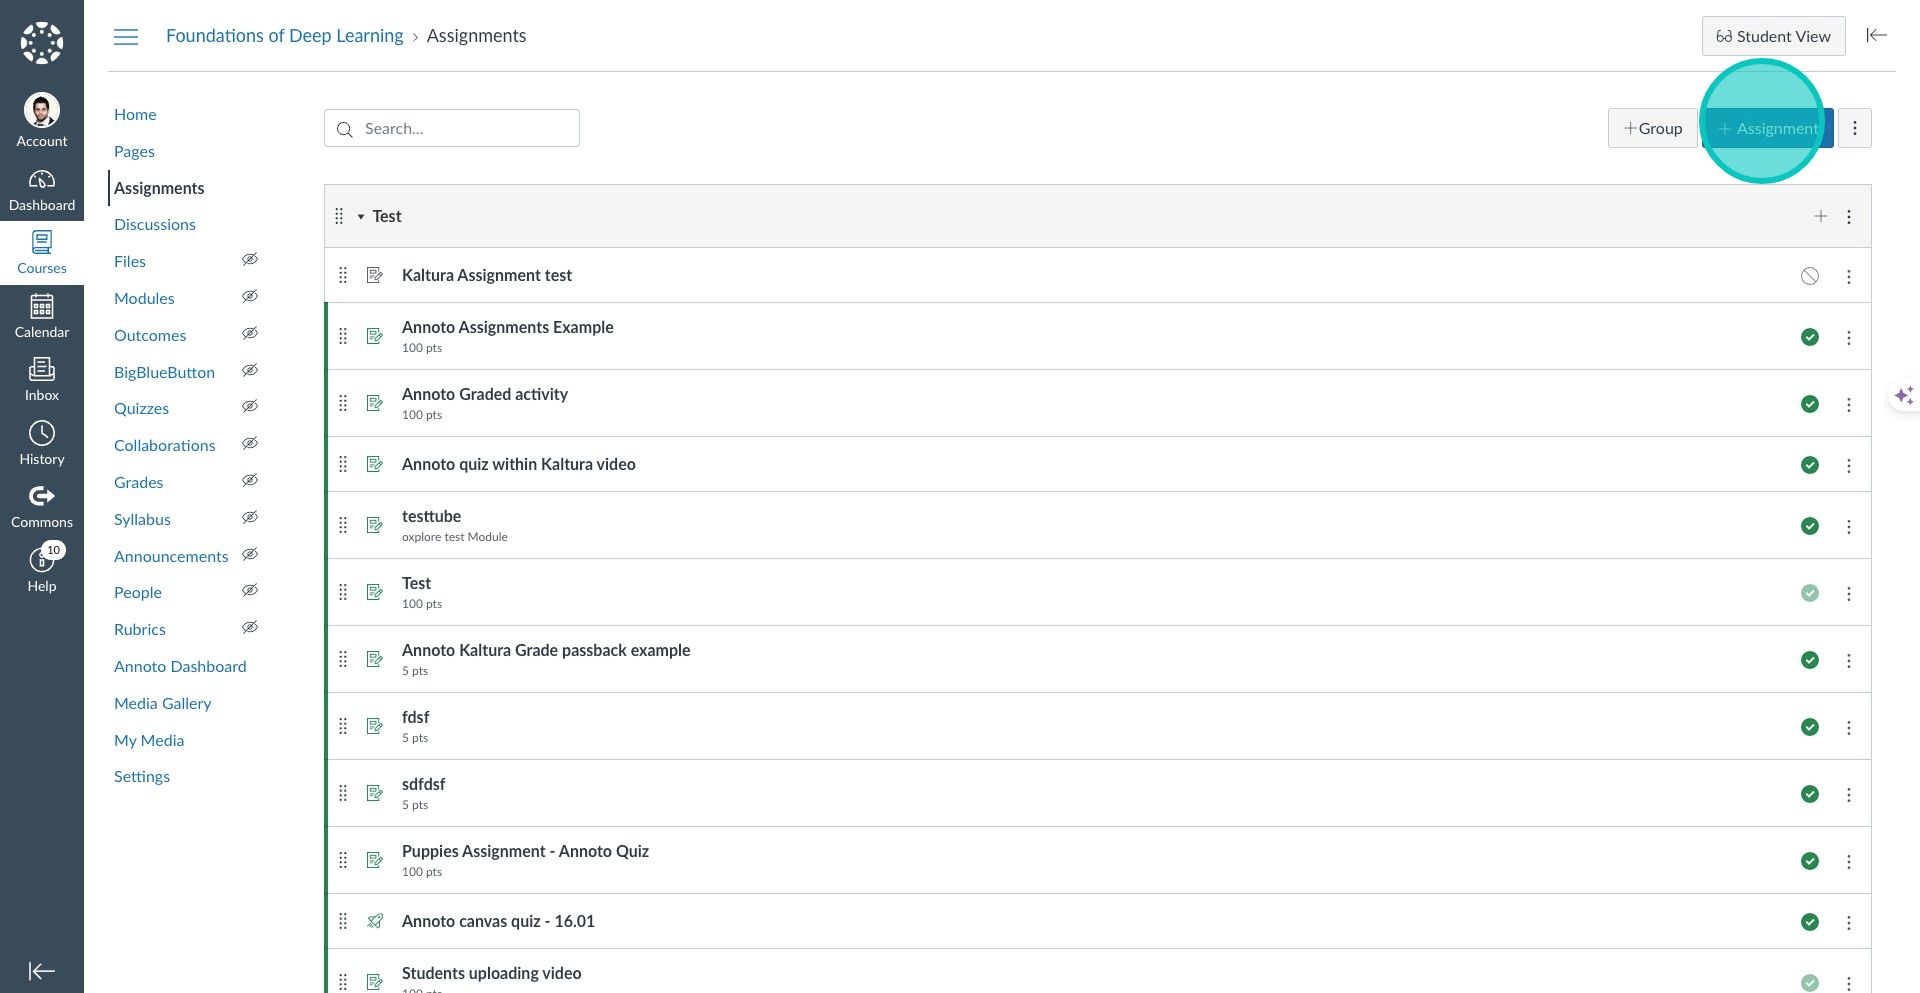
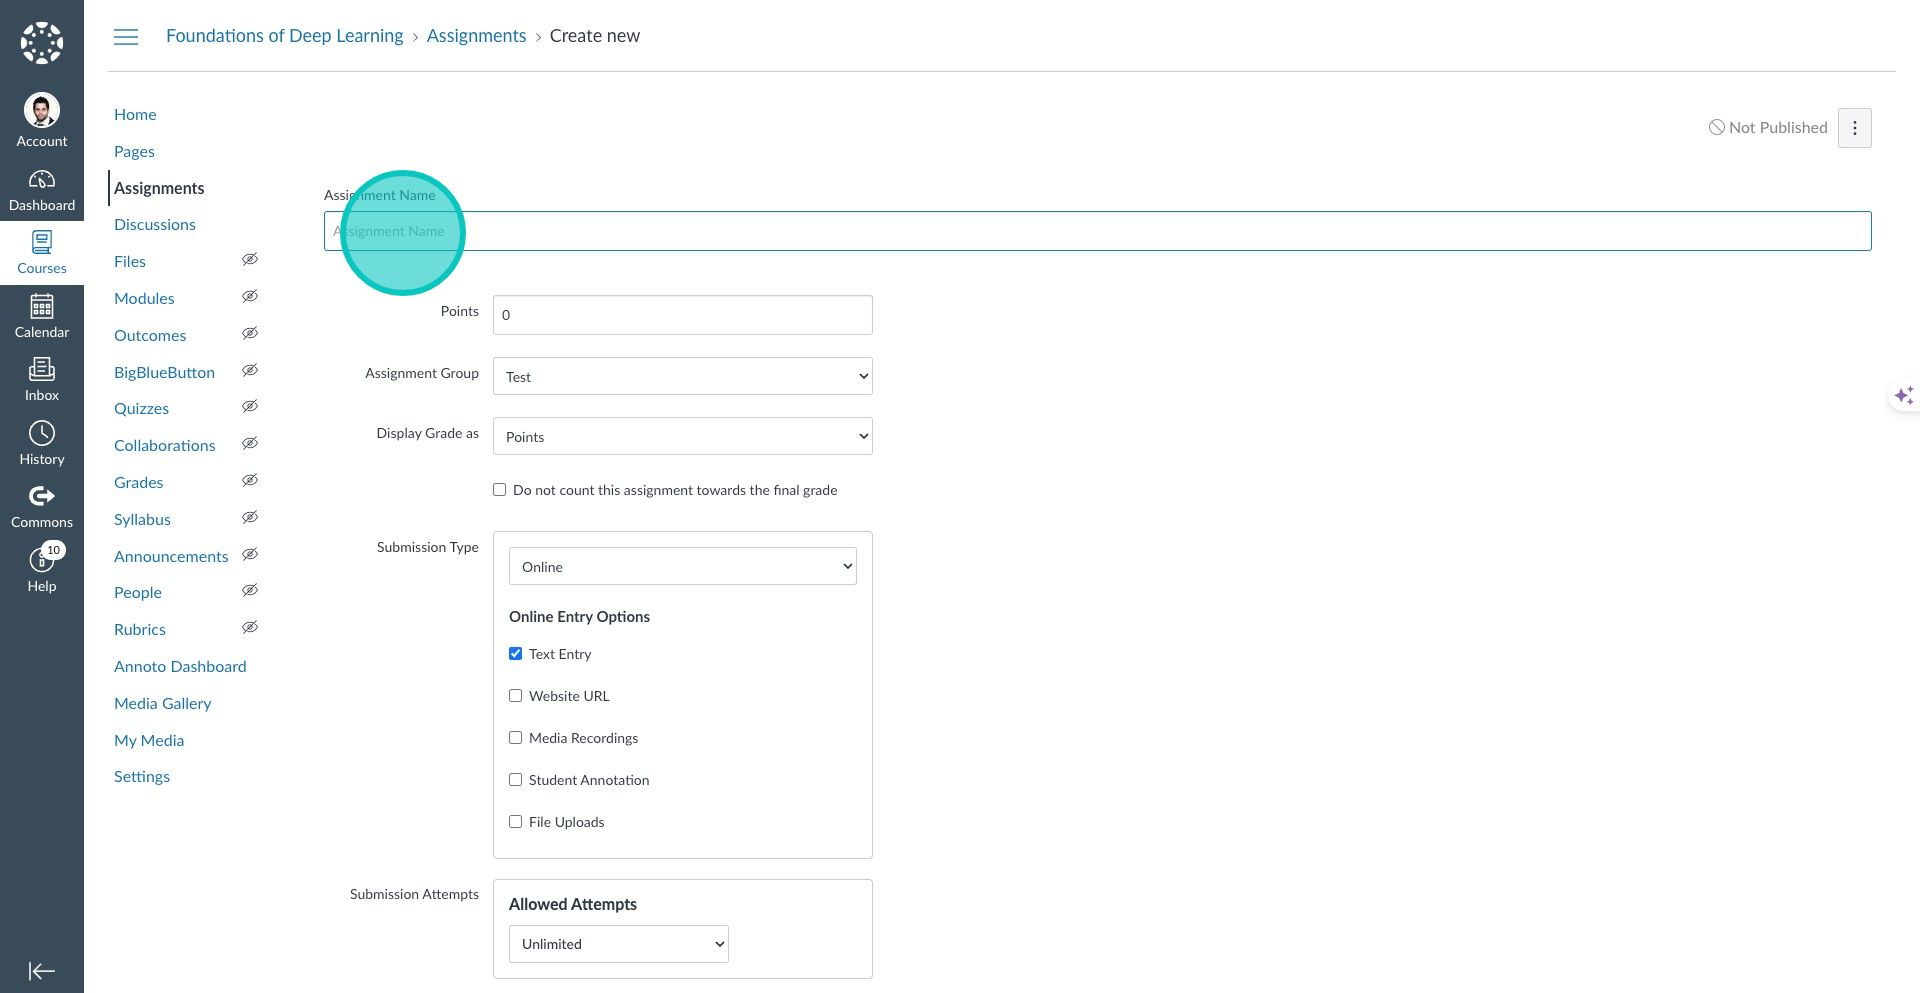
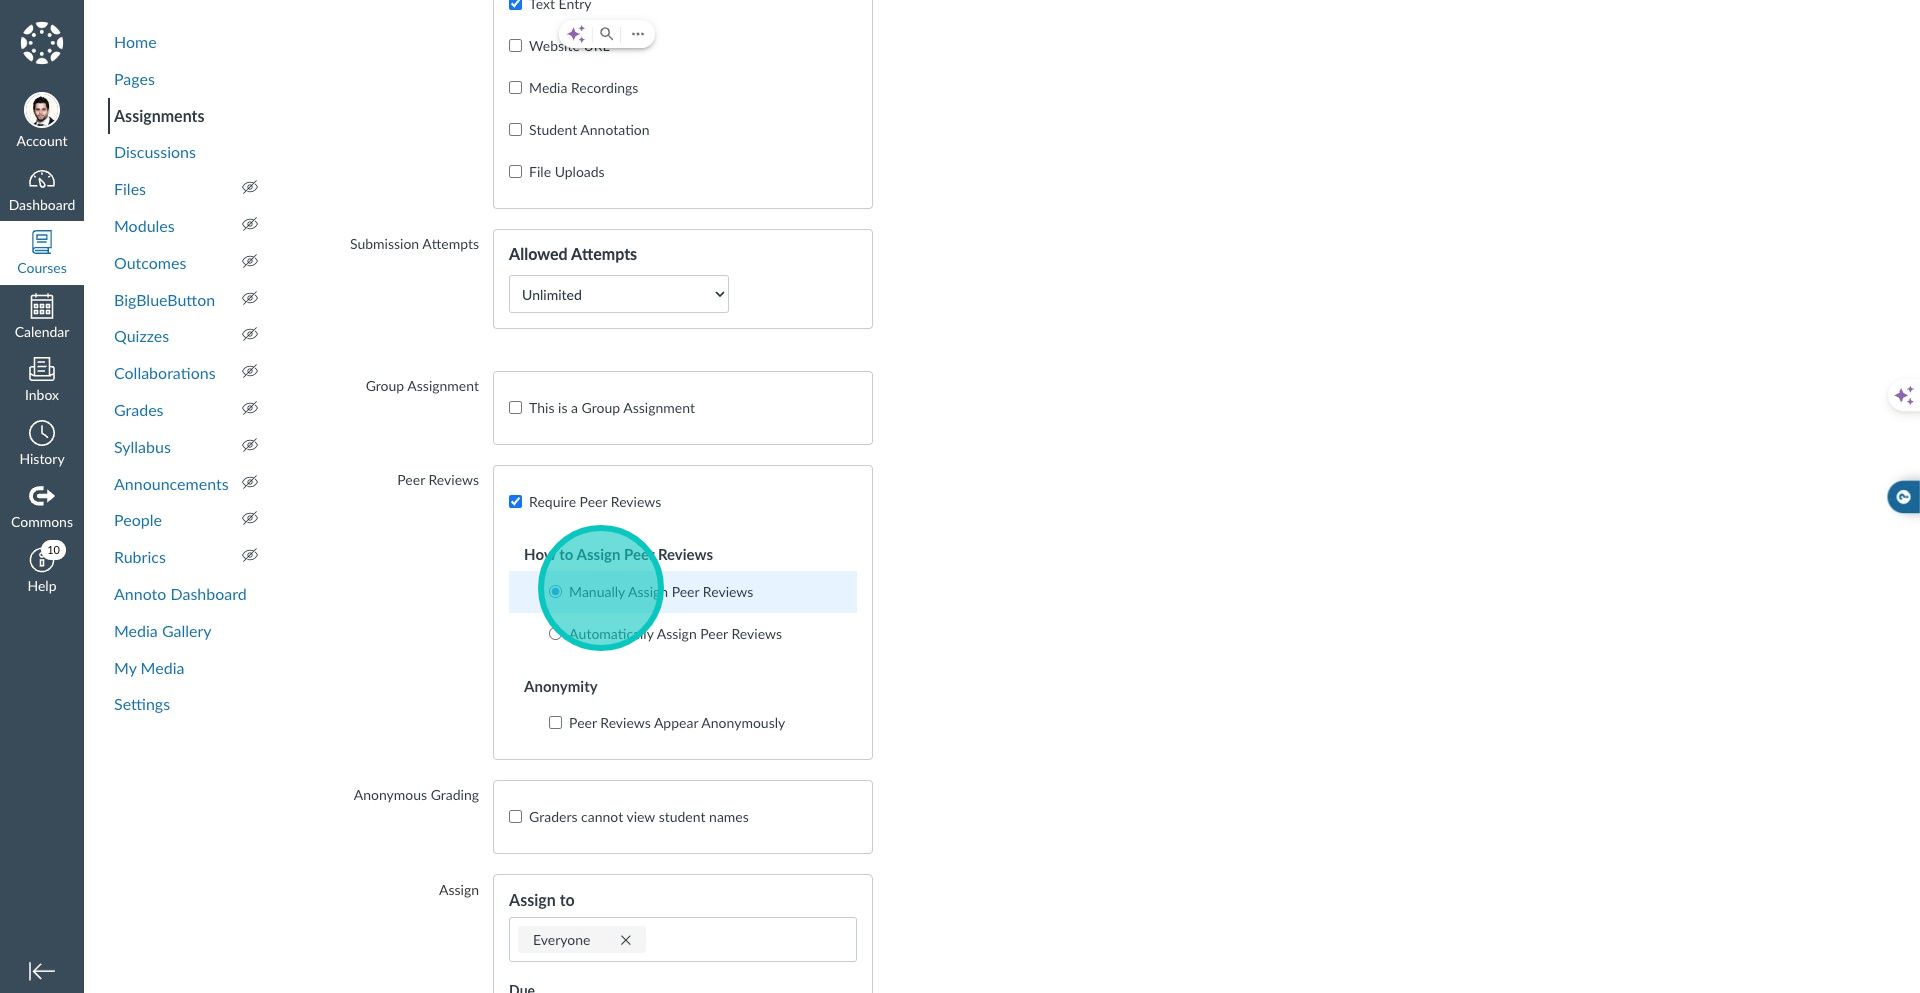
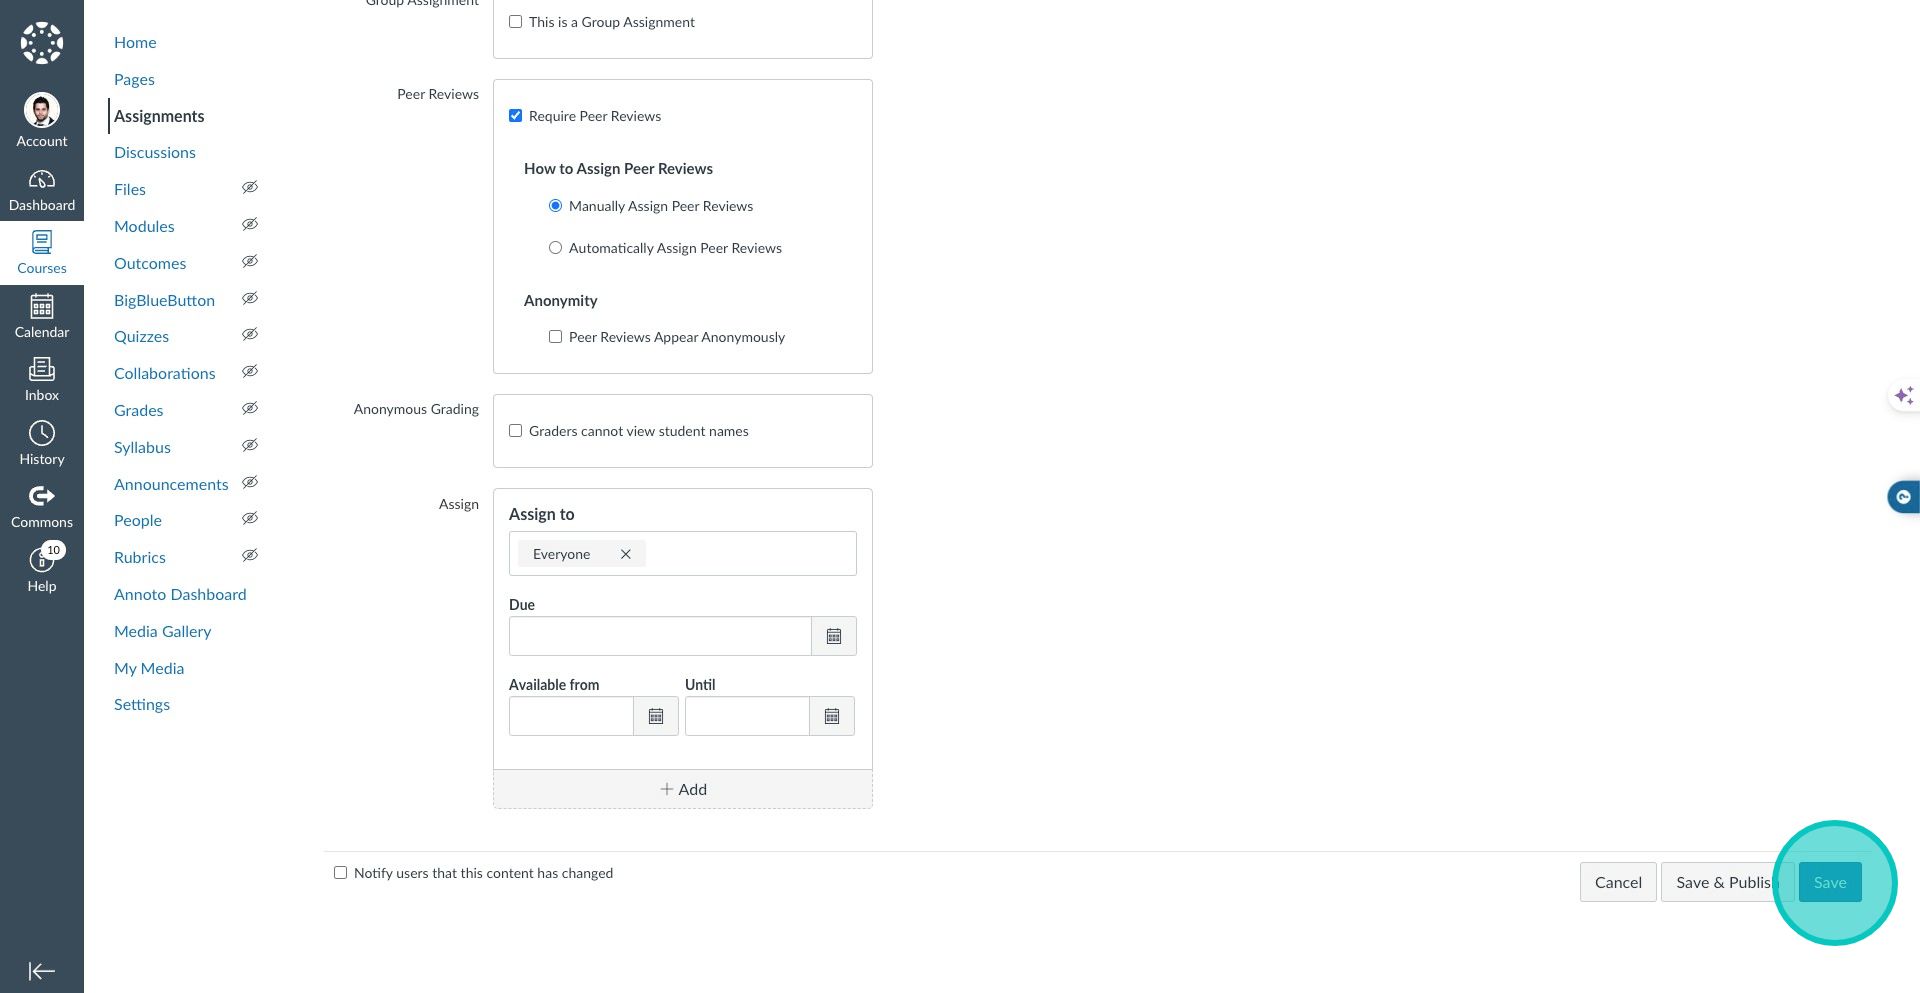
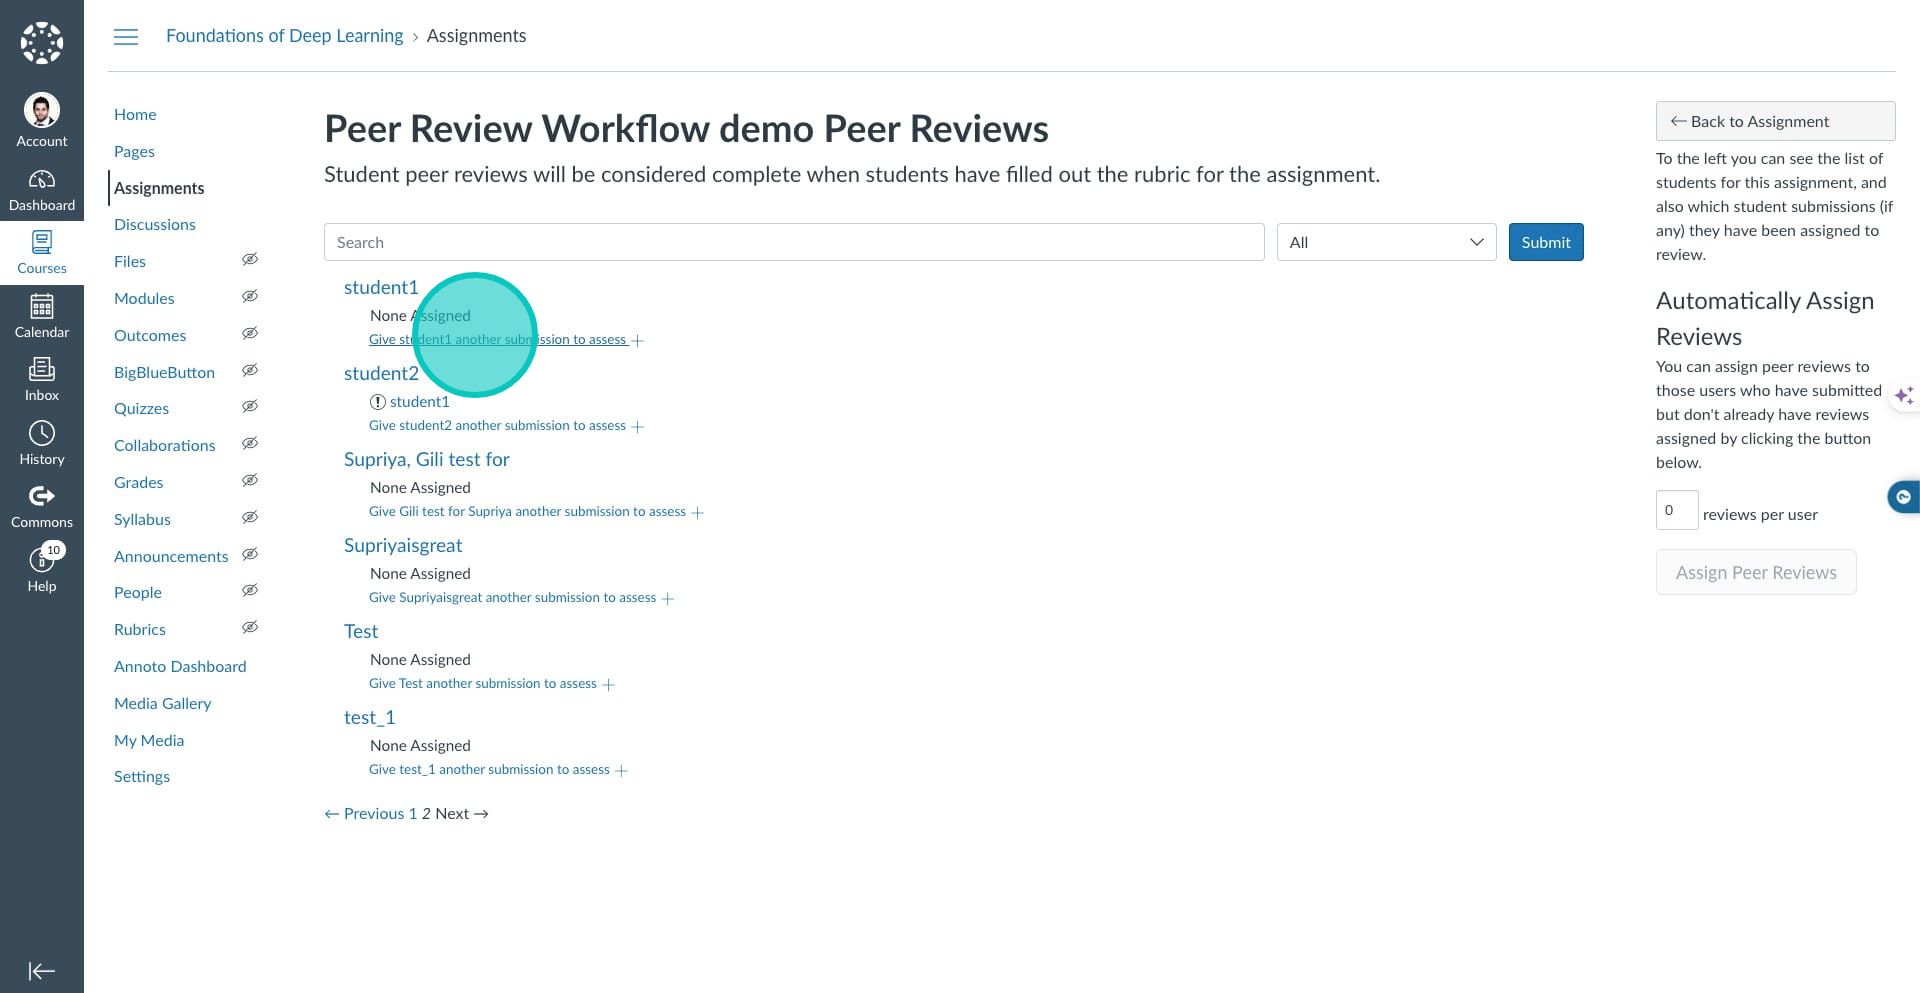

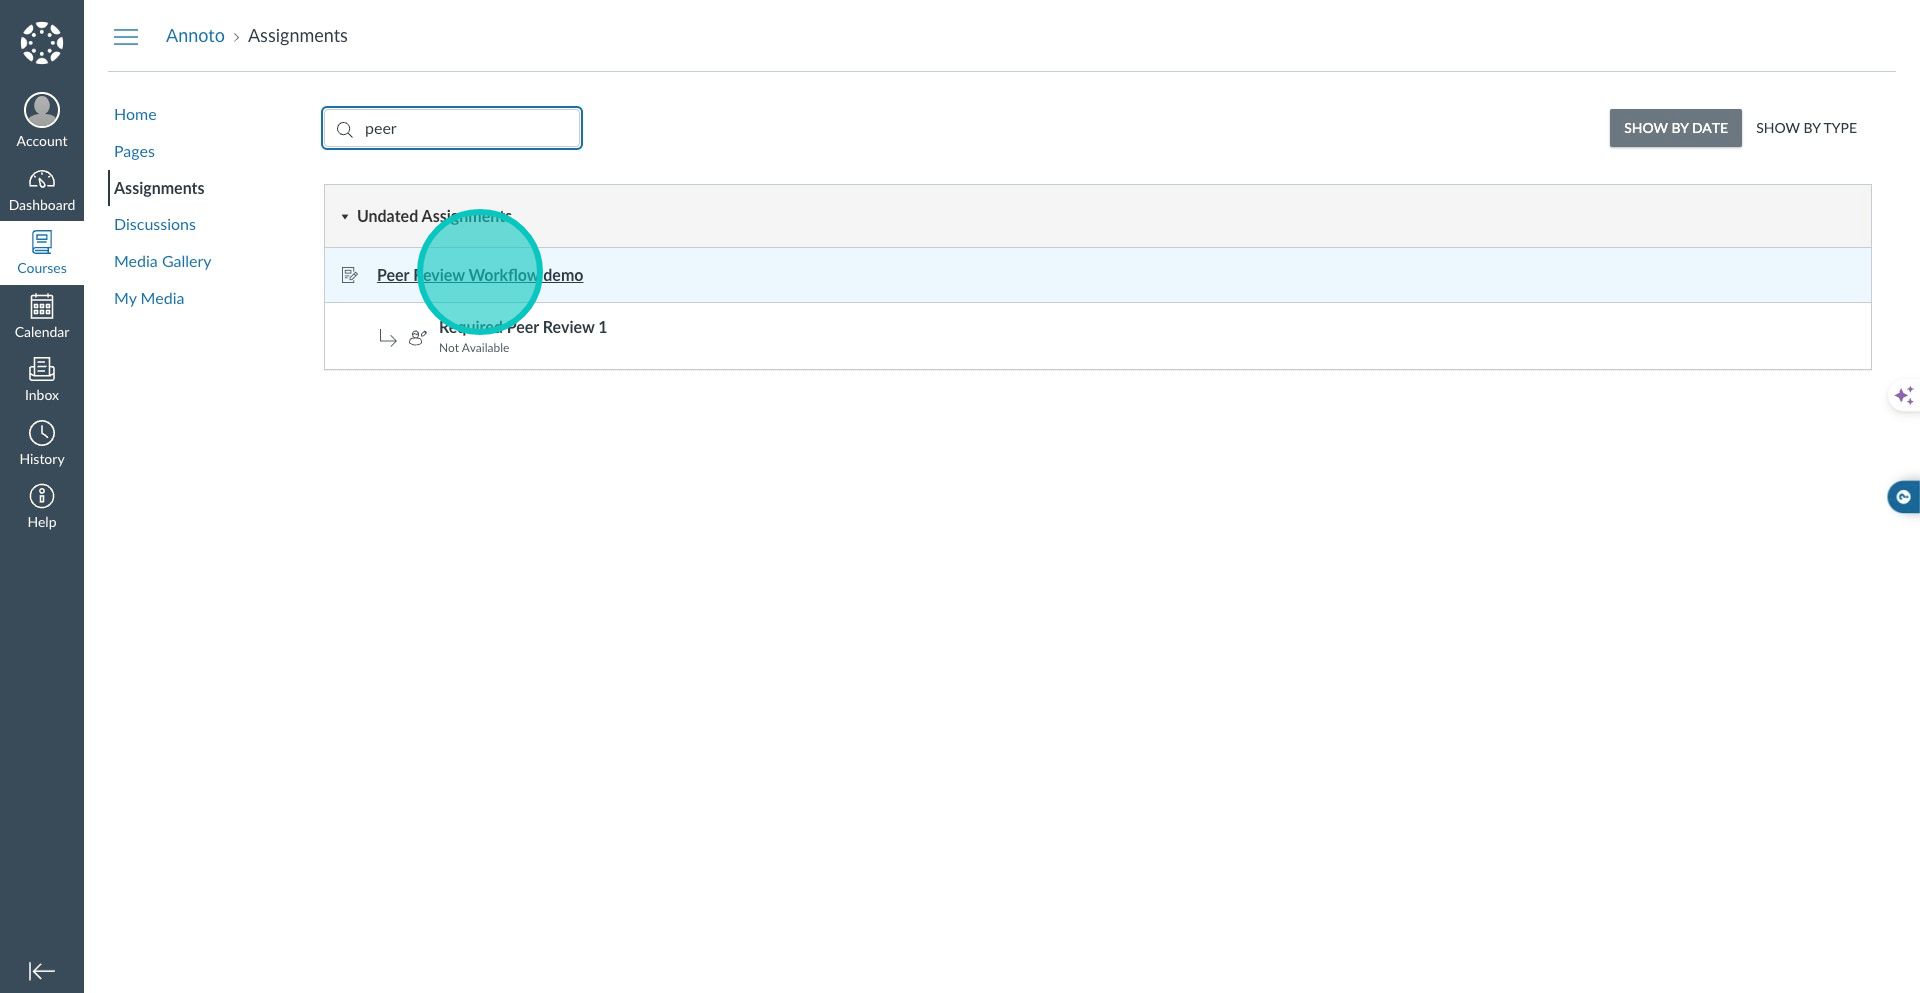
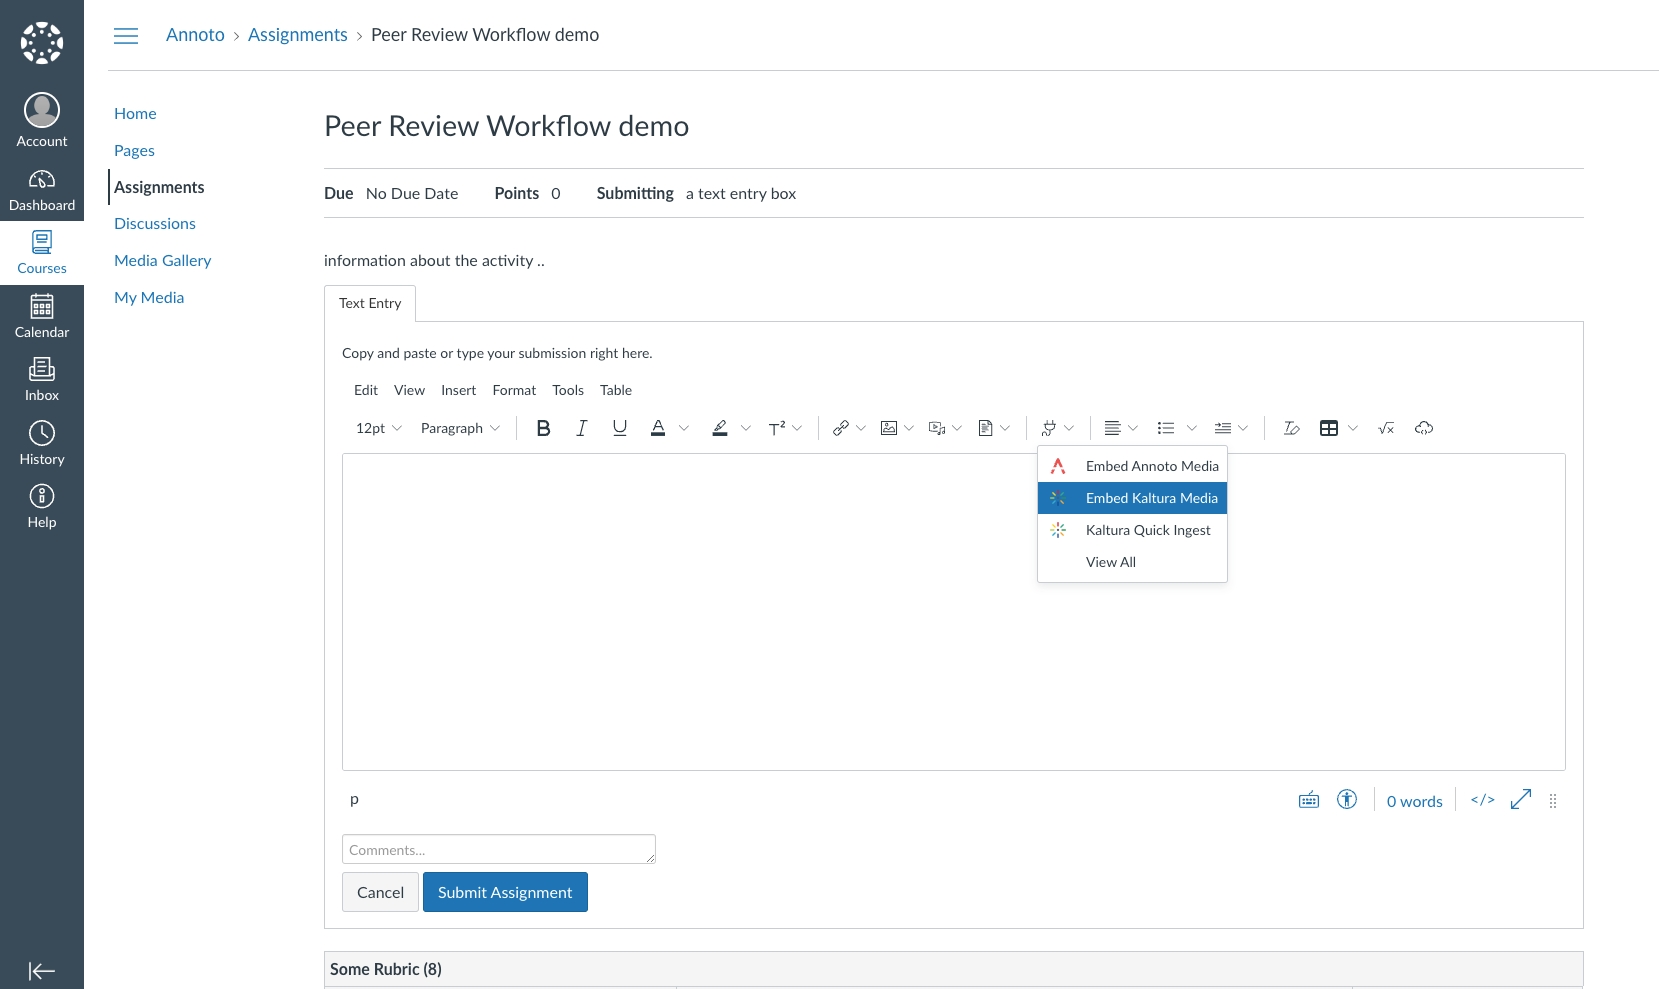
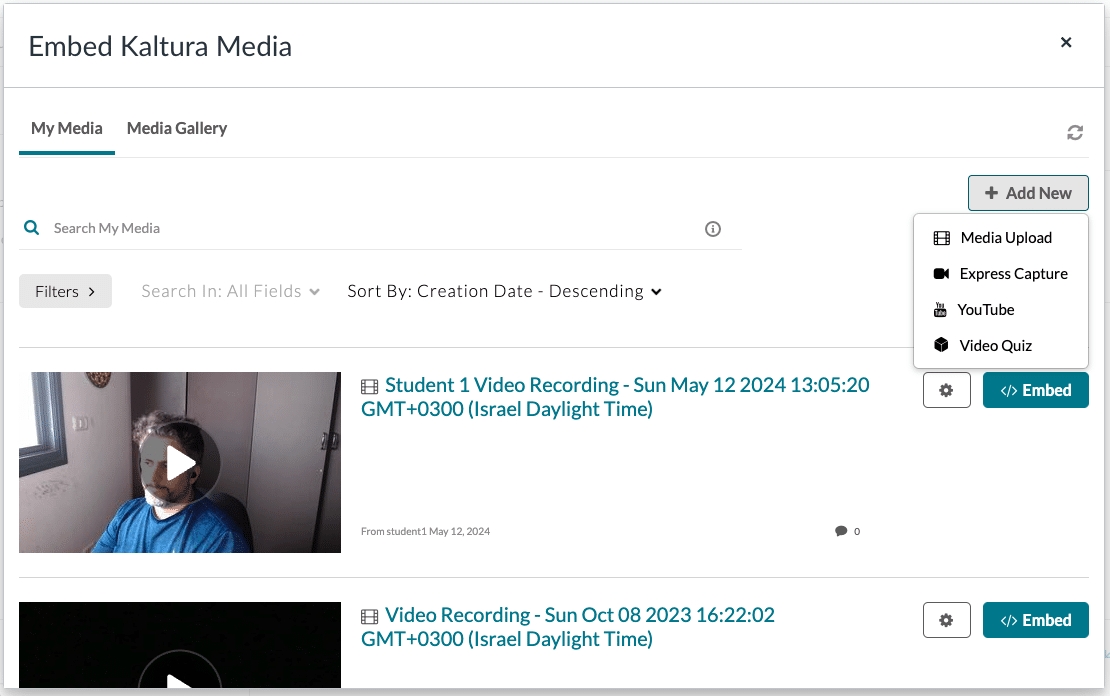
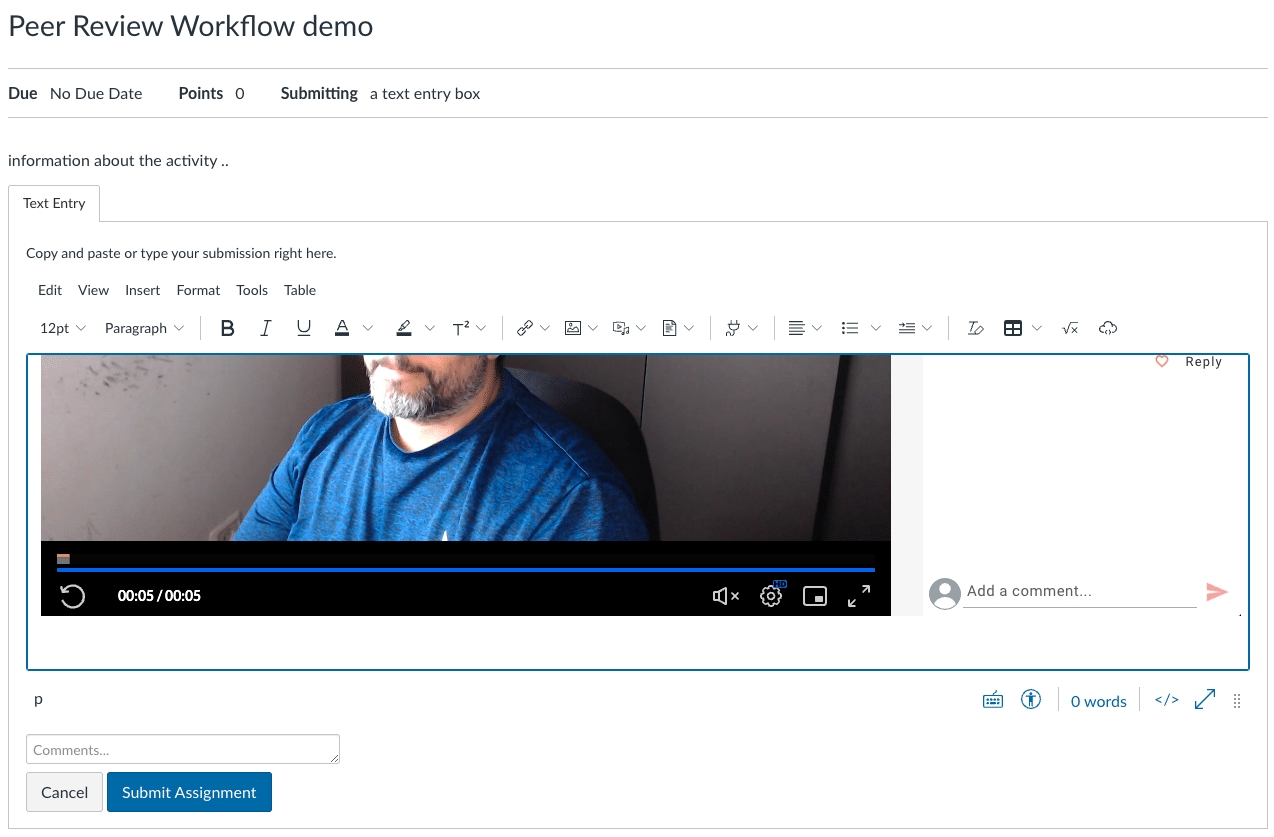
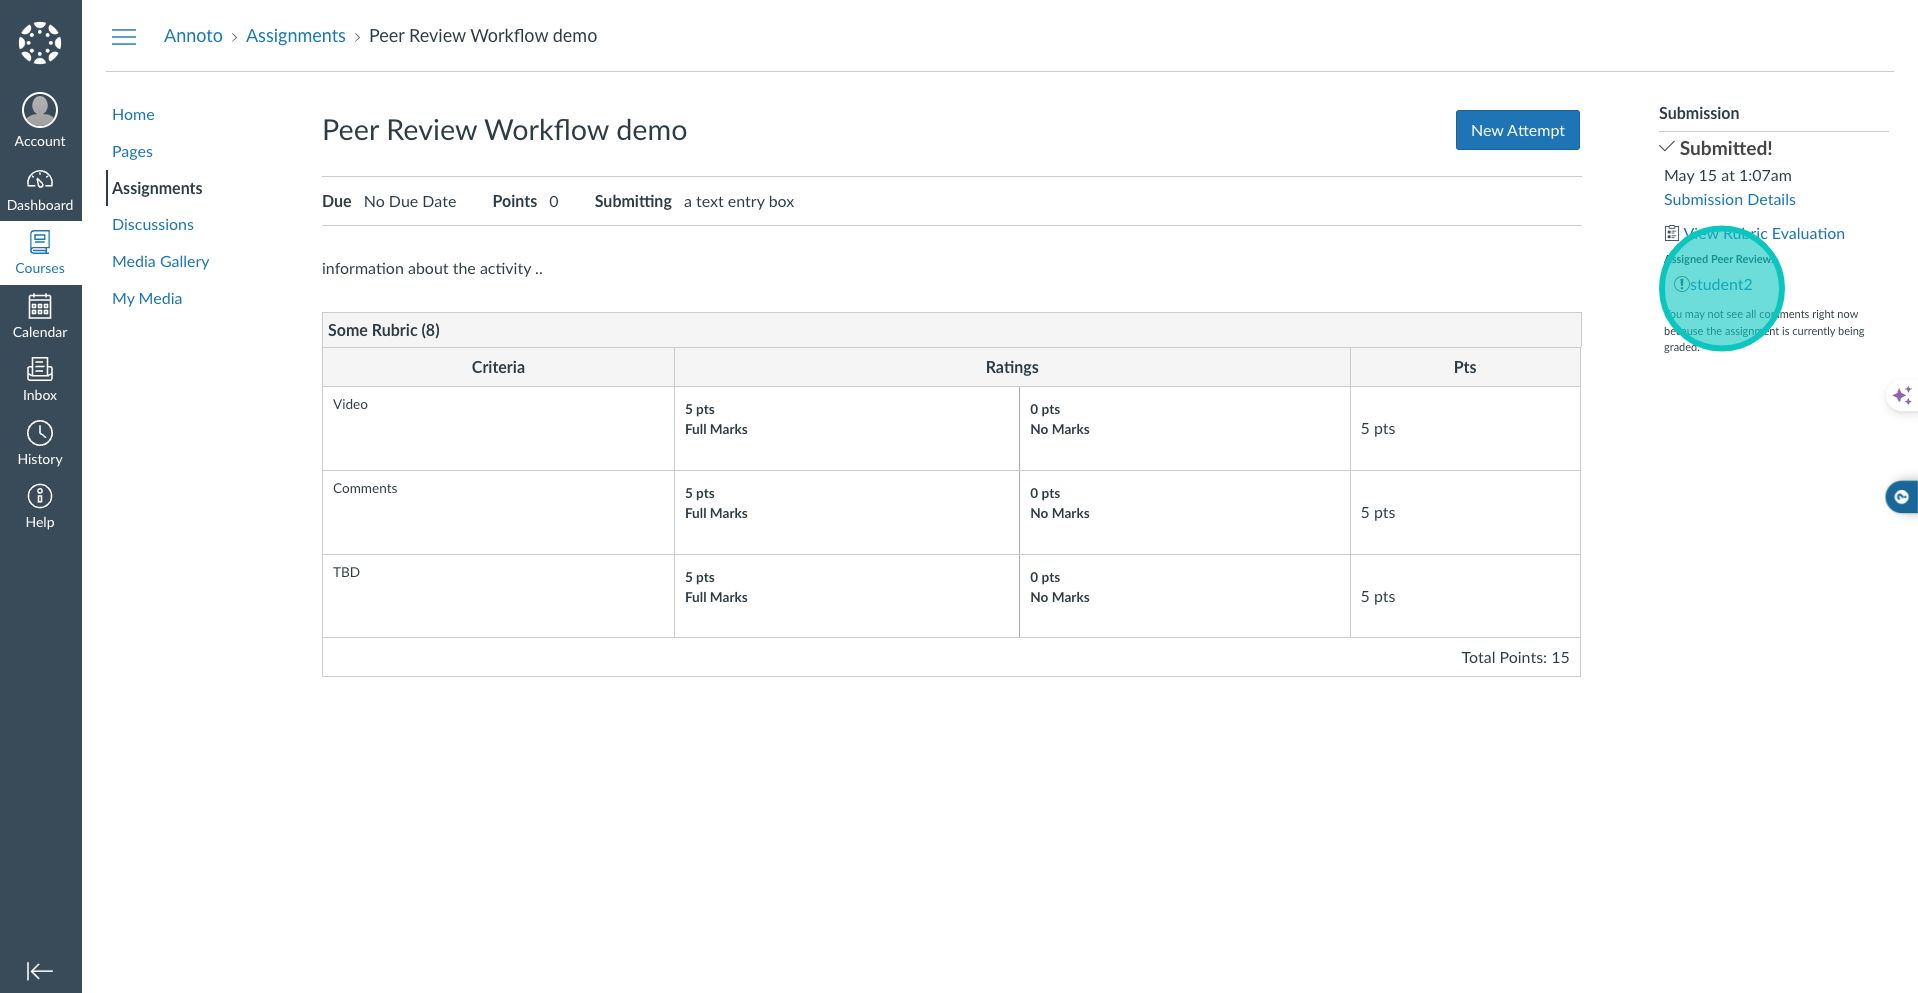

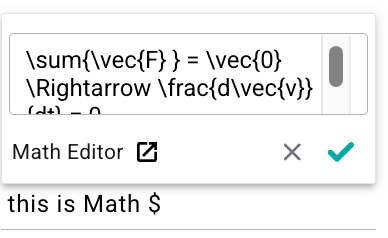
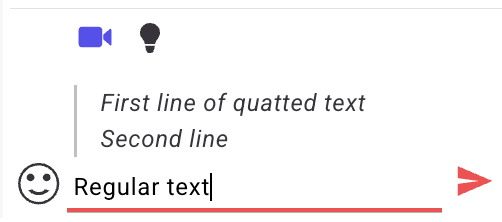
Moderate - delete users' comments (in case needed)
Watch Time(%) - Aggregated number of seconds the user has watched in all view sessions. The metric is shown in percentage .
Views - Number of times the user .
Engagement - User's score for creation and consumption in this video. For more details please refer to .
Collaboration - Number of comments and replies the user added in the video.
Replies - Number of replies the user submitted.
Notes - Number of personal notes.


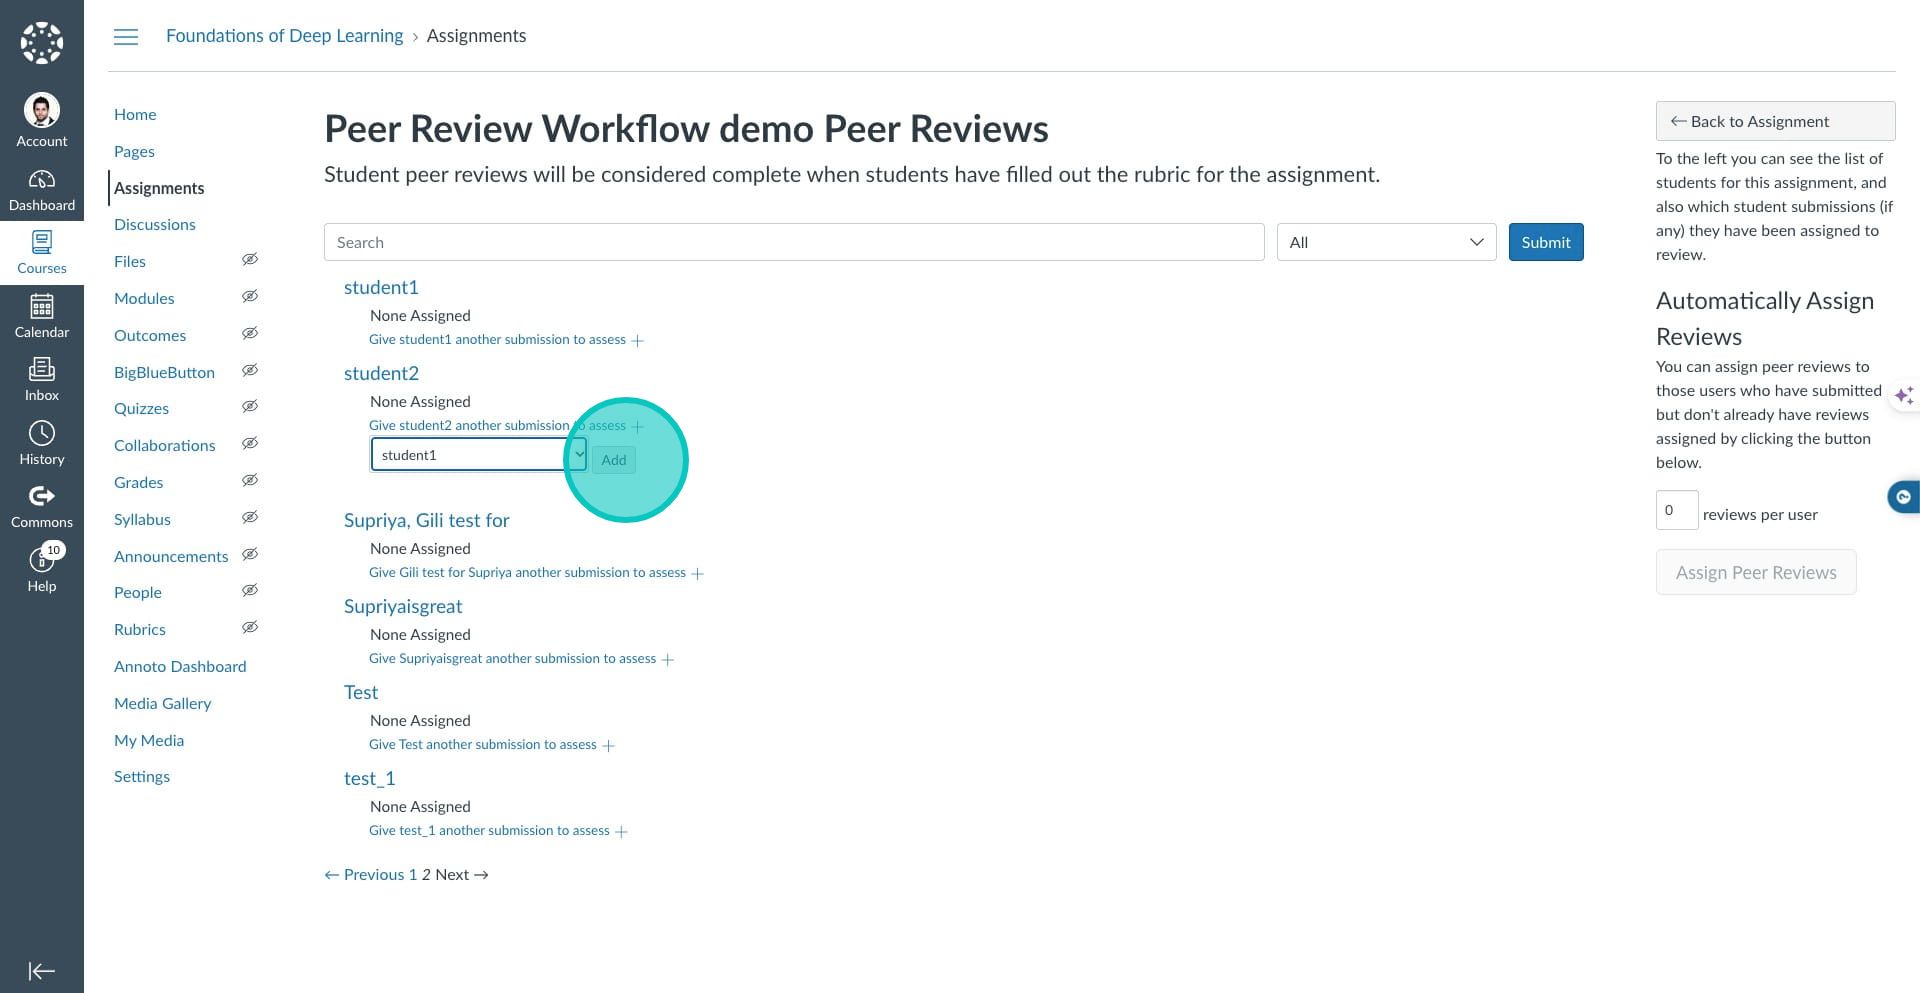
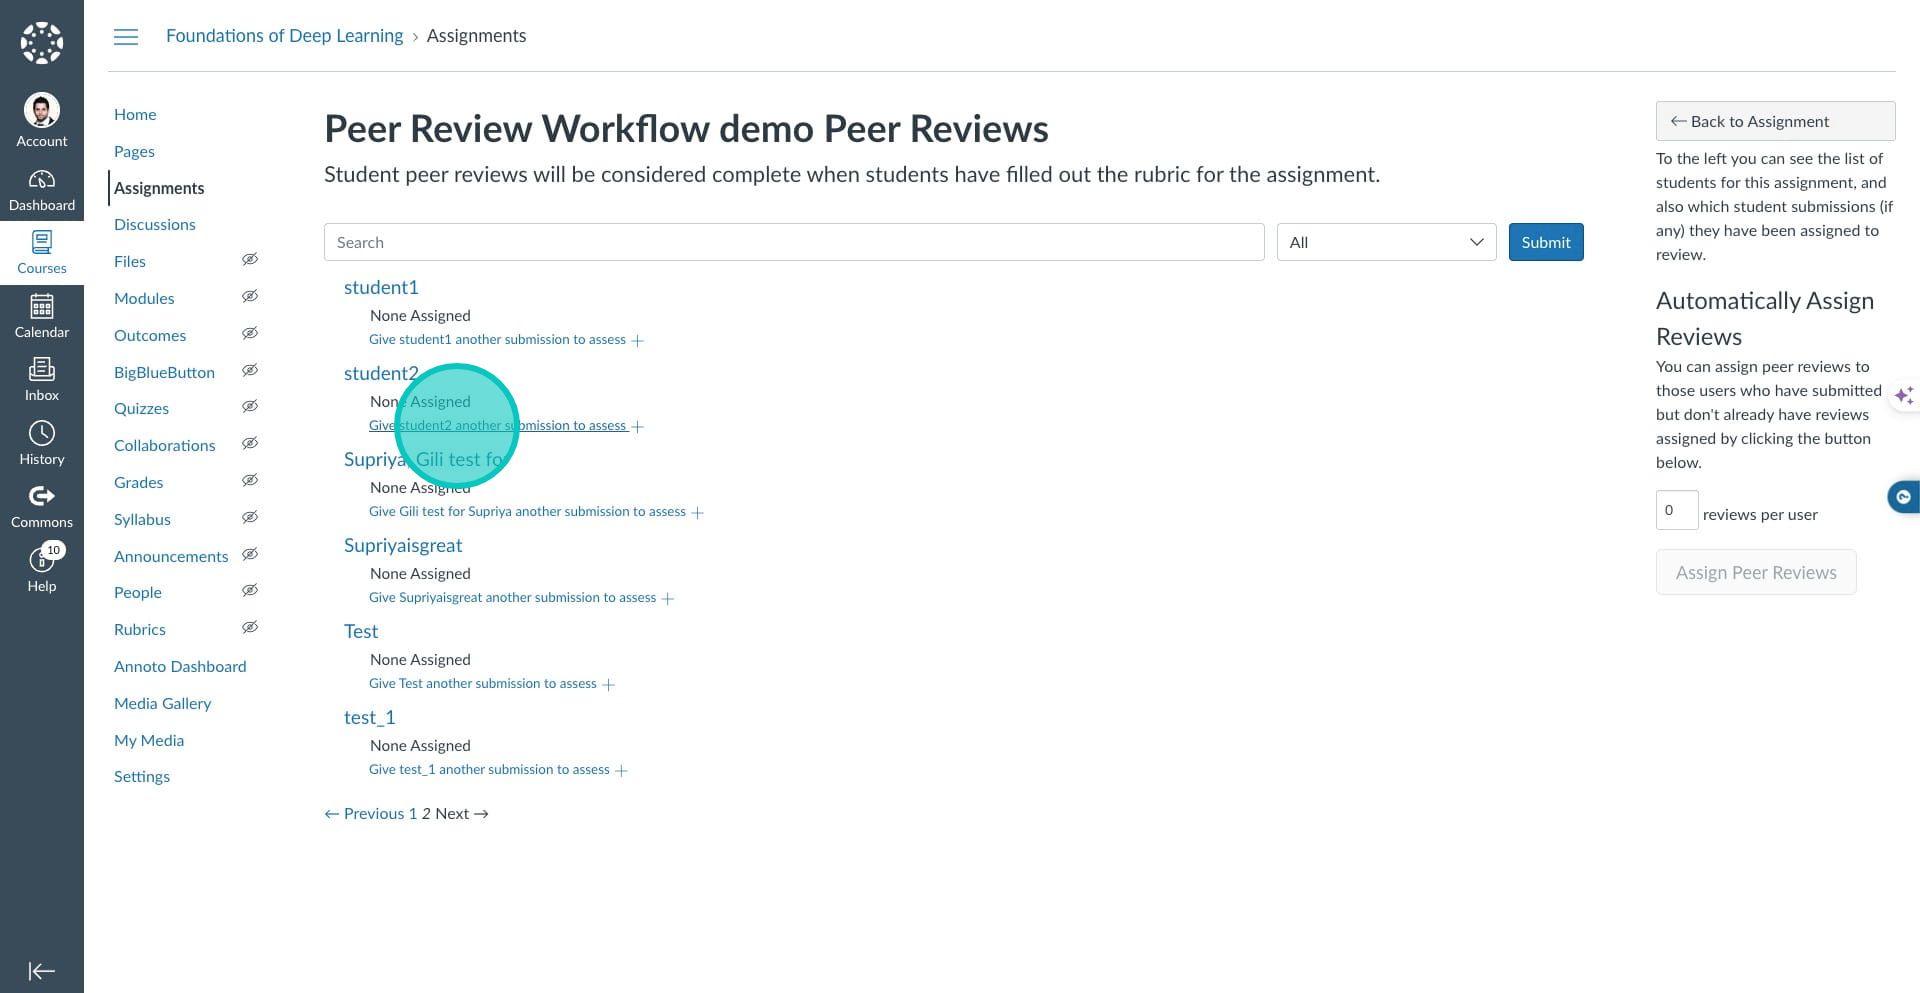
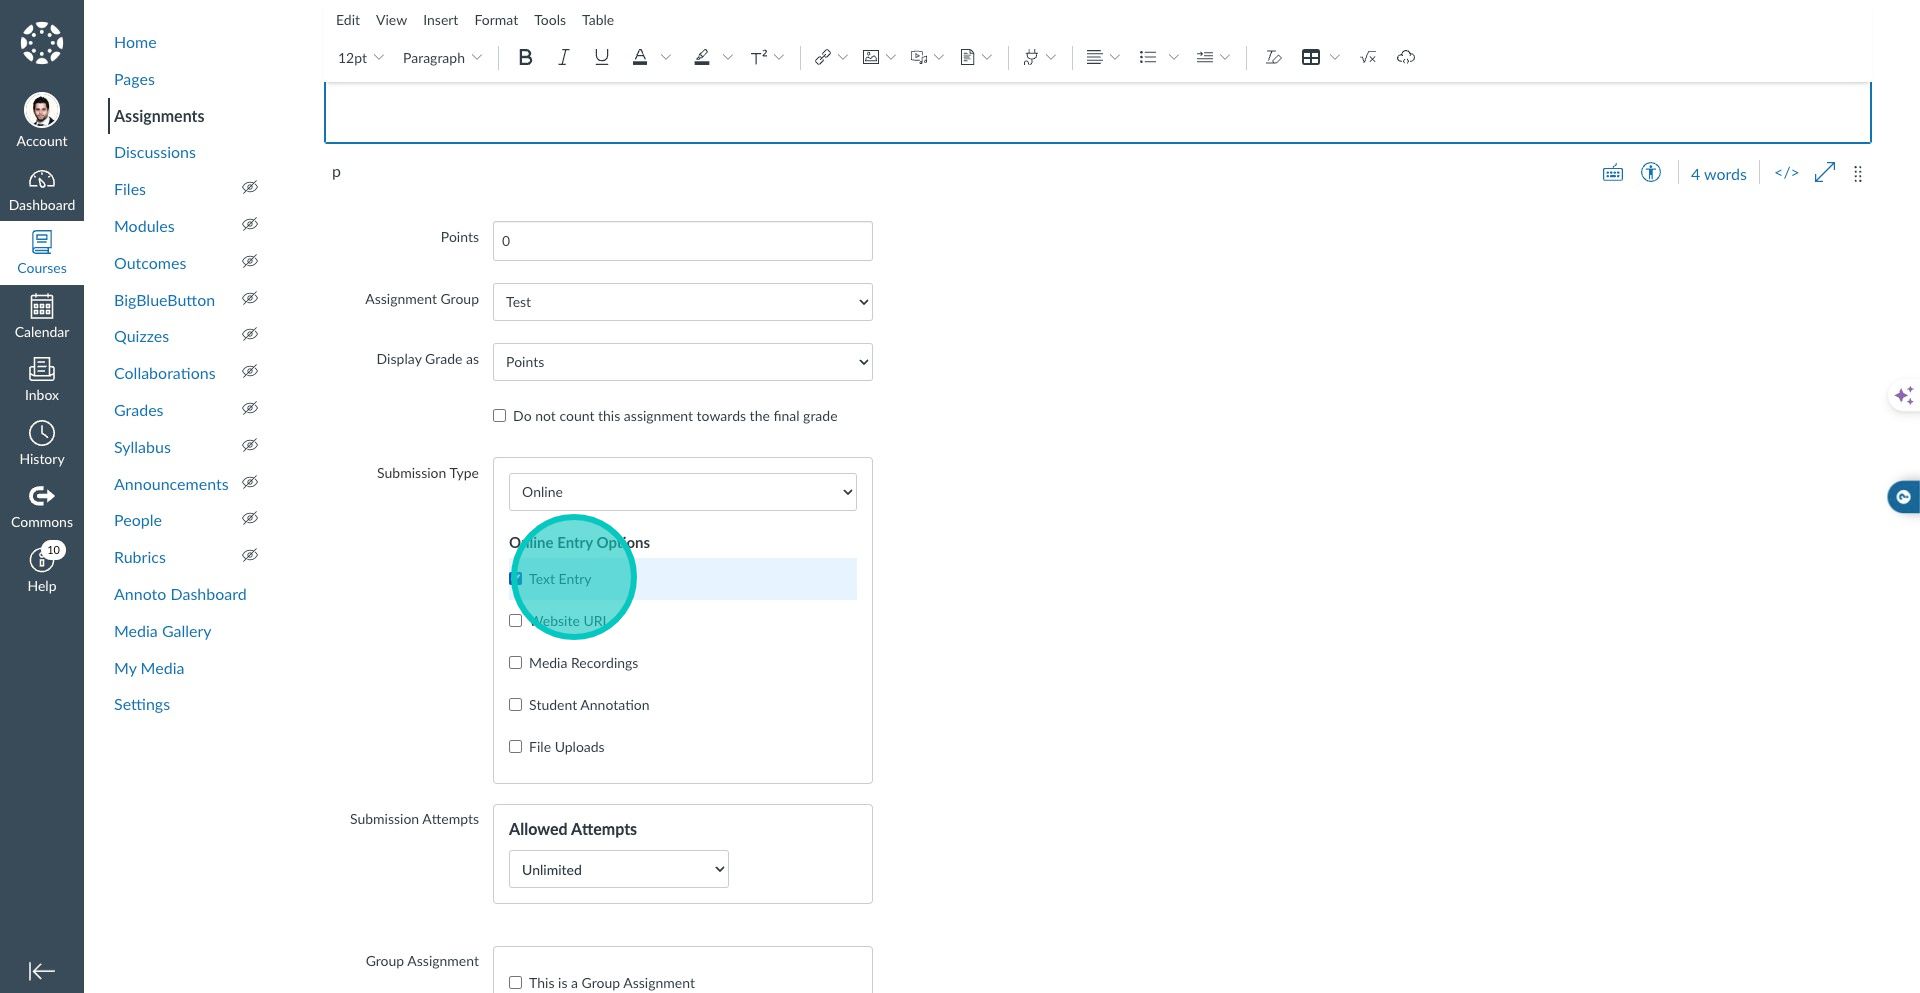


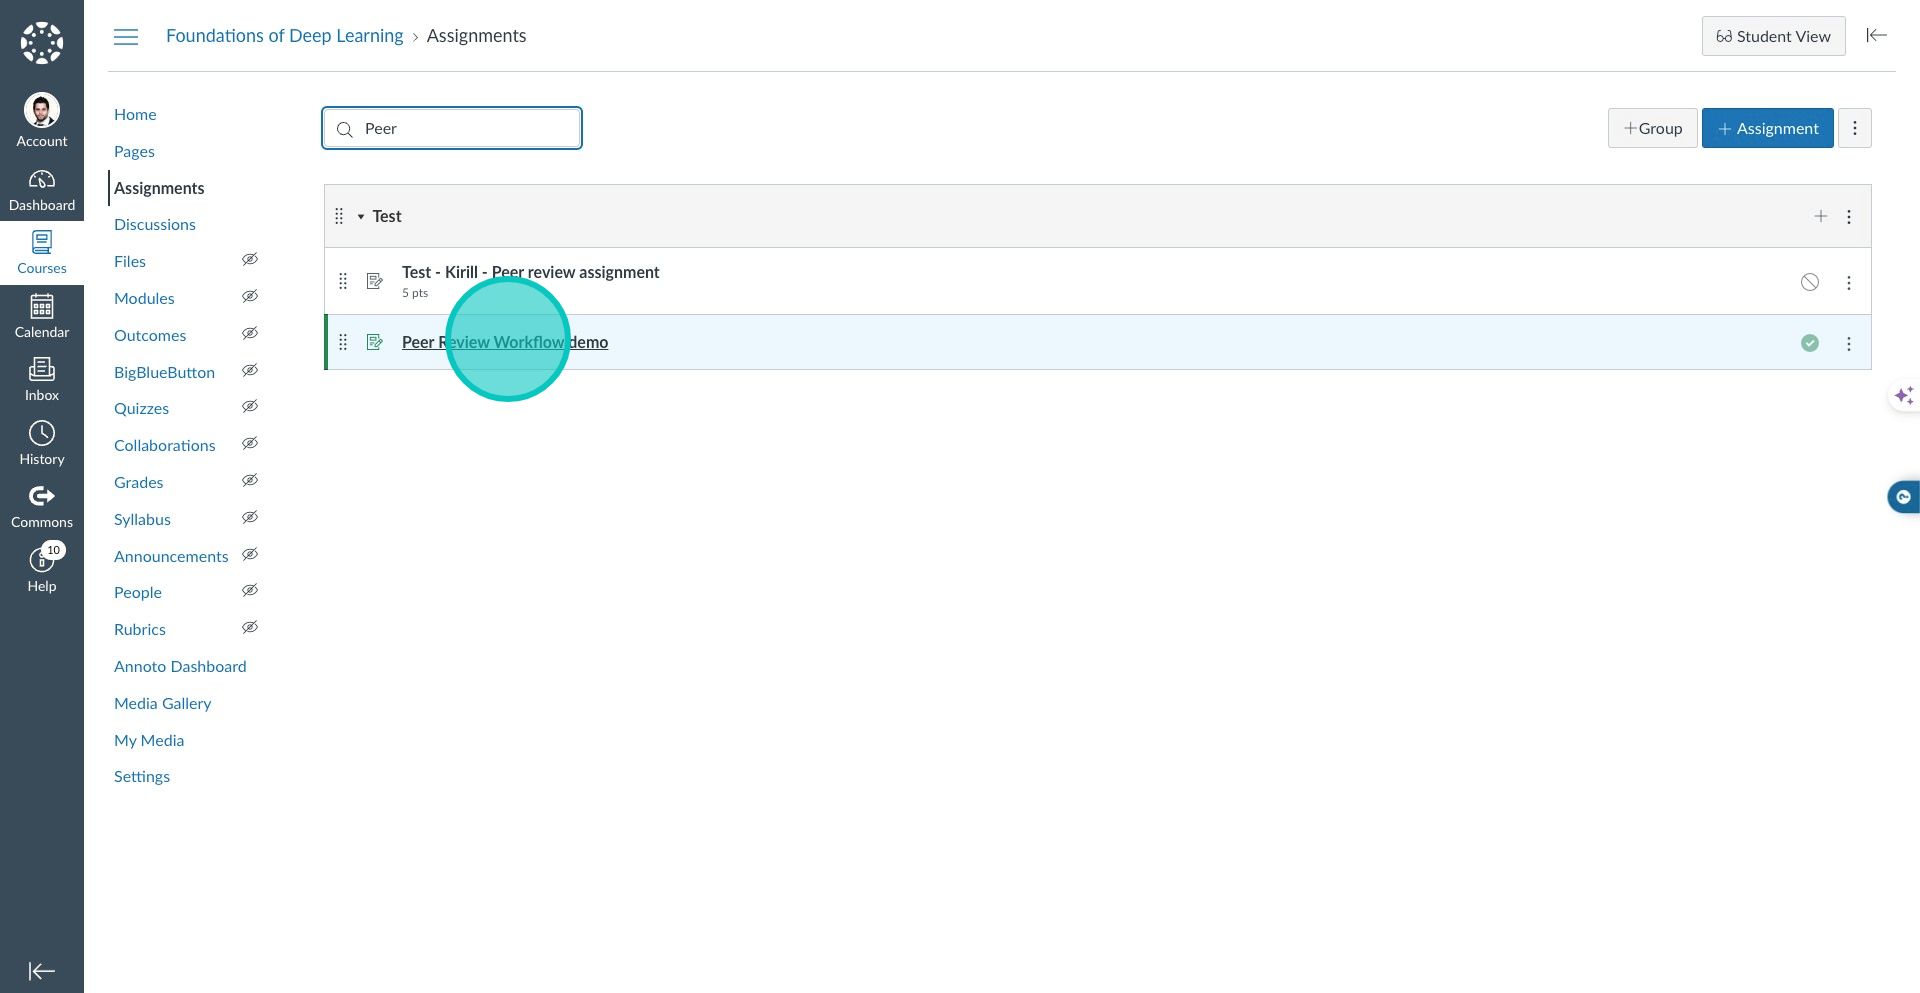
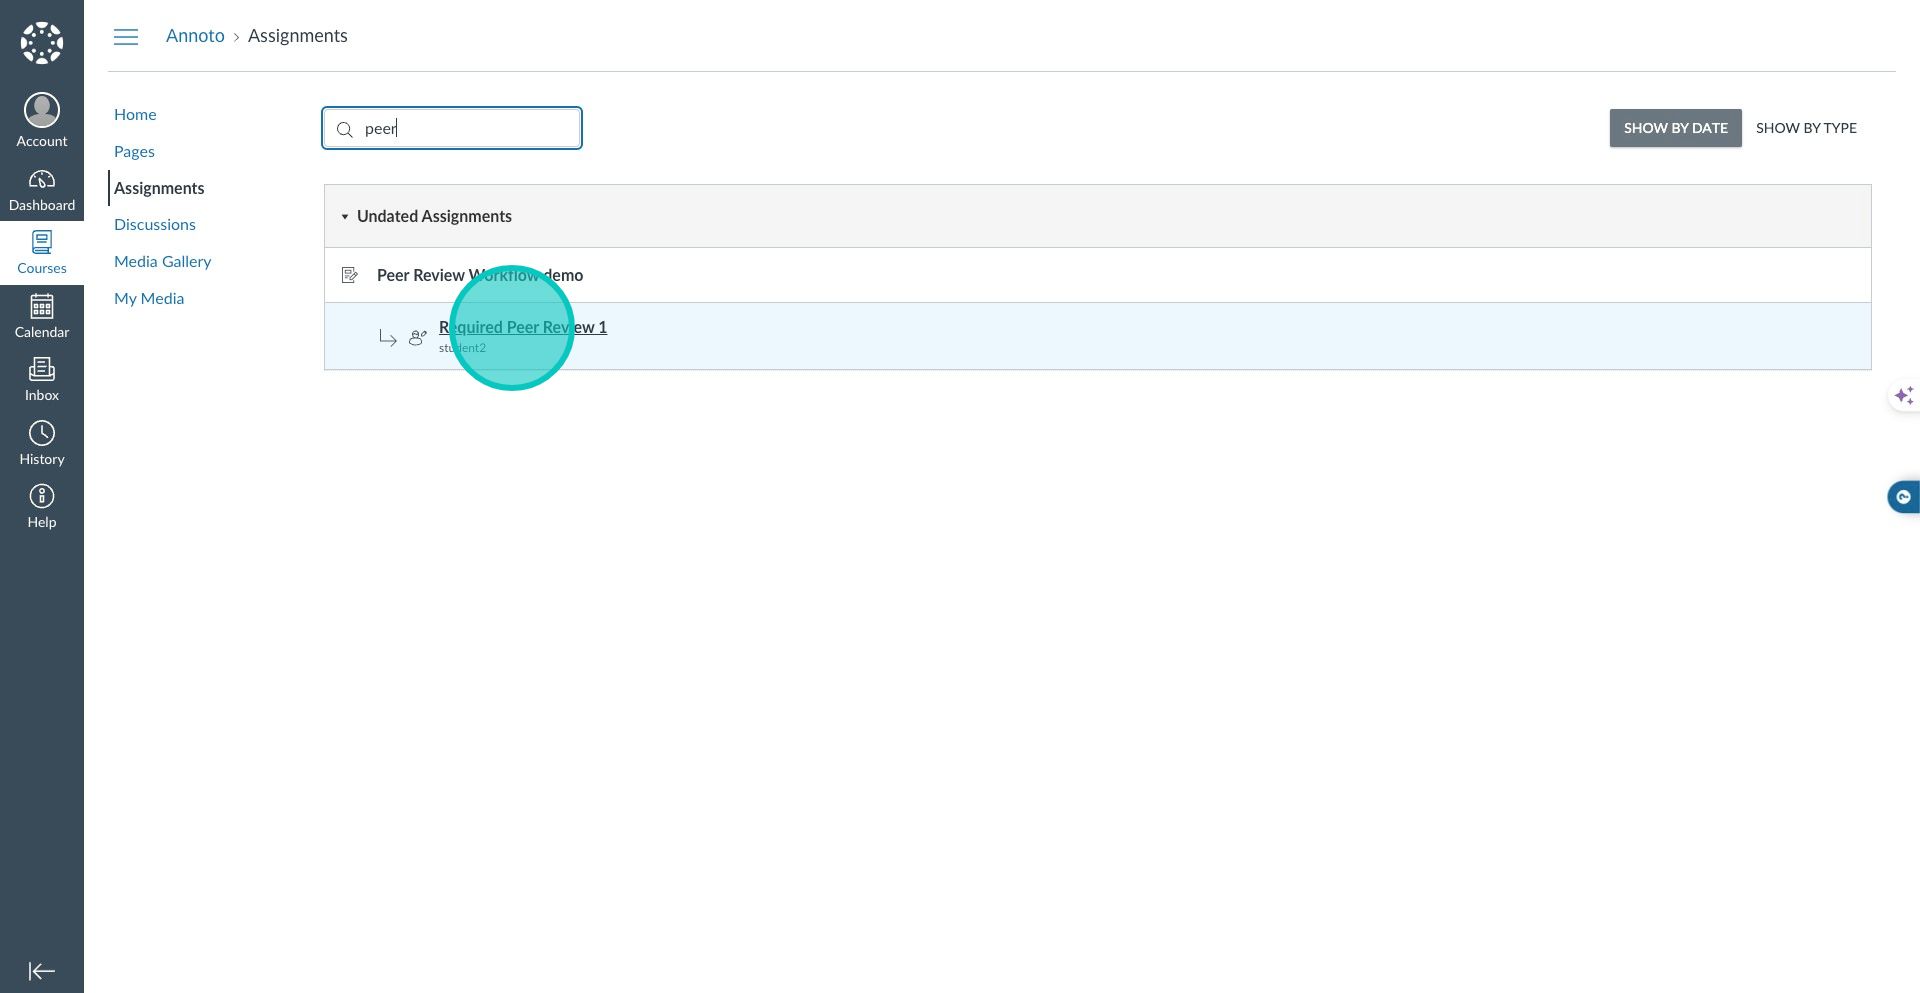


Your course Hub gathers all course content and allows you not only an overview of the course, but also the ability to see the activity in each video and manage it.
The controls at the top of the Hub card allows you to quickly search for videos by title, sort and perform common operations:
Videos can be sorted by:
Number of unread comments (number of comments not reviewed by you)
Last activity
Collaboration (number of comments)
Each video item in the Hub includes:
Video title + Thumbnail
Number of Interactions (If there were any):
Number of comments (in grey) and unread comments (in red):
Date of Last activity in the video
Clicking on a specific video will take you to to manage the discussion.
An instructor has the ability to import data from one course to the other:
Course Preferences
All course comments that were written by the instructor
Course published Interactions
This was created in order to save instructors from doing the same work over and over.
That means that if you are teaching the same course in another semester – you can use the comments and Interactions you already used built-in time-tag, no need to write them again
Exporting & importing comments will be only of the instructor’s root comments.
Learners’ comments will not be imported – keeping a private discussion per course.
This is easily done within the dashboard of the course you want to import to, as you can see , or in the following instructions:
Go to the course Hub:
Click on the 3-dots menu on the right side (Next to "Unrest Comments"):
Choose “Import data from another course”:
Choose the course you want to import from (you can search by title):
Choose what you want to import (by toggling) – Preferences/ Comments/ Interactions and click on the green Import button:
This is it! Everything you chose will be imported.
All duplicated comments will have the same as the original comments
Duplicating comments can be extremely useful in , , or - anywhere you added questions, comments or insights for your learners, and you want to use them again.
Once imported, all instructor's root comments will be added to all videos in the new course. If there is a comment you do not want in a specific video - simply this comment.
You can mark all the comments as READ, by choosing Review all Course comments:
Course Insights consist of 4 tabs, each sheds light on a different perspective of the activity:
Overview
Videos
Users Activity
This tab provides you with highlights of participation and engagement in the course.
On the left we can see a radial bar representing how many of the users are participating in the course.
Hovering the mouse over the bars provides details on the participation category:
Active Users: Number of active participants in the course
Engaged Users - Percentage of the engaged users. To learn more about which users are considered engaged, please refer to .
Collaborated Users - Percentage of users that wrote at least one comment or a reply.
In the above example: 53% of the learners collaborated in the course. This indicates active learning!
The engagement in this example course is higher than collaboration. This means that the discussion created by 53% drove many more users to be engaged in the course and had meaningful interactions.
On the right side we can see general information about the course:
Active Videos – Number of active videos in this course.
Avg. Completion Rate – Sum of percent watched in each view session divided by number of views (for all the course users that watched all course videos). How well the the course videos perform in terms of dropout.
In addition, we can find the aggregated activity metrics made by all course participants.
Views – Number of times videos were viewed in this course. For more details, please refer to How Views are counted.
Engagement – Rating for user generated content creation and consumption for the course. For more details please refer to How engagement is measured.
Collaboration - Number of comments and replies in the course (for all course videos).
Interactions - Number of interactions (quiz questions) in the course (for all course videos).
Notes - Number of personal notes in the course (by all the course users).
The Courses Videos table provides analytics for each video within the course:
The table can be sorted by each column to quickly find top performing videos in the course by the selected category. For example the most engaging videos, or videos with highest Average completion rate, etc.
Last Activity - Date when the users were last active on the video.
First Activity - Date the video was added to this course (that we know of).
Users - Number of users that viewed the video.
To learn more about Total Completion, Avg. Completion Rate and Watch time, we highly recommend to read:
Recommended further reading:
Clicking on any of the rows will dive into the of that specific video.
The Course Users Activity table presents the activity of each user in the course.
The table can be filtered by each column to quickly find The most active users in the course by the selected activity type. For example the engaged users, or users that are sharing their knowledge by adding the most replies.
Last Activity - Date of the user's last activity in the course.
Avg. Total Completion – Average Total Completion of all the watched videos. Total Completion is aggregated video completion for all view sessions (video coverage).
Avg. Completion Rate – Sum of percent the user watched in each view session divided by number of views (for all the videos in the course). How well the user performs in terms of dropout (how much of the video the user watch each time he viewed it).
Recommended further reading:
Clicking on any of the rows will dive in to the of that specific user.
If a user is not on the list, it means the user did not have the sorted type of activity.
The Activity Trends graph shows trends of key metrics over a period of time. It allows to investigate how the users learn over time and identify important events throughout the course life cycle.
The key metrics of the trends are: Engagement (blue), Collaboration (green), Notes(orange) and Views(red).
Recommended further reading: .
Might also interest you:
Course analytics data can be exported, and downloaded in CSV format
The export button is available at the top bar of the Course Insights.
Clicking on "Click to Export the Analytics Data in csv format" downloads a zip folder that contains the following CSV’s:
Overview – the highlights of the course.
Users – Course Users activity (with additional fields such as: user email, votes, last login date).
Videos – Course Videos.
Recommended further reading: .
May also interest you:
The data in CSV files is formatted and optimized for custom analysis using software such as Microsoft Excel.
The files are encoded using UTF-8. If you encounter any issues with non-English characters, please follow our guide.
Use the Features cards and User Experience tab to choose the default preferences for all the course videos. You can manually set your preferred features or simply use one of the presets.
Please refer to section to learn more.
A-Z (alphabetical order)
Comments from other instructors in the course will not be imported - to keep the privacy of each instructor.
Noted Users - Percentage of users that wrote at least one personal note.
Views - Number of times the video was viewed. For more details please refer to .
Avg. Completion Rate – Sum of percent watched in each view session divided by number of views (for all the course users that watched the video). How well the video performs in terms of dropout (how much of the video the users watch each time they view it).
Avg. Total Completion – Average Total Completion of all users that watched the video. Total Completion of single user is aggregated video completion for all view sessions a user had (video coverage).
Avg. Watch Time(%) - Average Watch Time of all course users. Watch Time of single user is aggregated number of seconds watched in all view sessions. The metric is shown in percentage for convenience to be comparable to the completion metrics and to be comparable between the videos in the table (hovering the percentage shows the formatted time in seconds).
Engagement - Rating for user generated content creation and consumption. For more details please refer to .
Collaboration - Number of comments and replies.
Interactions - Number of interactions.
Notes - Number of personal notes.
Duration - Video duration
Avg. Watch Time(%) - Average Watch Time of all the videos. Watch Time is aggregated number of seconds watched in all view sessions.
Views - Number of times user viewed videos in the course. For more details please refer to .
Watched Videos - Number of videos out of the total course videos the user has viewed.
Engagement - Score for creation and consumption by the user. For more details please refer to .
Collaboration - Number of comments and replies the user wrote in the course.
Replies - Number of replies the user submitted.
Notes - Number of personal notes added by the user.
ThumbsUp Badges - Number of likes on comments received from Educators.


Annoto is an in-video collaboration solution that enables users to contribute, share and learn together, turning passive 1-way video viewing into an interactive group experience.
The following guidelines and best practices are here to serve as your toolkit to promote learners' engagement in the learning materials and encourage the learners to take an actionable part in learning, driving them to lean forward towards the video and actively learn from it.
Send an email or a message to the learners to inform them about Annoto with a short description, for example:
Add course announcement to the learners to inform them about Annoto with a short description. Feel free to use the phrasing above or a shorter introduction.
If you wish, you may use the following phrasing:
(same as in the image above, here for you to copy):
Meet Annoto!
Annoto allows discussing and collaborating while watching videos anytime and anyplace, using time-based video annotations as an overlay to any video.
Annoto includes several spaces, each enables a different way of engaging with the video: a focused discussion regarding any moment in the video, as well as the ability to manage a personal journal throughout the course, to have a private chat with any of the course participants and even in-video quizzing. Any video can include one or more of the Annoto Spaces (Comments/ People/ Personal Notes/ Interactions).
Annoto is presented aside the video, meaning you are not required to leave the video in order to ask a question, comment or add a note - everything is right in front of you. 😊
Enjoy!
Dear learners,
Meet Annoto. Annoto is where you can ask questions about the video, share your thoughts and contribute to the discussion. Every comment in Annoto is time-tagged, keeping the discussion always within the context of the video.
Enjoy!
It’s best to add a comment to encourage the discussion in videos before the course starts. This way you can make sure all of the learners will see the comment (once a learner finished watching the video, he probably won’t see the correspondence that occurred after that).
Asking your learners a question or inviting them to share examples can be a catalyst of the conversation and perhaps serve as an indicator to the level of understanding.
Adding a comment in the form of a question can do wonders in terms of engagement. Learners that are requested to add an example or share a thought will definitely be more involved than learners that are only watching.
Add comments on different moments of the video with additional facts or ideas and call users to action asking them what they think.
Teach the learners the art of replies: encourage them to reply to each other's comments. Let them know when a learner wrote a good reply or asked a good question.
You may add a comment in Annoto that invites learners to answer one another.
The timing of your comment throughout the video will provide additional motivation to the learners to watch the entire video.
When you answer another's comment or question, make sure you use the "Reply" button, and not writing your answer as a new comment. This way you can be sure the discussion keeps its context.
In many cases – one user's question on top of a video can save duplication of this question (by multiple users) in other platforms
A good question is both answerable and challenging.
Here are a few examples of comments phrasing that can stimulate the discussion:
Additional comments and questions phrasings can be found .
Additional ideas:
Additional activities and ways to encourage discussion can be found .
Any comment or note that you add can be given a sentiment, to provide a visualization of its type:
All you need to know about sentiments you can find .
Use Annoto to mark keynote moments in the lecture
Annoto can be also used as an enriching layer to the video: you can add Links and videos as your comment. You can use another video as an addition to the original one, or as a completion). Click to learn how to add videos as a comment.
You may place translations or clarifications to words, phrases or ideas in the exact place in the video that they appear
You may add, in specific moments, questions that are related to that moment and serve as an example for the questions that will be in the exam
When an instructor “likes” a learner's comment or a reply (by clicking on the red heart), that comment\reply is marked with “Educator’s thumbs up!” (yellow medal on the comment).
An example to "Educator's Thumbs Up" can be seen in the following image:
The “Educator’s Thumbs Up!” feature:
Empowers the learner
An indicator to other learners as to what comments are valuable
Drives the ‘labeled’ learner to add more comments
As all the activity in Annoto is measured and presented within the Annoto Analytics and Insights dashboard (more info about it can be found ), Annoto can be used as extra credit, bonus points or as part of the class grading.
This can rely on:
Quantitative measures (number of comments, replies, etc.) - You can learn all about the Engagement Metrics .
Qualitative measures (the content of the comments – can use the “educator’s thumbs up” for acknowledgement and marking) - You can learn all about Comments Review .
A combination of both options (number of good comments, for example)
In order to be notified on new comments and replies in your course or videos, follow the group in the Annoto menu.
Go to the Annoto menu and make sure you are Following this group:
You can follow a course either from the Annoto menu (as seen above) or from the "Following" option from the dashboard (Just make sure you are not already following). how to follow a course from the Annoto dashboard.
From the Annoto dashboard you can also manage the discussion. how to do that.
If you wish to learn about all of Annoto's following options (for example: how to follow only replies to your comments), click to read all about it.
Encourage your learners to follow discussions. This way learners will be informed on new comments and replies. These notifications will get them back to the video, to re-watch it, learn new things and have a deeper understanding of the studied materials.
If you wish to know the context of a specific comment in the video - simply click on the comment's time-tag! This will take you to the exact moment in the video the comment refers to.
Annoto's Time-Line in the video can be a helpful indicator to understand what parts of the video may require attention. Moments in the video that include many comments (will be presented by a high bar) indicate a vigorous discussion. This can be due to an extremely interesting topic, that got the users talking about it or it can point on places in which learners are struggling.
A high brown bar, for example, represents a place that includes many questions. It might be worthwhile to see what it's all about.
You may add a comment to remind the learners they can use personal notes - to highlight or bookmark important parts of the video, to summarize content or to add videos\links to learn from. These personal notes can be exported directly from the Annoto menu, as Docx or Xlsx. Click to learn how.
The personal notes space can be used by instructors to mark moments in the video for which:
Some of the learners might seem to struggle with the material
You are interested in expanding the discussion:
In order to make the most of each video, here are a few tips:
You can sort the comments in the Comments Space, by clicking on the sorting drop-down menu:
Comments can be sorted according to:
Newest - sorts the comments according to when they were added (newest - first)
Top Comments - sorts by the comments that were most voted (liked) and replied to
Timestamp - sorts the comments according to their timetag
Annoto's Time-Line in the video can be a helpful indicator to understand what parts of the video may require attention. Moments in the video that include many comments (will be presented by a high bar) indicate a vigorous discussion, for example:
This can be due to an extremely interesting topic, that got the users talking about it
It can point on places in which learners are struggling.
A high brown bar, for example, represents a place that includes many questions. This may indicate a certain topic in the video that the learners are struggling with. It might be worthwhile to see what it's all about.
To learn more about the Annoto Timeline, click here.
Interactions' settings - when creating an interaction, choose the features that support the interaction's purpose, such as: Feedback (what will the learners see if they answered correctly/ incorrectly), Allow Retry, Allow Re-watch, Answer Reflection (will allow the learner immediate reflection and feedback), Shuffling Answers order, Presentation type (Pop-up/ side panel), etc.
Editing an Interaction - even after an interaction was published, you can and even determine the impact of the change. This will set whether the learners must re-take the quiz, choose if they want to re-take it or not need to re-take it at all.
Align Questions with Learning Objectives: Ensure that each quiz question aligns with specific learning objectives or goals. Focus on assessing key concepts and skills covered in the video content.
Use a Mix of Question Types: Incorporate a variety of question types, such as multiple-choice, true/false, multiple-answer, etc. Different question types engage learners in various cognitive processes, promoting a comprehensive understanding of the material.
Consider Questions/ Answers length: Keep questions short and focused. Avoid having long, confusing answers. Make the length of distractors similar to that of the correct answer.
Test Regularly but Sparingly: Integrate quizzes regularly to reinforce learning, but avoid overwhelming users with too many questions. The optimal number of questions per video duration can vary based on factors such as the educational context, content complexity, and the attention span of the audience. Strive for a balance that enhances learning without causing learner fatigue.
Review and Update Questions: Regularly review quiz questions to ensure they remain relevant and aligned with the curriculum. Update questions based on user feedback and changes in course content.
Use the table to get a deeper understanding on specific users - track their progress and identify areas of strength and weakness.
The Personal Notes space can be used for planning a teaching session:
Adding time-tagged notes to discuss a specific part of the video
Adding time-tagged notes to discuss a things that were raised in the comments space (thoughts\ insights\ questions)
Annoto can be used for different assignments. To learn more about assignments at Annoto, click .
An instructor has the ability to delete learners’ comments from the discussion (in case of inappropriate comments, for example). Click to learn how to delete comments.
Annoto can be used for ice-breaking:
Asking the learners to introduce themselves
Asking the learners to vote on an instructor's comment as a way to say "yes" (for examples: "Like this comment if you want to learn more about positive thinking")
The beauty of the discussion is that it saves duplications of questions (once a question was asked, no one will ask it again, as everyone can learn from it). In addition, learners can answer other learners, which really eases off the load.
As for notification emails: You can choose which notifications you would like to receive (you can choose to be notified only on replies to your comments, for example). Click to learn about notifications preferences.
Instructors have also the privilege of managing the discussion from the dashboard, so they don't even have to go to the video in order to be a part of the conversation - replying to all videos is just one-click-away from one another. Click to learn how to manage the discussion from the dashboard.
Instructors can choose to go to the dashboard on a timely basis and see all the new comments there, and in this case, they can disable the notification emails, if they are interested.
The number of learners is not the only thing that differs one course from another.
Each instructor and each course have their own DNA, therefore Annoto provides a world of options, from which each instructor can navigate the course to whatever they relate to.
Here are some best practices that have proven themselves extremely helpful in large courses:
The instructor can invite learners to ask questions to which only the instructor replies. This will keep the discussion only in the form of Q&A, instead of a massive discussion.
When using Annoto for , the instructor can ask learners to mark questions with the . This can help both the instructors and the learners stay focused on where the questions are, and quickly find them within the discussion.
The instructor can invite learners to answer their peers’ questions. In this case the instructor can choose whether to review the replies or to leave the discussion only for learners.
Common questions that were raised by viewers can be saved by the instructor and be used in the next course - instructor can add the answers to these questions in advance, to save learners from asking them.
And, as mention in the , in many cases – one learner's question on top of a video can save duplications of this question (by multiple learners) in other platforms
The provides one place to easily manage all the comments in all videos.
The column indicates in what videos new comments were added, and in each video, the instructor can quickly only the new comments that were added (instead of reading the entire discussion in the video).
Learners can answer instructor's questions in their own Personal Notes and the and submit them. In this case - most of the activity is done individually, which will reduce the number of comments in the discussion.
Annoto provides a management & Insights dashboard allowing you to curate and monitor learners' activities and generated content. Using the dashboard, you can see where new comments were created, reply quickly, see where you can stimulate the discussion and much more.
If you wish to learn about Annoto's Dashboard, .
If you need any additional information or have any questions, please contact us at .
You are more than welcome to schedule a training session. Click to contact us.
Want to stay updated with all new features? Follow the
To learn more about Annoto’s dashboard and the insights provided by it, visit our page and the .
To engage in the discussion – read the labeled comment\reply
To be an active part of the discussion (“Maybe I’ll get a medal too?”)
You wish to explain the material differently
It would be a good idea to ask for examples
You would like to give a related assignment
If you wish to learn more about Annoto's Personal Notes, click here.
Limiting Fast Forwarding - if, as part of the Interactions experience, you do not wish to allow the learners to skip ahead in the video, you can limit the option for fast-forwarding (throughout the entire video, or until the learners finish answering the mandatory questions (or all questions)).
Duplicating Interactions - a work that was already made - does not need to be made again! You can easily duplicate the quizzes and preferences (as well as your comments) from one course to another.
Encourage Critical Thinking: Craft questions that require critical thinking rather than rote memorization. Challenge learners to analyze, evaluate, and apply the information presented in the video.
Provide Immediate Feedback: Enable immediate feedback for quiz questions to enhance the learning experience. Use the Answer Reflection feature in each question's settings to reinforce correct answers and provide guidance for incorrect responses.
Plan the Learning Experience: Which Annoto spaces would you like to have along with the quiz questions? You may choose to keep the Personal Notes (for student's reflection) or allow a discussion in the Comments Space. You also have the option to keep only the Interactions Space - all in the Annoto Preferences.
Analytics and Reporting: Take advantage of Annoto analytics and reporting features to track user engagement and performance. Use data to identify quizzes that may be too difficult or too easy. The Assessment's Activity summary graph can give a good indication for the level of the questions:
Annoto can be used as part of a synchronous session. Click here to learn more about it.
Adding a quick intro video as a comment


Annoto is very flexible and can be fit to the needs of any use-case.
The Features and User Experience can be set for the required context (Site, Course or per specific video) via the Preferences Tab:
Setting preferences can be done on the following organizational levels:
Site preferences - any preferences that are set by the organization in the are the default preferences for all courses and videos.
- by default, the course preferences will be same as Site preferences. Modifying the course Features will create a copy of all the site preferences and override all the site preferences (so any future change to site preferences will not affect your course custom preferences). Same override is available for the User Experience.
If Course is using the Site defaults you will have the following indication at the top right corner of the preferences tab:
Once preferences are changed the indicator will change to a button:
Clicking on this button will revert the custom course preferences to site preferences.
- by default Video will have same preferences as the Course preferences it belongs to. Similar to Course preferences, video Features can be modified to fit the specific use case.
If Video is using the Course defaults you will have the following indication at the top right corner of the preferences tab:
Once preferences are changed the indicator will change to a button:
Features tab includes all Annoto features that can be Enabled \ Disabled.
Features are enabled / disabled using the toggle at the bottom left corner of each feature card.
Some of the features include options:
Clicking on the Options button opens additional preferences that are related to the feature.
Once clicked, Course\ Video preferences can be set, either manually or by choosing a designated Preset:
Presets are ready-made sets of preferences, based on the most common use-cases of Annoto.
Selecting a preset is done from "Choose Preset" dropdown menu:
Collaborative Learning - Creating a discussion between video viewers. Great for: , , &
Personal Notebook - Enables only and on the videos. Great for
Once a preset is selected, click "Apply" to save the chosen preset preferences.
After selecting a preset, you can still change your preferences manually.
"Disabled" preset means you will not see the Annoto Widget, nor any info regarding course activity (no insights on content, users, engagement, etc.)
When enabled, videos include the – the tab that enables a discussion between all video viewers.
Options
Voting type - Select the type of voting that will be enabled in the course (Likes, emotions, etc.):
Like - Enable to click on the red heart to "like" a comment:
Sentiment - Enable to vote with sentiments
Disabled - will not allow any voting
Sentiment – Enable using while commenting.
Closed Discussion - Once enabled, users will not be able to add new comments to the discussion
Mandatory participation - When enabled, users will see other users' comments only after they submit a comment
The comments space significantly increases viewers’ engagement and is used for many different use cases, such as: Guided Watching, Collaborative Learning, Skills Assessment, Peer Review, Flipped Classroom, and
When enabled, videos include the – the tab that enables users to manage their own private notebook.
Options
Export - Enable to a spreadsheet or a document.
Sentiment – Enable using while writing a note.
Closed Notebook – Once enabled, users will not be able to add new notes
Personal notes can be used for:
Private noting on the video (summarizing\ highlighting\ reflecting on the content)
The Reflection Point feature is designed to foster active learning by encouraging students to pause and critically engage with video content. By prompting students with thought-provoking questions at key moments, this feature transforms passive watching into an interactive and reflective learning experience.
By requiring students to pause and reflect, Reflection Points help reinforce key concepts and promote active cognitive processing. This aligns with constructivist learning theories, which emphasize that students learn more effectively when they engage with material in a meaningful way.
Well-designed reflection prompts encourage students to analyze, evaluate, and apply information rather than just passively consuming it. This supports higher-order thinking skills as outlined in Bloom’s Taxonomy.
Research shows that active recall and reflection improve long-term retention. By integrating periodic reflection moments, students consolidate their learning and create stronger mental connections.
When used with Subjective Critical Thinking (Within the Reflection Point options button) or Managed Comments, Reflection Points encourage structured peer-to-peer engagement, fostering a collaborative learning environment where students can share perspectives and learn from one another.
By making students pause to reflect before proceeding, this feature helps develop metacognitive skills—the ability to monitor and regulate one's own learning. This aligns with research on self-regulated learning (SRL), which emphasizes the importance of reflection in developing independent, lifelong learners.
Ability to mark a comment as a Reflection Point.
Option to limit fast-forwarding, ensuring students engage with the reflection activity.
A popup dialog appears at the designated reflection point.
Replying to the reflection point is mandatory to continue watching.
If a student has previously replied, the reflection point does not reappear.
Clearly differentiated UI indicator for reflection points vs. regular comments.
To promote independent and deeper thinking, we've added an option to the Reflection Point feature: Subjective Critical Thinking.
When this option is enabled:
Regular users won’t be able to see others’ replies until they submit their own.
Users won’t be able to edit or delete their replies after posting.
Regular comments (not part of Reflection Points) will not be affected.
This feature gives moderators full control over the discussion process and helps ensure that each response is a result of the learner’s original thought—not influenced by others.
Anonymous Comments – Allow students to reply anonymously.
Managed Comments – Faculty can review and publish replies only after all students have responded.
Video Comments – Enable richer responses beyond text.
This feature enhances structured engagement, guiding students through meaningful reflection moments while ensuring a seamless learning experience.
Enable participants to add . Recording can be self-recording (Camera) or screen recording.
Options
Max Duration – Set the maximum length of the recorded video comment (set in seconds). Duration can be set up to 360 seconds.
When enabled, videos include the - the tab that enables users to see all course participants and their presence, search and also mention (@) uses
Enable participants to have 1*1
Add various quiz questions in the , to get your learners engaged
Prevent fast forwarding the video to make sure all the video content is watched without skipping.
Allow users to react on the video to increase engagement and get feedback
Enable on new comments and replies in the discussion. When enabled, users can manage their notification preferences in the Annoto Widget
Enable users to write anonymously. When , only moderators will see user's details
Options
Apply to moderators- When enabled, moderators will not see who posted an anonymous comment, same as regular users
User Experience
Enables presets for managing the discussion in various modes:
Simple - Publish and Delete user's comment. Comment will become public in the discussion only after Published by the moderator.
Managed Q&A - Enables rich options for managing the discussion, with the option to publish answers to everyone or reply privately to a user.
Options
Publish action - when enabled, every comment will require approval. Once approved, it will be visible to all users.
Delete action - when enabled, once a comment is deleted, it will be deleted to all users, including the comment's author.
Dismiss action - when enabled, a comment can be dismissed, meaning: it will not be visible to anyone, including the moderators. The author will keep seeing the comment as pending approval.
Enable the that provides you with extensive analytics of the activity - course\ videos\ participants
The analytics are visible for moderators only (not for learners)
Disabling analytics means you will not see any info regarding course activity (no insights on content, users, engagement, etc.)
Enable from the dashboard to csv files. Exporting the analytics is for moderators only
Provides enhanced analytics on the videos, such as
Enable adding badges in the discussion (such as: Educator's Thumbs Up)
Moderator Like – when enabled, moderator's vote will be presented as (instead of a regular vote)
Enable participants to manage their info and to stay updated with all the latest activity in the videos they are following.
User Experience tab enables you to set the UX preferences that suit your use-case.
It includes 3 sections:
Widget
Player
Comments
The UX preferences will affect the level you are setting them: or .
Position - Enables you to set the positioning of the widget when it loads in closed mode:
Load state - Set the widget behavior once it loads: Open, closed or Peekaboo mode (Peekaboo means a minimized widget that hides after a few seconds if the user does not take action.)
Tabs - When enabled, the colorful tabs (that are enabled) will be shown in the widget. If disabled - switching between tabs will be done via the Annoto menu.
Video autoplay triggers - when enabled, video will automatically play after a comment or a note is submitted (depending on the setting)
Default Sorting - Choose the default way in which the comments will be in the widget
Make sure to click SAVE CHANGES after the User Experience preferences are chosen
In some use-cases, only moderators would want to see the Annoto widget - to set the interactions, or to choose the exact time to hide the widget for the users.
Under Access Control, moderators can control who will see the Annoto widget (and when). This is set in the Annoto dashboard Preferences, within the User Experience tab, under Access Control:
Moderators can choose whether only moderators will view the widget:
Or if users will also see the widget:
By default, users can see the Annoto widget.
Having the ability of enabling/disabling preferences, allows to choose the set of features that best suit each course and/or video.
In case of enabling some of the Annoto spaces (/ /) - the widget will include only the tabs that were enabled.
Here are a few examples of preferences settings, both from the dashboard side and how it looks in the widget:
Enabling Comments, People and Personal Notes tabs allows the users to enjoy all the different types of interactions: Having a group discussion, learning from one another, having 1*1 chats with fellow learners and the instructor and reflecting on the content in a private notebook.
Preferences in the dashboard:
How it looks in the widget:
In case viewers public discussion does not suit the needs of the video, only Personal Notes and People spaces can be enabled. This will allow the users to watch the video, have 1*1 chats and reflect on the content in their own Personal Notes.
Preferences in the dashboard:
How it looks in the widget:
Enabling only Personal Notes can be in case no viewers interaction is required. The Personal Notes will provide each learner the option to engage with the video and better learn from it.
Preferences in the dashboard:
How it looks in the widget:
Only Analytics enabled:
In case only analytics are enabled (a video with quizzes, for example, where learners interaction does not suit the needs of the video), the Annoto widget will not be shown, however the dashboard will present the analytics of the activity: users, views, completion analytics, etc.
Skills Assessment - Providing time-based feedback on a video. Great for use-case.
Peer Review - Providing time-based feedback on a video. Great for use-case.
Live Video Stream - Best for Live streaming
Disabled - All Annoto features are disabled
Reply action - when enabled, replying to a comment will also approve it, meaning: it will be visible to all users.
Reply privately action - when enabled, a comment will have the option to be replied in a private chat. The comment will be marked as private for author and the moderators, and will not be visible to other users.


