Annoto is an in-video collaboration solution that enables users to contribute, share and learn together, turning passive 1-way video viewing into an interactive group experience.
Annoto provides the full solution:
Video time-based discussion on one hand and Insights and Management Dashboard on the other, as you can see in the following video:
As opposed to simply watching a video passively, users can lean forward and become participants, share ideas and create meaningful content, causing all users to be actively involved and return to the video.
Powered by comprehensive analytics and insights, Annoto sheds light upon users and their interactions within the video content, giving a view on how and when users interact with the video content and with each other.
Want to learn more about Annoto? You're definitely in the right place!
Go ahead - Annoto's guides are waiting for you!
Deployment Guide
This guide describes how to add the Annoto App to your Instructure Canvas environment. This guide is intended for IT and administrators.
This is the recomended deployment method which uses LTI 1.3
The Annoto App for Canvas is implemented as a set of LTI external tools.
Setup Guide
Adding the Annoto App to Account
If not done so yet, please finish the before proceeding witht the setup.
The newely created Key would be listed in your Account and have it's "State" set to off:
Click on the Toggle to enable the Key:
Step 4: Share the Client ID with Annoto
The Client ID of the LTI Developer Key is available in "Details" column:
Please copy the key and share it with Annoto team to finalize the deployment.
Do not click on the "Show Key", it will show a different private key, not required by Annoto. The Client ID is the visible ID in the Developers Keys table.
Support
If you need any additional information or have any questions, please contact us at Annoto Support
Login to your Moodle site as an admin and go to Administration > Site administration > Plugins > Install plugins.
Upload the ZIP file. You should only be prompted to add extra details (in the Show more section) if your plugin is not automatically detected.
If your target directory is not writeable, you will see a warning message.
Check the plugin validation report
The “Deploy Tool” page will display.
For the following steps please refer to this picture.
Name: Annoto LTI 1.3 Integration
Description: Dashboard and Embed with Content-item messaging
Add the appropriate org units for where in your institution you would like to use Annoto. We recommend choosing the main Org unit and all sub descendants, but you can also select otherwise.
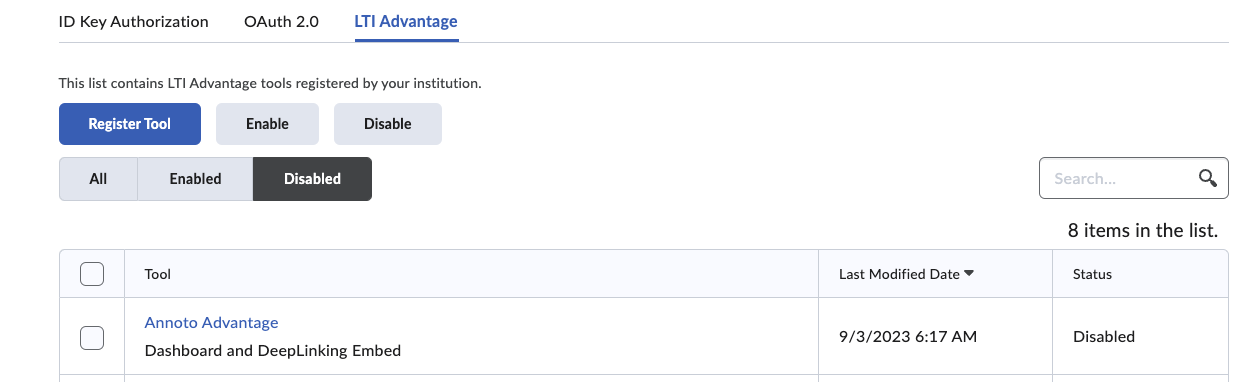
Go to “Administrator Tools” and select "LTI Tool Providers".
Click on "Register LTI 1.3/Advantage Tool"
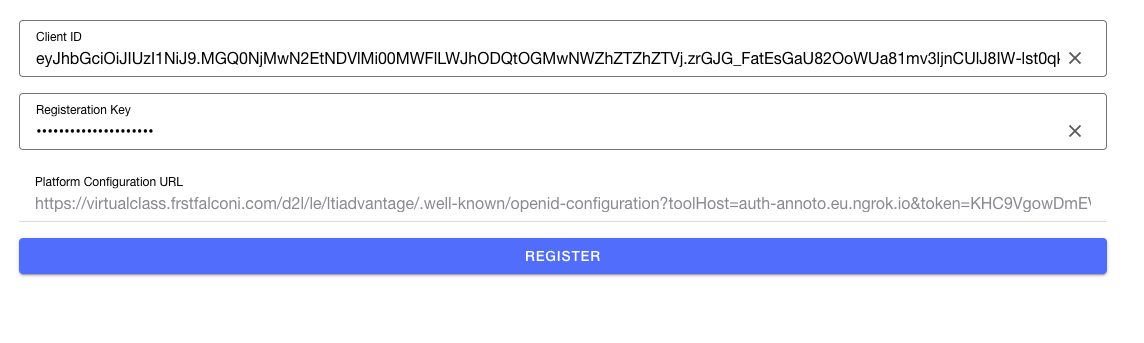
Copy Paste the Client ID provided you by Annoto
Click "Submit"
Thats it! See this guide for quick getting started with Annoto in Blackboard:
Access to the Annoto dashboard is available only to users enrolled into the course as a Teacher.
So even if as admin you can see the Annoto Dashboard in the Navigation menu, but not enrolled in the Course, access will be denied.
To learn more about the Annoto’s dashboard please visit our
Embed LTI Activity
Annoto LTI activities can be embedded across the different sections such as Pages, Assignments, Modules, and more.
Please follow along the short video below on how to embed a youtube video activity on Canvas page to validate that the setup was successful.
To learn more about the Annoto’s please visit our
Support
If you need any additional information or have any questions, please contact us at
Using Annoto in-video collaboration widget
To add Annoto to a unit click on “Add Existing”
Click on the "Embed Annoto Media":
Add a video source
Copy paste embed code or url of your video.
Set a Title
Click on "Embed"
If you need any additional information or have any questions, please contact us at , or visit our online documentation website:
API Support
Introduction to Branding Using Annoto's API
Annoto's robust API provides organizations with the flexibility to seamlessly integrate and customize the Annoto widget to align with their unique brand identity. This powerful feature enables you to tailor the look and feel of the video interaction environment, ensuring consistency with your organization's branding guidelines.
Key Benefits of Branding with Annoto's API
Customizable Widget Layout: Adjust the widget's layout to match your brand's aesthetics, including colors, fonts, and design elements.
White Labeling: Remove Annoto's branding and replace it with your own, creating a cohesive brand experience for your users.
Consistent User Experience: Maintain a unified brand presence across all video interactions, enhancing user trust and engagement.
Leveraging Annoto's API for branding ensures that every aspect of your video content interaction is aligned with your organization's identity, providing a professional and immersive experience for your users.
For additional information, please refer to the following source:
Kaltura and Annoto Data Transfer
To provide the best customer and user experience, some of the data is transferred between Kaltura and Annoto platforms.
Processed Data
Kaltura shares data about the media details (media items and their context) and information about the users that consume the media.
Annoto collects all the UGC (User Generated Content) such as comments, votes, private notes, etc. and securely stored on AWS cloud (SAAS solution) or dedicated enterprise cloud (Enterprise solution).
Media Details Data
Kaltura shares the following media details to Annoto:
Media identifier
Media title
Media description
Media duration
Users Data
Kaltura shares the following user information to Annoto via SSO (Single Sign-On):
User identifier
User full name
User email
User role
Data Transfer Methods
All the data is securely transferred over https.
Personal Notes Export
Annoto's Personal Notes feature allows users to add private notes to video content, making it easier to reflect, bookmark important moments, and add additional information such as weblinks. This functionality transforms passive video watching into an active, engaging learning experience.
Exporting these personal notes is a simple process that ensures your insights and reflections are easily accessible for future reference.
Supported Export Types
Annoto supports exporting personal notes in various formats to suit different needs:
Word: Ideal for sharing and printing, Word exports maintain the formatting of your notes for easy readability.
CSV: Perfect for data analysis and integration with other tools, CSV files provide a structured, tabular format.
You can find more information about exporting notes in this link:
Templates
You have the option to brand the files that are exported from the system. To do this, you can create specific templates that align with your brand identity. These templates can then be sent either to your Annoto Customer Success Manager (CSM) or to
Export a video's notes branding template
Word Format:
Excel Format:
Example:
Export course notes branding template
Word Format:
Excel Format:
Set Only the Annoto course dashboard
Overview
This document shows how to add only the Annoto Course Dashboard to your D2L environment and have it within the NavBar of the course
Email Notifications
Annoto's Email Notifications feature is designed to keep your users informed and engaged by delivering timely updates and alerts directly to their inboxes.
To make these communications even more impactful, we now offer the ability for you to brand these notifications by adding your logo. This customization ensures that every email your users receive is instantly recognizable and reinforces your brand’s identity.
With Annoto's Email Notifications, you can enhance user engagement and maintain consistent branding, providing a seamless and professional experience.
Please send the following information to your Annoto CSM or [email protected]:
Your institute's logo
Your site URL (When the user clicks the logo, it will redirect them to your site)
How to access the Annoto Dashboard
Annoto dashboard is available as part of the Schoology navigation:
Deployment Guide LTI 1.1
This document shows how to add and use Annoto as an external tool Canvas App Center.
Adding the Annoto App
Create the Annoto Links
Click the Admin Tools icon and click "External Learning Tools".
2. Click on "LTI Advantage"
Click on
Annoto for Site/Channel Engagement
Engaging audiences effectively is crucial for the success of any site or channel.
Annoto is a powerful tool that transforms passive content consumption into interactive and collaborative experiences. By integrating seamlessly with your platform, Annoto enables real-time discussions, peer-to-peer engagement, and valuable insights, directly within your videos and also within your site or digital content.
Whether it's for educational purposes, community building, or brand growth, Annoto empowers users to comment, share feedback, and interact, fostering a sense of connection and collaboration.
Its intuitive interface encourages meaningful participation, helping you enhance user retention, improve engagement metrics, and build a thriving, interactive community around your content.
Bring your audience together and unlock the full potential of your site or channel with Annoto.
Set Annoto as a Tool Provider
Overview
This document shows how to add Annoto to your Brightspace environment.
Add Annoto as a Tool Provider
The Tool Provider allows you to enter the Annoto key and secret one time for all the Annoto tools.
How to add Annoto Course Dashboard to the NavBar
Adding the Annoto Course dashboard can be done either by the admin in the course template, or by the individual course admin
Hover over the navigation bar and click the three dots on the right (or pencil icon on the left).
Click Edit This NavBar
Set Annoto insights dashboard
Click the Admin Tools icon and click "External Learning Tools".
2. Click on "Manage External Learning Tool Links" tab and then click "New Link" .
Annotokaf Module
Overview
This module extends Annoto Module with additional functionality for Hosted KAF (Such as LTI Outcomes).
Go to your KMS/KAF Management Console (<Your_Kaltura_site_Url>/admin) and navigate to the
Introduction
Annoto is a pioneering solution in the realm of educational technology, designed to enhance online video delivery through interactive, social, and assessment layers. With a mission to support diverse educational use cases such as student assignments, skills development, collaborative learning, guided watching, and peer review, Annoto integrates seamlessly with platforms like Canvas, offering deep insights into user engagement and video content.
Recognizing the diverse needs of educational institutions and the importance of brand identity, Annoto has introduced a feature that allows education customers to incorporate their own branding into the Annoto interface. This customization capability empowers institutions to maintain a consistent brand presence across all their educational tools and platforms, fostering a cohesive and recognizable identity for students and educators alike.
By enabling custom branding, Annoto not only enhances the aesthetic appeal of the educational content but also reinforces the institution's values and ethos. This feature is designed to be user-friendly, allowing institutions to easily upload logos, choose color schemes, and customize various elements of the Annoto interface to align with their branding guidelines.
Incorporating custom branding into Annoto provides numerous benefits:
Comments Export
Annoto's Comments feature facilitates dynamic interaction by allowing users to add time-stamped comments directly on video content. This turns passive video consumption into an engaging, collaborative experience. Comments can be used for discussions, questions, feedback, and sharing additional resources, enhancing the overall learning environment.
Exporting these comments is a valuable feature that enables moderators to archive discussions, review interactions, and analyze feedback comprehensively.
Supported Export Types
Annoto supports exporting comments in several formats:
Word: Ideal for maintaining the format and structure of the comments, making it easy to share and review.
Media author
Media thumbnail URL
Context (channel/category/course) identifier
Context title
Context description
Context thumbnail URL
Brand Consistency: Ensures that all educational materials and tools reflect the institution's identity, creating a unified experience for users.
Enhanced Engagement: A familiar and branded environment can increase student engagement and trust in the platform.
Professional Appearance: Custom branding adds a level of professionalism and sophistication to the educational content, enhancing the overall learning experience.
Differentiation: Allows institutions to stand out by showcasing their unique brand attributes and creating a distinctive learning environment.
Annoto's commitment to supporting educational institutions extends beyond functionality to include these customizable branding options, demonstrating a holistic approach to enhancing the digital learning experience.
Annotokaf
module.
Enable - set Yes to enable the module.
Click Save.
Support
If you need any additional information or have any questions or want to know how you can add Annoto to your videos, please contact us at [email protected]
If you want to lean more about Kaltura, click here.
Click the Admin Tools icon and click "External Learning Tools".
2. Click on "Manage Tool Providers (Legacy)" tab and then click "New Tool Provider" .
3. Fill in the information as follows:
Launch Point:
Depending on your type of deployment (Ask your Annoto support representive):
EU:
auth.eu.annoto.net
US:
auth.us.annoto.net
Version: Choose the LTI 1.1 version from the drop down
OAuth Signature Method: Select HMAC-SHA1
Secret: Use your Annoto Admin Secret that was provided to you by Annoto
Check "Use custom tool consumer information instead of default” under "Tool consumer information".
Key: Use your Annoto Admin Host ID that was provided to you by Annoto
Note: This needs to be Annoto Host ID and note API Key/Client ID
Name: Choose a name for the Tool, e.g.: Annoto Course Dashboard
Description: Enter a description that users will understand, e.g. "The Annoto Dashboard helps you manage and analyze learners' video consumption and behavior".
Contact Email: Enter an email address for users who wish to contact support at your institution.
Check "Allow users to use this tool provider" under "Visibility”.
Check all boxes under “Security Settings”.
Add the appropriate org units for where in your institution you would like to use Annoto. We recommend choosing the main Org unit and all sub descendants, but you can also select otherwise.
The Edit Navbar window is displayed.
Click Add Links.
Click Create Custom Link
6. In the Create Custom Link window, enter Annoto Course Dashboard as the Name.
7. Click Insert Quicklink.
Select External Learning Tools.
Select Annoto Dashboard.
The URL Quicklink is displayed:
Under Behavior choose "Same Window"
Under Availability make sure to choose course staff and exclude unauthorized roles (e.g. student)
Click Create and then Add
Click Save and Close
Annoto Course Dashboard should be now available in the NavBar
Support
If you need any additional information or have any questions, please contact us at Annoto Support
Description: Enter a description that users will understand, e.g. " The Annoto Dashboard was designed in order to shed light upon learners' video consumption and behavior within Annoto in-video collaboration widget, providing you with analytics and insights regarding their activity in the course. ".
Visibility: Check the box for “Allow users to view this link”
Check the boxes under “Signature” and choose “Tool consumer key/secret”.
Check “Use tool provider security settings” under “Security Settings”.
Add the appropriate org units for where in your institution you would like to use Annoto. We recommend choosing the main Org unit and all sub descendants, but you can also select otherwise.
CSV: Provides a structured, tabular format suitable for data analysis and integration with other tools.
You can find more information about exporting comments in this link:
Templates
You have the option to brand the files that are exported from the system. To do this, you can create specific templates that align with your brand identity. These templates can then be sent either to your Annoto Customer Success Manager (CSM) or to Annoto Support
You can enable the Annoto xblock in studio through the advanced settings, as you can see , or in the following instructions:
From the main page of a specific course, click Settings->Advanced Settings in the top menu.
Check for the Advanced Module List policy key, and add "annoto" in the policy value list.
[
...
"annoto",
...
]
As seen in the image below:
3. In “LTI Passports “, Add value "annoto-auth:<annoto_client_id>:<annoto_client_secret>" to LTI Passports list, fill in “annoto-auth:” and then ClientID and Secret, separated by punctuation.
These ClientID and shared secret are provided by Annoto, If you do not have this information, please contact us at:
Once the Annoto Module was added to the Course, it should be added to the course unit, using the following steps:
1. On the Course Outline page, open the unit in which you want to add Annoto:
2. In the course unit, add the video block.
3. Under Add New Component, click Advanced, and then select Annoto.
4. Click Edit and then change Annoto settings as you prefer:
Support
If you need any additional information or have any questions, please contact us at
Last but not least
To learn more about the Annoto widget in OpenEdX, visit page.
In order to learn more about all the wonderful things you can do with Annoto, visit the page.
Annoto - Kaltura Product Support
Annoto provides its in-video collaboration solution for Live video and VOD across the different Kaltura products.
Through our strategic partnership, Annoto and Kaltura empower organizations to activate in-video collaboration and insights effortlessly with just a single click.
Annoto is supported by the following Kaltura products:
Elevates KMS beyond a mere video content management system to a dynamic e-community hub, fostering a vibrant interactive space for users.
Annoto seamlessly integrates the tangible benefits of a traditional classroom into the digital realm, transforming Kaltura into a comprehensive video assessment platform that caters to a wide array of .
The KAF Module integration ensures compatibility and consistency with KMS settings.
Annoto enhances audience engagement by making viewers active contributors, creating an immersive experience that mirrors the interactivity of in-person events. With support for Kaltura Webcasting, Annoto extends the conversation from live events to on-demand video (VOD), maintaining the context of each interaction. This feature not only enriches live streaming with collaborative notes and discussions but also preserves these interactions for the VOD content, with comprehensive analytics accessible via the Annoto dashboard.
Annoto supports Kaltura Webcasting and provides a unique capability of continuing user discussions and personal notes that were made during live video streams, on VOD, keeping each comment in sync with the video. Annoto provides analytics and insights on the user's activities during the live session and afterward in the VOD.
Now Kaltura Webcasting users can collaborate and take notes during live streaming and then continue on the recorded content, and all the analytics will be available through the Annoto dashboard (also integrated as part of Kaltura).
Kaltura Webcast has added support to “Live to VOD” - This is a unique capability enabling all user interactions (comments, notes, votes, etc.) created during the Live session to be available on the recorded session as well.
Annoto's suite of features fully supports Kaltura Lecture Capture for live streaming, inviting all participants to engage through comments, notes, and more during the live event. This interactive layer adds depth to the learning experience, offering valuable insights into user engagement during live sessions.All Annoto features and capabilities are also available for the Kaltura Lecture Capture live stream enabling all users to interact (comments, notes, votes, etc.) during the live broadcast, and gain insights on the live sessions.
Annoto can be added as a player plugin in KMC. This enables customers to embed Annoto in external sites (SharePoint, intranet, etc.).
Annoto can be easily added to the player via the configuration.
Annoto Dashboard Canvas App
This document shows how to add and use Annoto Dashboard as an external tool Canvas App Center.
Adding the Annoto Dashboard App
Open Settings
In Course Navigation, click the Settings link.
Open Apps
Click the Apps tab.
Search for Annoto Dashboard:
Click on the Annoto Dashboard App
Note: there are two apps one for EU region and one for US region, contact support if you not sure which you should use
Click the +Add App button.
Add App Details
Enter the name of the app in the Name field [1] : Annoto Dashboard
Enter the consumer key in the Consumer Key field [2] and the shared secret in the Shared Secret field [3].
This key and shared secret is provided by Annoto, If you do not have this information, please contact us
Add App
Testing the Annoto Dashboard Direct Integration to Canvas:
Go to this page .
Support
If you need any additional information or have any questions, please contact us at
Last but not least
In order to learn more about all the wonderful things you can do with Annoto, visit the page.
Annoto Only Insights dashboard Manual Integration
This document shows how to add only the Annoto insights dashboard as an external tool using XML.
Notes:
External apps can also be configured using XML in sub-accounts.
Manually configuring an external app is an account permission. If you cannot configure an external app, this permission has not been enabled for your user role.
Customizations
Configure variable substitutions for User ID and Course ID
Course ID is used to uniquely identify the Canvas course.
Annoto Local Plugin Settings
Overview
This document offers an overview of the settings for the Annoto Moodle local plugin.
Background
KMC Plugin
How-to Add Annoto to Kaltura Player
Follow the next steps in order to add Annoto capabilities to Kaltura player.
Login to KMC:
Deployment Guide LTI 1.3 - Manual Registration
Register the Annoto Tool in Brightspace
Login to your Brightspace instance with an Admin user account.
In Brightspace, click the 'Admin Tools' (little gear on top right) button, and click on "Manage Extensibility".
To configure an app, click the View App Configurations button.
Add New App
Add New App
Click the Add App button.
Set Configuration Type
Set Configuration Type
Select the Configuration Type drop-down menu and set the configuration type to Paste XML.
Add App Details
Add App Details
Enter the name of the app in the Name field [1] : Annoto Insights Dashboard
Enter the consumer key in the Consumer Key field [2] and the shared secret in the Shared Secret field [3].
This key and shared secret is provided by Annoto, If you do not have this information, please contact us [email protected]
Enter Configuration XML
Enter Configuration XML
In the XML Configuration field, paste the XML code.
The XML Code can be found in the following link:
EU Deployment:
US Deployment
Open it using a web browser (preferred Chrome) and just copy-and-paste it to the field.
Submit App
Submit App
Click the Submit button.
Verify App
Verify App
If the Annoto App has already been added in the account, Canvas verifies that you still want to install the app. To continue, click the Yes, Install Tool button.
Note: Verifications only take place in the same context for an existing external app (such as installing the same app multiple times in the root account).
Support
If you need any additional information or have any questions, please contact us at Annoto Support
By default Annoto uses $Canvas.course.id for course and $Canvas.user.id for user. In some cases it is required to use different values as unique identifiers for course and user.
The most common use case is if Kaltura KAF integration is used alongside Annoto LTI on the same Canvas LMS. For seamless experiance, Annoto LTI setup and Kaltura KAF setup should use the same subsitution variables for identifying courses and users.
If Kaltura KAF(LTI) course ID substitution variable does not match Annoto LTI, two duplicate courses would be created in Annoto platform with same name, one for Kaltura KAF actvities and another for Annoto LTI activities.
If Kaltura KAF(LTI) user ID subsitution variable does not match Annoto LTI, two duplicate users would be created in Annoto platform with same name.
This leads to confusion and may lead to variaous access and analytics issues.
Prerequisites
Admin access to Canvas account
LTI 1.3 deployment of Annoto (Not Legacy)
Step by Step guide
It is highly advisable to coordinate any changes to substitution variables with the Annoto team, prior to making any changes.
Changes to those settings will effectively modify the course/user identifiers, for live courses this will cause duplicates and data corruption.
If the goal of making this change is to match the Kaltura KAF, do not relly on the mentioned defaults below.
Why did Annoto choose $Canvas.user.id as the default instead of what Kaltura is using$Canvas.user.loginId .
As per Canvas documentation the $Canvas.user.id we are using by default is a unique user identifier, is bound to the user account and is the best option to uniquely identify users in the Canvas LMS.
On the other hand $Canvas.user.loginId which is used by Kaltura is "Username/Login ID for the primary pseudonym for the user for the account" which in some cases can be an email. The value of loginId can be changed by the user itselft, effectively changing they identification if used.
Annoto is a comprehansive interactivity and assessment platform, and unique and reliable user identification is required.
Annoto's best practice recomendation is to keep Annoto defaults, and change Kaltura KAF subsitution variables instead.
Determine the required Canvas substution parameters to be used as course ID and user ID (Canvas has support for various ids).
To determine the values used by the Kaltura KAF, please refer to Kaltura video app for Canvas deployment guide.
Scroll down and expand the Additional Settings dropdown to access the Custom Fields:
Replace existing or add new fields as required (the defaults might be missing if the deployment was done long time ago):
nn_sub_course_id=$Canvas.course.id - in most cases no change is required for the defaults as it maps to the Canvas course ID as seen in the browser URL.
nn_sub_user_id=$Canvas.user.id - , so to match Kaltura deployment this value can be changed to: nn_sub_user_id=$Canvas.user.loginId
Inform the Annoto team about this change. For valid setup, Annoto team would need to update substitution parameters in the Annoto Admin dashboard LTI integration to match the new value:
Hide the Annoto Dashboard Link by Default for all the Courses
Using LTI 1.3 in Canvas, administrators have the option to hide the Annoto Dashboard link from course navigation by default. This means that the link will not appear for instructors unless they choose to enable it themselves.
Prerequisites
Admin access to Canvas account
LTI 1.3 deployment of Annoto (Not Legacy)
Step by Step interactive guide
Annoto supports Moodle using local plugin that includes, among other things, the following capabilities:
Annoto In-video engagement widget
Automatic detection of the type of player running on the page and automatic adjustment of the type of player
The plugin currently supports the following video players/sources (the system supports more players. If needed can be added such as FlowPlayer, Wistia, etc.):
VideoJS
YouTube
Vimeo
H5P
jwPlayer
Kaltura
Wistia
HTML5
Single sign-on support
Ability to change Annoto appearance and layout settings
Ability to activate Annoto on :
All site
In a course level
In activity level
Annoto Plugin settings
Once the plugin is installed, go to its settings screen and set its mode of operation according to the desired mode.
The plugin is installed with default settings that include settings for roles, and settings of how to run on a site.
Annoto Setup
API Key –Which was received from Annoto, this is provided per domain
SSO Secret –Which was received from Annoto, this is provided per domain
Annoto’s script URL - Provide Annoto's script URL (No need to change)
Deployment domain - Provide the region for the widgets. Please note that the widget data is bound to a specific region.
Annoto dashboard (LTI)
The Annoto local plugins add the Annoto Dashboard automatically to Moodle, and set the LTI activity.
Name, URL and Icon Fields do not need to be changed
Add to all the courses
If enabled, Annoto dashboard will be automatically added to all the courses.
If disabled the Annoto dashboard can be added manually from the “+ Add an activity or resource” on the desired course
Dashboard Manager Roles - Specify which role will trigger the addition of the Annoto dashboard to the course. For example: in the above image only Teacher and Manager roles will trigger the addition of the Annoto dashboard to the course.
Annoto Settings
Locale – If enable will set the language of Annoto per page and course based on Course and User preferences
2. Moderator Roles – Specify who is allowed to moderate discussions (only roles that at least include the following capabilities are available: local/annoto:moderatediscussion).
Media Player Settings
Enable overriding the Moodle Media Player settings for better user expirence
Activity completion (Beta)
If enabled, Annoto activity completion will be available in the following Moodle activities:
Page
Label
H5P
hvp
Kaltura activity
Annoto Assignment
Support
If you need any additional information or have any questions, please contact us at Annoto Support
Choose the desired player (e.g. ‘Example Player – Basic’).
3. Choose in the right menu “Plugins”
4. Create New Plugin For the desired player by pressing on the ‘Create New Plugin’ button.
5. Message box will be shown enter the Plugin name “annoto” and then press ‘Add’ button.
Note : The name of the plugin needs to be “annoto” (this name is important, this is how Kaltura works).
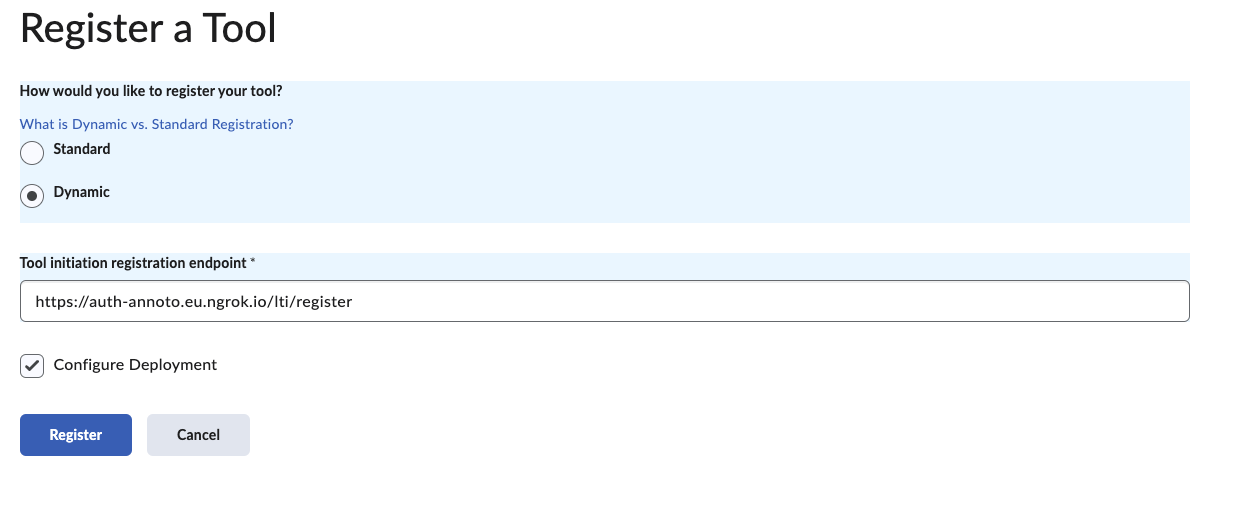
In Manage Extensibility page select the “LTI Advantage” tab and click the “Register Tool” button.
The “Register a Tool” page will display. Click the “Standard” radio button to display the Tool Registration fields. For the following steps please refer to this picture.
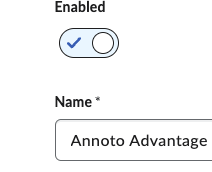
Enabled should be checked. If it is not, click on the slide button to enable the tool.
Fill in the following fields:
Name - give a general name to the tool. E.g: “Annoto LTI 1.3 Integration”.
Description: Annoto Dashboard and Embed with Content-item messaging
Domain
US Deployment:
Using the information provided by Annoto support, populate the specified fields.
Redirect URIs
OpenID Connect Login URL (Login Initiation URL)
Extensions - check all 3 check boxes.
i. Assignment and Grade Services
ii. Deep Linking
iii. Names and Role Provisioning Services
Roles - Check the Send Institution Role
Click the “Register” button. The following alert displays:
Send this strings to your Annoto contact support (as text).
Enable support for Annoto Passback Grading in Kaltura
Installation Overview and Requirements
Enabling Annoto Passback Grading in Kaltura transforms the video learning experience by fostering greater student assessment directly within the video content.
This feature streamlines the grading process by seamlessly integrating with Learning Management Systems, allowing for the efficient transfer of assessment data. It offers educators deep insights into student interactions, enhancing the ability to tailor feedback and improve teaching strategies.
By bridging Kaltura's rich video capabilities with Annoto's interactive tools, educational institutions can significantly enhance both teaching effectiveness and learning outcomes, creating a more dynamic and personalized educational environment.
Prerequisites
A Kaltura Administrator account
A Kaltura Application Framework (KAF)
In some cases (Canvas) An LMS Administrator account
Deployment Instructions
Enabling Annotokaf Module
This module extends Annoto Module with additional functionality for Hosted KAF (Such as LTI Outcomes).
Go to your KMS/KAF Management Console (<Your_Kaltura_site_Url>/admin) and navigate to the Annotokaf module.
Enable - set Yes to enable the module.
Click Save.
Setting Annoto Webhook
Configure the webhook integration to enable advanced features, such as enabling Annoto's reporting and grading functionality in the Learning Management System (LMS).
Please send the Endpoint URL to your Annoto representative. If it is empty, send the KAF URL instead.
In Correspondence, you will receive the following values. Please enter them in the respective fields:
jwksUrl
integrationKey
Update the LMS
D2L
Everything is ready. There is nothing left to do. 😄
Canvas
Using Kaltura KAF LTI 1.3
Login to your Canvas instance with an Account Admin user account.
Click the following to launch the LTI Developer Key Settings page.
Moodle
Get in touch with our .
Blackboard
Get in touch with our .
Are you using a different LMS? Get in touch with our .
Annoto Integration
Overview
This document shows how to add Annoto to your Blackboard environment.
Creating a Tool Provider
This section describes how to create a Tool Provider so that you can deploy the Annoto Extension for Blackboard. The Tool Provider allows you to enter the Annoto key and secret one time for all the Annoto tools.
To Create the Tool Provider:
This key and shared secret is provided by Annoto, If you do not have this information, please contact us:
Deploying the Annoto Tools to Your Blackboard Environment
This section describes how to add the following tools to your Blackboard environment:
Annoto Widget Embed
Annoto insights dashboard
Click Create Placement.
Annoto insights dashboard
Create a placement with the following information:
Annoto Manual Integration
This document shows how to add and use Annoto as an external tool using XML.
Notes:
External apps can also be configured using XML in sub-accounts.
Manually configuring an external app is an account permission. If you cannot configure an external app, this permission has not been enabled for your user role.
Adding Annoto App
Open Settings
In Course Navigation, click the Settings link.
Open Apps
Click the Apps tab.
View App Configurations
To configure an app, click the View App Configurations button.
Add New App
Click the Add App button.
Set Configuration Type
Select the Configuration Type drop-down menu and set the configuration type to Paste XML.
Add App Details
Enter the name of the app in the Name field [1] : Annoto
Enter the consumer key in the Consumer Key field [2] and the shared secret in the Shared Secret field [3].
This key and shared secret is provided by Annoto, If you do not have this information, please contact us
Enter Configuration XML
In the XML Configuration field, paste the XML code.
The XML Code can be found in the following link:
EU Deployment:
US Deployment
Open it using a web browser (preferred Chrome) and just copy-and-paste it to the field.
Submit App
Click the Submit button.
Testing the Annoto Direct Integration to Canvas:
Support
If you need any additional information or have any questions, please contact us at
Last but not least
To learn how to access the Annoto Dashboard in your Canvas, go to page.
In order to learn more about all the wonderful things you can do with Annoto, visit the page.
Deployment Guide LTI 1.3 - Dynamic Registration
Overview
This document shows how to add Annoto to your D2L environment via LTI 1.3
Annoto can be setup in Brightspace with LTI 1.3 dynamically or manually. It is recommended to use dynamic registration.
Register the Tool
Click on the settings icon, then click on Manage Extensibility.
From the LTI Advantage tab, click Register Tool.
Choose Dynamic, enter the Annoto registration URL, check the checkbox to Configure Deployment and click Register:
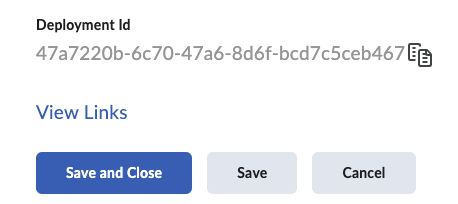
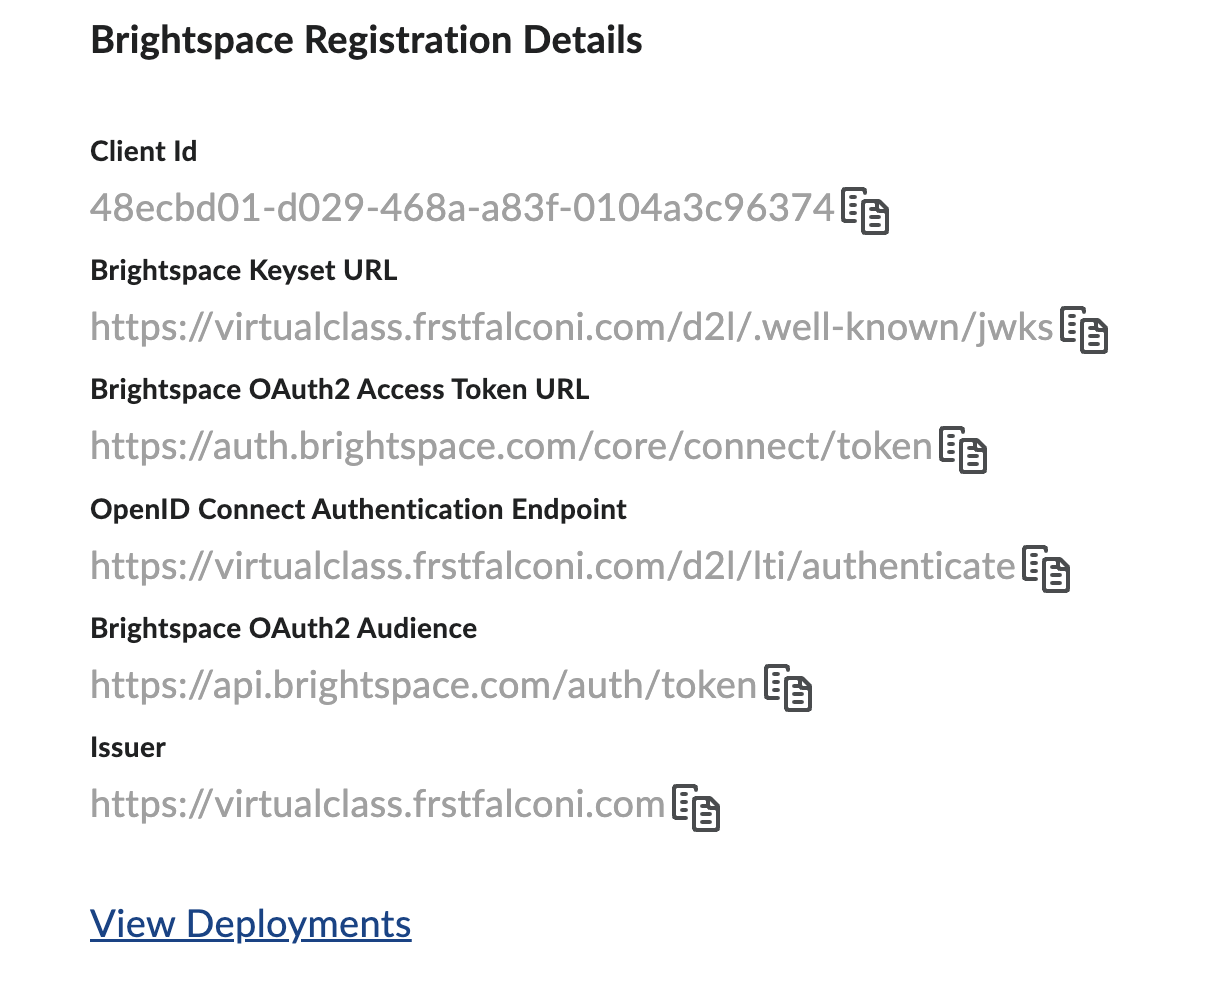
Click on View Deployments link
Open the newly created deployment.
Note the deployment will have the same name as the registration.
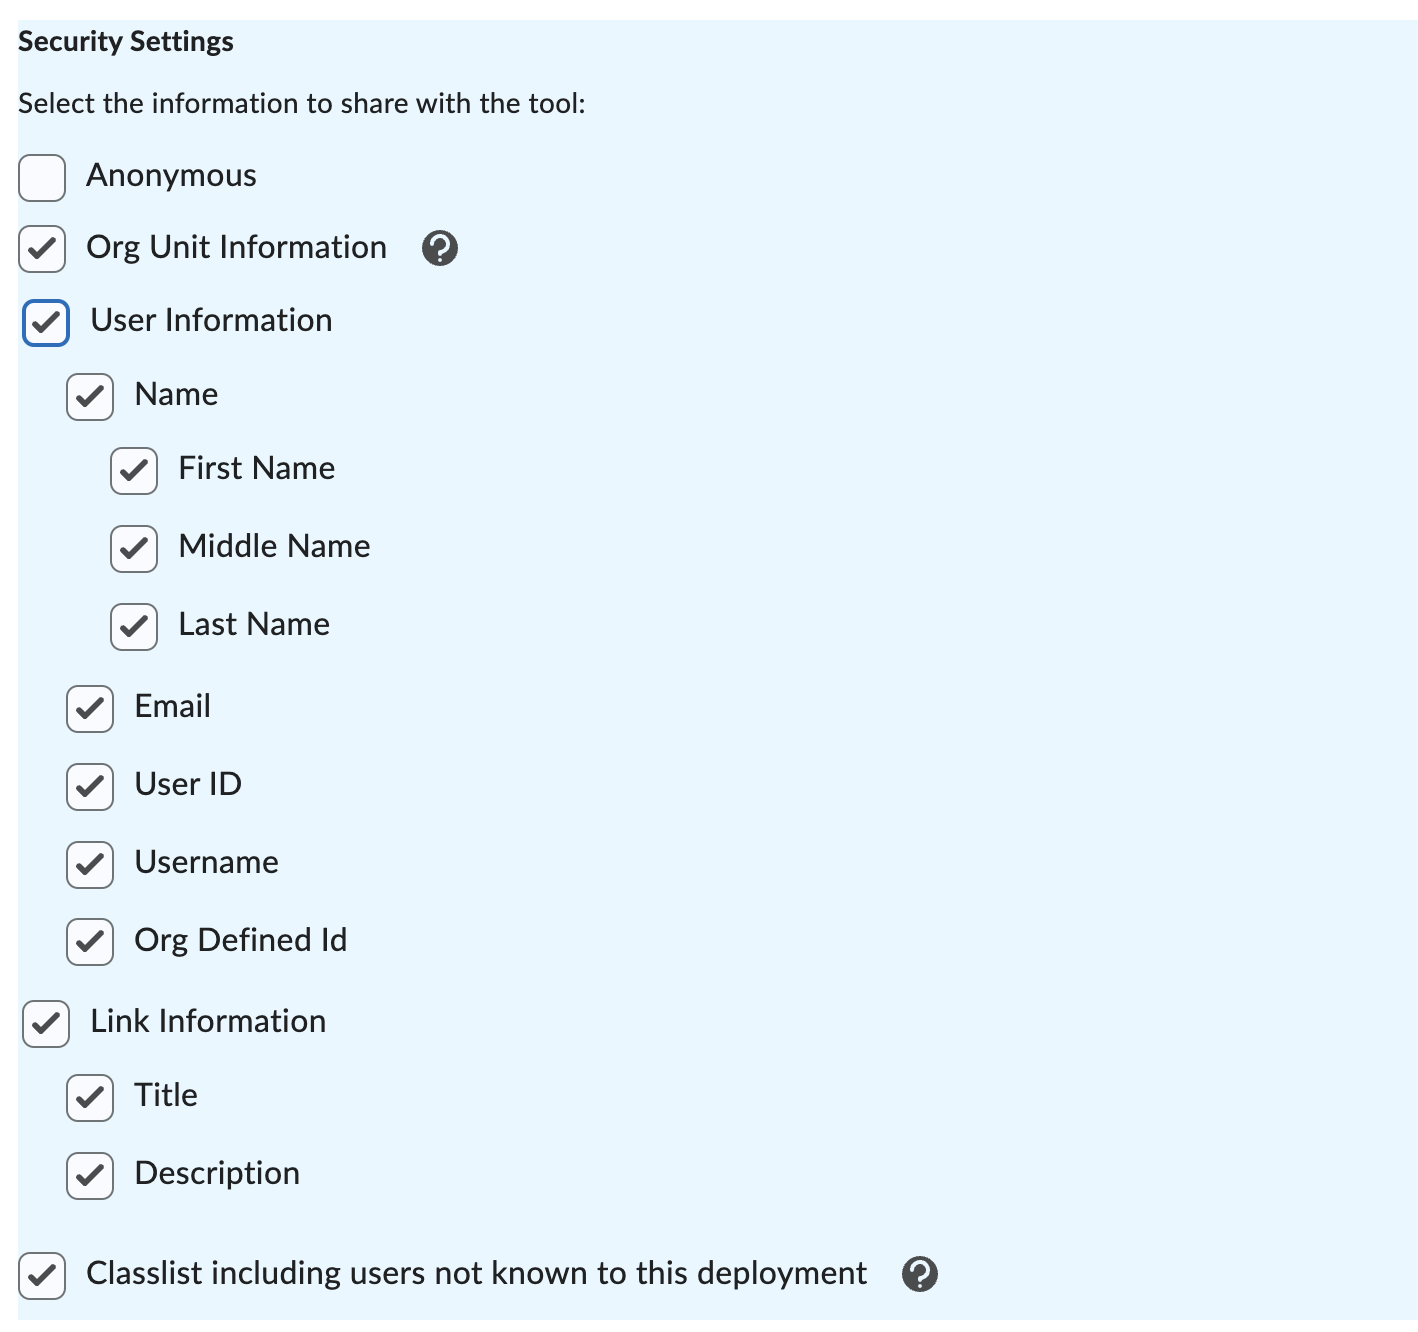
Scroll to the "Security Settings" section and make sure all checkboxes except "Anonymous" are enabled
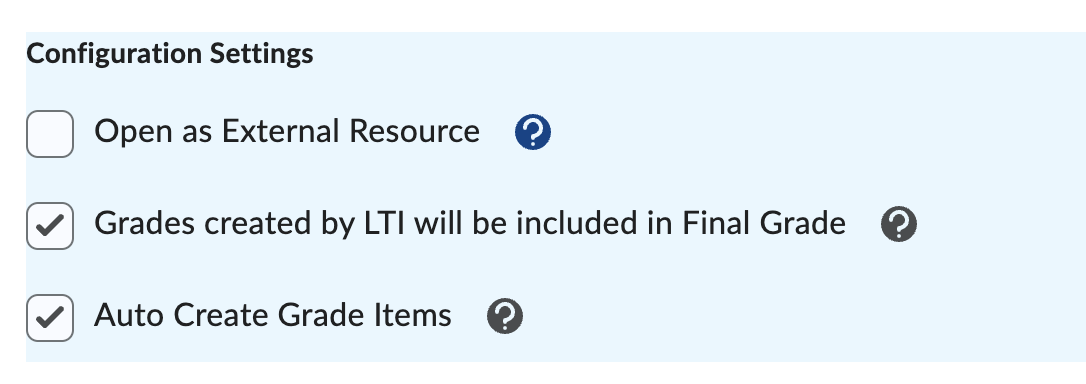
Under Configuration Settings, enable Auto Create Grade Items and optionally enable Grades created by LTI will be included in Final Grade:
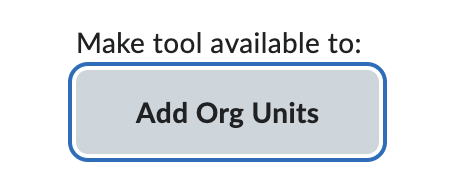
Add Org Units the too should be available to:
Click on Save and the Tool will be available for usage in the select Org units.
Annoto automatically adds 3 links which can be viewed by clicking on View Links:
Annoto has now been registered in Brightspace and is ready for use!
How to add Annoto Dashboard
Overview
This document shows how to add Annoto Insights Dashboard to your OpenEdx environment.
Annoto Insights And management Dashboard Setup
Annoto’s dashboard was designed in order to shed a light upon students’ behavior within Annoto in-video collaboration widget, providing you with data regarding their engagement within the video content.
Enable LTI Consumer In Studio
You can enable the LTI xblock in studio through the advanced settings:
From the main page of a specific course, click Settings->Advanced Settings in the top menu.
Check for the Advanced Module List policy key, and add "lti_consumer" in the policy value list.
[
...
" lti_consumer",
...
]
Adding ANNOTO INSIGHTS AND MANAGEMENT DASHBOARD
Once the lti_consumer module was added to the Course, it should be added to the course unit, using the following steps:
On the Course Outline page, open the unit in which you want to add Annoto:
2. Under Add New Component, click Advanced, and then select LTI Consumer.
3. Click Edit and then change LTI Consumer settings as you prefer:
LTI Annoto DASHBOARD Settings
Set the following fields as follows :
Display Name : Annoto Dashboard
LTI ID : annoto-auth
LTI URL:
9. In order to see Annoto Dashboard on the published page click on View Live Version
Support
If you need any additional information or have any questions, please contact us at
Last but not least
To learn more about Annoto’s dashboard and the insights provided by it, visit our page and the .
Using the Annoto Widget
Overview
This document shows how to add Annoto in-video collaboration widget to your OpenEdx course videos
Adding Annoto In-Video Collaboration Widget
Note: Annoto module needs to be added to the course. If it does not exist, please refer to guide.
Once the Annoto Module was added to the Course, it should be added to the course unit, with the steps mentioned .
Annoto Widget Settings
Display name: The name of the module
Widget position: Select the position of Annoto widget in the video player.
Overlay Video: Will Annoto show on the video (True) or outside of it (False)
Tabs: Annoto widget will have tabs on the side for quickly toggling between discussion and private notes.
Hidden Enabled tabs
Initial State: When the video starts – will Annoto be open or closed
Discussion Scope: Will discussions on a video be per course (Private per course) or will anyone in the site be able to be a part of the conversation (Site Wide).
Features: When adding the Annoto widget to the Course Unit you can set the widget features. There are four options in the dropdown menu:
Comments & Notes (Default).
Comments – Enable only the Shared comments feature.
Private Notes – Enable only the personal notebook feature.
Example: if you don't want users to add comments and want to have only the widget's personal notes, you can just disable it and use Annoto as personal notes.
5. Save the changes you made.
6. In order for the changes to go live, don’t forget to publish the unit:
7. In order to see Annoto on the published page click on View Live Version
Support
If you need any additional information or have any questions, please contact us at
Last but not least
To learn how to add the Annoto Dashboard in your OpenEdX, go to page.
In order to learn more about the wonderful things you can do with Annoto, visit the page.
How to add Annoto Dashboard
Overview
This document shows how to add Annoto Insights Dashboard to your OpenEdx environment.
Note: The change does not affect the functionality of native Kaltura video quizzes in communicating with the Canvas gradebook. It simply removes the Quiz filter when selecting the video you want to use. Before the change:
After the change:
Using Kaltura KAF LTI 1.1 ? - Get in touch with our support team.
If you're unable to locate the Annotokaf Module, please contact your Kaltura representative so they can assist in adding it for you.
Annoto’s dashboard was designed in order to shed a light upon students’ behavior within Annoto in-video collaboration widget, providing you with data regarding their engagement within the video content.
Enable LTI Consumer In Studio
You can enable the LTI xblock in studio through the advanced settings:
From the main page of a specific course, click Settings->Advanced Settings in the top menu.
Check for the Advanced Module List policy key, and add "lti_consumer" in the policy value list.
[
...
" lti_consumer",
...
]
Adding ANNOTO LTI Activity
Once the lti_consumer module was added to the Course, it should be added to the course unit, using the following steps:
On the Course Outline page, open the unit in which you want to add Annoto:
2. Under Add New Component, click Advanced, and then select LTI Consumer.
3. Click Edit and then change LTI Consumer settings as you prefer:
Annoto LTI Activity Settings
Set the following fields as follows :
Display Name : Annoto Dashboard LTI Activity (Or any name you like)
LTI Version: LTI 1.3
Tool Launch URL:
Registered Redirect URIs: leave empty
Tool Initiate Login URL:
Tool Public Key Mode: Keyset URL
Tool Keyset URL:
Enable LTI NRPS: True
LTI Assignment and Grades Service: Allow tools to manage and submit grade (programmatic)
Scored: True
Accept grades past deadline: True (Default)
Send extra parameters: True
In order for the changes to go live, don’t forget to publish the unit:
In order to see Annoto Dashboard on the published page click on View Live Version
Support
If you need any additional information or have any questions, please contact us at Annoto Support
This document shows how to add Annoto as an LTI activity to your OpenEdx environment.
Enable LTI Consumer In Studio
You can enable the LTI xblock in studio through the advanced settings:
From the main page of a specific course, click Settings->Advanced Settings in the top menu.
Check for the Advanced Module List policy key, and add "lti_consumer" in the policy value list.
[
...
" lti_consumer",
...
]
3. In “LTI Passports “, Add value "annoto-auth:<annoto_client_id>:<annoto_client_secret>" to LTI Passports list, fill in “annoto-auth:” and then ClientID and Secret, separated by punctuation.
These ClientID and shared secret are provided by Annoto, If you do not have this information, please contact us at:
This document shows how to add Annoto to your Schoology environment.
System Administrators can create and install LTI apps at the district level. Depending on the app, System Administrators may install for all courses/groups or specific users only.
Become an App Developer in Schoology
Click on Tools andthen User Management
Click on Permissions
Go to Schoology Apps and APIs (at the end of the page)
Check the Box for Develop apps for system Admin
Click on Save permissions
Create the LTI 1.3 app in Schoology
As an admin, log into the .
Click Add App.
Fill in the following information:
For Can be installed for, select where users will be able to access the app (e.g. Users, Courses, Groups), Click the following checkboxes and enter the following strings:
Left Navigation
The Annoto Dashboard string value and Embed Annoto Media string value are provided by Annoto;
If you do not have this information, please contact us:
Set Configuration Type,Privacy, LTI Advantage Extensions as follow:
JWKS URL - Copy and paste the values you received from Annoto Support.
For the Domain/URL in the Schoology configuration page
EU Deployment :
OIDC Login Init URL - Copy and paste the Login Initiation URL you received from Annoto Support.
Example:
Redirect URLs - Copy and paste the values you received from Annoto Support.
Click the checkbox for Require System Administrators to configure settings for this App.
Click the checkbox for This application meets the Schoology Terms of Use.
Click Submit.
Configure the Client ID
Navigate to the and log in.
Next to the newly created Annoto app, click Options.
Copy the Client ID and send it to the Annoto support/Account manager to activate your account.
Add the Annoto App to a Schoology Organization
Navigate to the and log in.
Click Install LTI 1.3 app.
Click I Agree, to authorize access to Schoology by the Annoto app.
"Annoto provides you with a toolkit that lets you create a range of assessments and interactive video activities for any use case, while providing you actionable insights on the students and the video content delivered."
Category - Choose all
Recommended For:
App Logo:
For Type of App, select LTI 1.3 App, and Check the Launch app in Schoology
Copy and paste the Annoto Dashboard string value you received from Annoto Support.
Example:
Course Materials Selection/Rich Text Editor/External Tool
Copy and paste the Embed Annoto Media string value you received from Annoto Support.
Example:
US Deployment:
Example:
Click Continue.
Click Add to Organization.
Click the checkboxes next to the Users, Courses, or Groups you want to install the Annoto app for.
Enabling and Configuring the Annoto Module in KAF/KMS
Overview
This module adds Annoto’s in-video collaboration assessment and insights solutions to Kaltura Video Portal (aka KMS) and LMS integrations (Kaltura Application Framework aka KAF).
For KAF and LMS integrations, the Annotokaf module is required to be enabled as well. If this module
is not available, please get in touch with your Kaltura representative to enquire about adding it.
Prerequisites
Send the following information to the Annoto team:
Send the KAF/KMS domain and any alias domains if you have one
To activate the module, the Annoto team will send back the following information:
Grading Support
If you are using Annoto in an LMS via the Kaltura KAF to the following to enable grading support
Send the field called "endpoint" under the Webhook section in the Annoto Module.
Make sure AnnotoKAF Module is existing and enabled.
Annoto Team will send you the jwksUrl and integrationKey values.
Video as Comment
Integration parameters are required for them to enable .
Go to your KMS/KAF Management Console (<Your_Kaltura_site_Url>/admin) and navigate to the Annoto module.
Enable the Annoto module for the integration parameters to auto-populate.
Copy the text of the following integration configuration:
Annoto Module Settings Overview
General Settings
enabled - Enable/Disable the Annoto module.
apiKey - Which was received from Annoto, this is provided per Partner ID.
ssoSecret – Single Sign-On secret matching the API Key provided by Annoto.
Webhook (Only KAF)
Configure webhook integration so that advanced features can be enabled, such as enabling Annoto's reporting grading to the LMS.
jwksUrl - JWKS URL for validating the webhook messages, provided by Annoto.
integrationKey - Integration Key provided by Annoto.
Endpoint - Target URL to where Annoto should send the webhook messages. (The following field are auto-populated with the disable/enablement of the module. )
Annoto Preferences Permissions Settings
activationEditAllowedRoles - Who can change the ? if a role is selected, any role above it will also be able to change the Annoto Preferences.
The dropdown has the following options:
Specific Users
privateOnlyRole
adminRole
If a role is selected, any role above it will also be able to change the Annoto Preferences.
Permissions Based on Users/Groups
To Authorize only specific users or groups to change the Annoto Preferences, choose “Specific Users” in the activationEditAllowedRoles dropdown, or follow the following steps:
Once “Specific Users” is chosen, a submenu will be available for adding authorized users and/or groups.
Click on “activationEditAllowedUsers” to add Users/Groups
Click on the “Select Users/Groups” to add Users/Groups to the list
Enter the user or group (once you start typing you will see suggestions related to what you entered)
For example, in the below image we can see is currently the only one that can activate/deactivate Annoto. All other users will not have the option to change the Annoto Preferences in Courses/Categories/Channels.
Additional Activation settings
guestUsersAllowed - If checked, not-logged-in Users will be able to see Annoto Widget. [KMS only]
loginPath - URL path for user login page. If provided, Users will have login prompts in the widget to add a comment/vote/etc.
Player Embed Sizes
playerEmbedSizesOverride - Enables overriding the BSE player sizes (for the optimal Annoto user experience).
keepCustomBSEPlayerSizes - If enabled, override only the default sizes but keep any custom BSE player sizes.
Integration
The following fields are auto-populated with the enablement of the module.
appTokenId - ID of the App Token.
appToken - Value of the App token.
appTokenHash - Hash type used to generate the App token.
Plugin Settings
The following fields are auto-populated with the enablement of the module. Do not change!
enablePlayerPlugin - Enables the built-in Player Plugin. If disabled, the Annoto plugin would not be injected into the Kaltura player by the module. Allows using Kaltura player with custom (non-production) Annoto plugin.
playerPluginUrl - URL of the V2 player Annoto plugin. Must start with '//'.
v7PlayerPluginUrl - URL of the V7 player Annoto plugin. Must start with '//'.
Once Annoto is enabled, when we will view the media, this is what we will see
The following image demonstrates the Kaltura Player with enabled.
The following image demonstrates within MediaGallery/Channel:
Troubleshooting
Support
If you need any additional information or have any questions or want to know how you can add Annoto to your videos, please contact us at
If you want to lean more about Kaltura, .
Last but not least
In order to learn more about the wonderful things you can do with Annoto, visit the page.
API Key
Secret
Go to your KMS/KAF Management Console (<Your_Kaltura_site_Url>/admin) and navigate to the Annoto module.
Enable the Annoto module
Fill in the appropriate fields with the API Key and Secret
Click Save
appTokenId
appToken
appTokenHash
uiConfigId
unmoderatedAdminRole
playerEmbedSizes - Defines sizes that can be used for embedded players. Defines the player size in the following format: {width}x{height}.
Recommended sizes:
Large: 1200*628
Medium: 1024*576
Small: 900*506
uiConfigId - Player UI config ID to be used by Annoto.
analyticsCDN - CDN host of the Annoto analytics assets (read-only).
NOTE: You can use Annoto with Kaltura videos embedded outside of LMS (KAF) and MediaSpace (KMS), please contact [email protected]for more information.
NOTE: If this module is not in your MediaSpace/Kaltura KAF application, please contact your Kaltura representative to enquire about adding it..
NOTE: If you see it empty, please enable/disable the Annoto Module.
NOTE: If you see it empty, please enable/disable the Annoto Module.
NOTE:
Regardless of the role settings below, only users that have access to Kaltura Channel/Category settings are Authorized to change the Annoto Preferences.
NOTE: As a best practice, We suggest creating a Kaltura Users Group named for example “annoto_admins” and adding only this group to activationEditAllowedUsers list.


